Dockerizing Parts Unlimited MRP
Dockerizing the Parts Unlimited MRP application
Introduction
We’ll take a brief look at the thought process and mental model utilized in this example. And specifically how we identified how to make it run within Docker containers. While this example is one way to Docker-ize an application, as with many solutions, there are probably numerous others. Test update
The decision process generally is driven from the immediate Use Case or Scenarios to be leveraged by running the Solution within Docker.
For this example, the immediate need is to provide a Developer ready deployment, quick and repeatable, with minimal changes.
Why Docker
A good place to start your journey with Docker is to review the What is Docker introduction.
In general, the way we’re looking at Docker is to facilitate:
- Infrastructure as Code (IaC)
- Instantiate a solution from bare metal:
- fast
- consistent
- known and desired state
- transparent and no magic
Steps for Docker-izing an existing Solution
From a high level we’ll assume that you’ve chosen Docker as a method to meet the needs as we’ve identified above.
The effort in going from a deployment that utilizes custom scripts or hand configuration of each Tier of the deployment to a full Docker container approach varies based upon what is available for the existing solution.
This example we are able to take advantage of several existing shell scripts (bash scripts) that were utilize in both the Middle tier and the MongoDB tier.
In other solutions if nothing exists already or its a totally hand woven approach to deployment, the effort to move to Docker could be a valuable effort – it at least provides a more declarative identification of what exists or is needed and minimum should give your the ability to resurrect the solution for Development, Testing, or even Disaster Recovery needs.
High Level Steps
- Review existing application deployment and architecture
- Identify primary tiers and platform components at each tier
- For this sample, review the section and image below Identification of Tiers
- Determine state-fullness of each tier
- Long Term Persistence or transient state-fullness? (a DB vs. User Session)
- Network needs
- Identify inbound and outbound TCP/IP port requirements
- Identify cross tier network requirements
Next Steps
Once we have identified the major tiers, state-fullness, and networking requirements, we are basically ready to begin building the Dockerfile (container definitions) and start looking at the deployment as “Infrastructure as Code!”.
Those steps are provided in the demonstration script.
Identification of Tiers
The following diagram illustrates the deployment of the Order Service application.
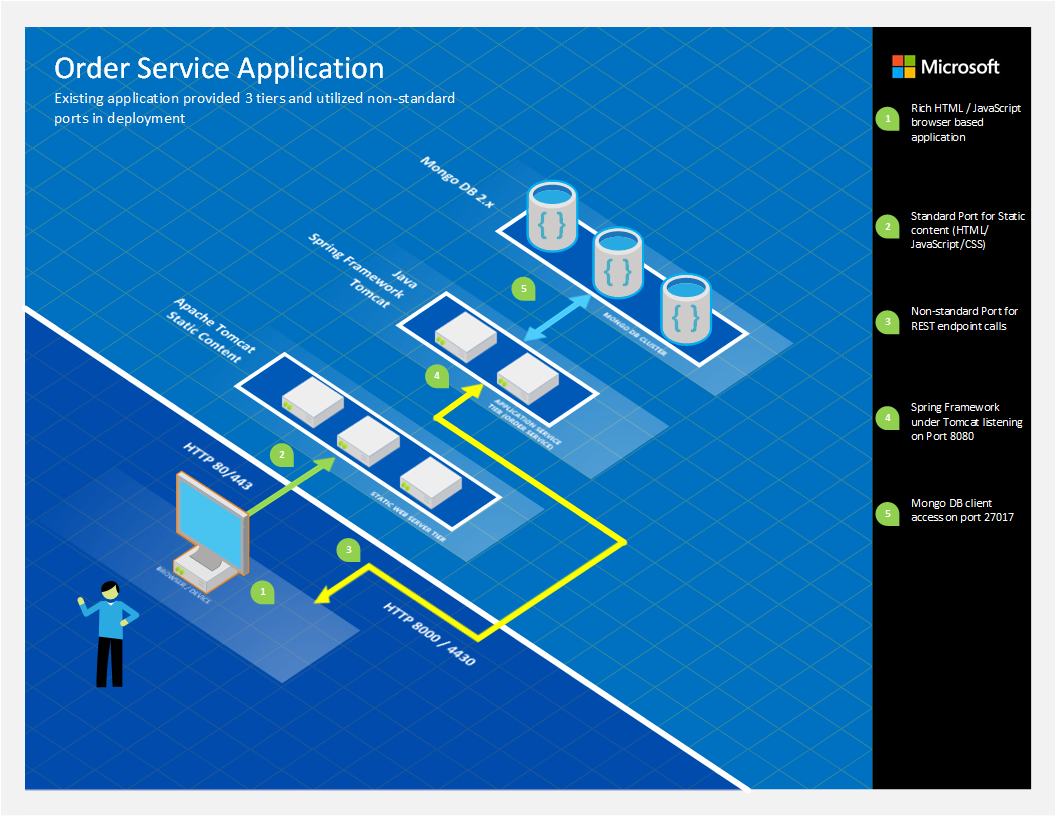
Important Deployment Points
- Tomcat hosted content is Static Content - no server side logic
- Mostly HTML, CSS, and Image content
- JavaScript content provides client side rendering
- JavaScript also initializes “configuration” values - such as what Port to use for accessing
- Browser requires non-standard Port access to the REST Tier
- MongoDB requires “seed” data
- For development and testing, we’ll provide a simple script to load seed data each deployment
- While in production, we’ll need to ensure that a MongoDB startup and recover from a node being added or recovered in a cluster.
NOTE We will not be covering the Production Deployment and MongoDB clustering approaches. For more information, you can refer to:
Statefull vs. Non-Statefull
While MongoDB and most persistence stores are state-full, and require long-term durable storage, we also need to examine what other tiers may need from short term persistence needs - if any.
For example, some application tiers may require “Session” management - that could be through a cache engine or even local files. For this example no other tiers require this; however, if needed we would have to accommodate this in some manner as when each Docker container is started or restarted it would require (possibly) access to state which must have some durability outside the life-cycle of the running container. If not noted already, it’s critical to understand that Docker fully manages from creation and destruction resources required during the life of the container when that resource is wholly contained.
MongoDB
For MongoDB, Docker provides the ability to map volumes into the container. This is described here: Managing Data in Containers
The Dockerfile for MongoDB in this example creates the directory /data/db if it doesn’t exist - and the script that starts the container passes in the Docker host path via the ‘-v’ switch - this mapping then ensures that any writes are persisted across container restarts.
Static Web and Spring Framework Tiers
Both of these tiers are stateless. Therefore it is not necessary to provide host volume mapping to the running containers.
Networking Considerations
For each tier, we have identified what ports require exposing either to external callers or between other containers running on the Docker host.
In this example, we see:
- Browser requires Inbound communication to Static Content Tier
- Browser requires Inbound communication to Spring Framework Tier
- NO communication is required from the “Static Content” tier to any other tier
- Spring Framework Tier requires Inbound communication to MongoDB Tier
MongoDB
MongoDB by default listens on port 27017 for HTTP based communications from clients. In the Dockerfile we provide the following (which is really just a hint). It is still required to pass the port mapping via the ‘docker run’ command and -p switch.
# Expose port #27017 from the container to the host
EXPOSE 27017
App Tier to MongoDB
For this example we identified that the App Tier (Spring Framework based App) needs to make direct calls to MongoDB.
By default Docker does not allow communication between containers. All intra-container communication must be declared. See Linking Containers Together for more information.
The linking is demonstrated in the following ‘docker run’ commands via the ‘–link’ switch.
docker run -d -p 27017:27017 --name mongodb -v /data/db:/data/db mongodb
docker run -d -p 8080:8080 --link mongodb:mongodb partsunlimitedmrp/orderservice
Note that in the ‘docker run’ command for Order Service (2nd line) we specify the link using the container name and an alias. That alias is then presented to the Order Service container as the hostname within the virtual networking support inside of Docker. There are far more implications of networking that should be reviewed for more complex scenarios Linking Containers Together.
Web Front End
We are using tomcat in that case, we just have to use the official repository from them and map the port 8080 of our host on the port 8080 in the container.
docker run -it -d --name web -p 80:8080 mypartsunlimitedmrp/web
HOL - Deploy Parts Unlimited MRP using Docker locally
As prerequisites of this HOL, you should have an environnement with the Docker engine installed on it.
We will not talk about running docker containers in production using Mesos or Swarm here, but the simpliest way to start with docker and to run Parts Unlimited MRP on it.
We will not cover the fundamentals of docker, a good knowledge about Dockerfile and the following command docker build and docker run is necessary.
We explained the concepts and basics around Docker for Parts Unlimited MRP with the three differents pieces that we need to run to have our application up :
- The Database : Mongo DB
- Backend Service : Java
- Web Server : Tomcat
So we will create three differents Dockerfile which contains the settings of our application, ready to be deployed in a docker environnement.
Dockerfile for the database using MongoDB
We will create an empty folder named Database, create an empty file named Dockerfile and paste this 4 command lines in it.
- We will use the official mongo image from the Docker Hub, we will use as first instruction :
FROM mongo - Next, we can specify a maintainer using the command :
MAINTAINER YouEmailAddress - As third option, we will copy all the contains inside the drop folder on my local machine, to the directory tmp inside the container.
It could be necessary to copy some artifacts or dependences for example. We will use the command :
COPY drop/* /tmp/ - Finally, we will tell to the command line that we want to start the mongo deamon everytime we will start this container.
We can start Mongo using different options, in our case, we will specify that we want to use the REST API and the smallfiles options, to do that we are using the command :
CMD ["mongod", "--smallfiles", "--rest"]
Here is the final result of our Dockerfile :
FROM mongo

MAINTAINER juliens@microsoft.com

COPY drop/* /tmp/

CMD ["mongod", "--smallfiles", "--rest"]
We will also create a “drop” folder inside the Database folder, and put all the files that we want to transfer in this container. For example, a Javascript file named MongoRecords.js with the data that we want to import in the mongo database at each deployment.
Dockerfile for the ordering service using JAVA
We will create an other empty folder, create an empty file named Dockerfile and paste this 7 command lines in it.
- We will use the official openjdk 8-jre image from the Docker Hub, we will use as first instruction :
FROM openjdk:8-jre - Next, we can specify a maintainer using the command :
MAINTAINER YouEmailAddress - As third option, we will create a new folder inside the container with the following command :
RUN mkdir -p /usr/local/app - Next, we will specify this folder as Work folder, it means from where we want to launch the next command :
WORKDIR /usr/local/app - Like the mongo container, we want to copy all the files inside the drop folder on our local machine, in the remote directory that we just created inside the container, in our case we will copy the artifact .jar file :
COPY drop/* /usr/local/app/ - Next, we will expose the port 8080 of this container thanks to the command :
EXPOSE 8080 - Finally, when this container will start we will call a custom script that we wrote inside the drop folder called run.sh with the command :
ENTRYPOINT sh run.sh
Here is the final result of this Dockerfile :
FROM openjdk:8-jre

MAINTAINER juliens@microsoft.com

RUN mkdir -p /usr/local/app

WORKDIR /usr/local/app

COPY drop/* /usr/local/app/

EXPOSE 8080

ENTRYPOINT sh run.sh
We will also create a “drop” folder, this is where we are supposing to put the artifact (.jar) and the run.sh script.
NOTE : the run.sh is a custom script. It will check if we already have a mongo instance responsing on the port 27017 before to launch the java application.
Here is the full script inside the run.sh file : **
while ! curl http://mongo:27017/
do
  echo "$(date) - still trying"
  sleep 1
done
echo "$(date) - connected successfully"

java -jar ordering-*.jar
Dockerfile for the web server using Tomcat
We will create a third empty folder, create an empty file named Dockerfile and paste this 5 command lines in it.
- We will use the official tomcat 7 running on JRE-8 image from the Docker Hub, we will use as first instruction :
FROM tomcat:7-jre8 - Next, we can specify a maintainer using the command :
MAINTAINER YouEmailAddress - As third option, we will copy all the files inside the drop folder of our local machine, inside the remote directory
/usr/local/tomcat/webapps/inside the container. We will use the command :COPY drop/* /usr/local/tomcat/webapps/ - Next, we will expose the port 8080 of this container thanks to the command :
EXPOSE 8080 - Finally, when this container will start we will call the tomcat script called
catalina.shto launch our web server :ENTRYPOINT catalina.sh run
Here is the final result of this Dockerfile :
FROM tomcat:7-jre8

MAINTAINER juliens@microsoft.com

COPY drop/* /usr/local/tomcat/webapps/

EXPOSE 8080

ENTRYPOINT catalina.sh run
We will also create a “drop” folder, this is where we are supposing to put the artifact (.war)
Build, run and ship our containers
We have now three different folders who contains one Dockerfile each, you should have a folder structure like this :
.
├── Database
|   ├── Dockerfile
|   └── drop
|        └── #File that you want to copy in the container (Example MongoRecords.js)
├── Order
|   ├── Dockerfile
|   └── drop
|        ├── PUT YOUR JAR FILE HERE
|        └── run.sh
├── Clients
|   ├── Dockerfile
|   └── drop
|        └── PUT YOUR WAR FILE HERE
├── BuildAndRun.sh
└── StopAndRemove.sh
Inside the drop folder, you can manually copy the .WAR and .JAR for now (from Here), We will explain how you can automatically generate and download it in this folder in an other HOL. Finally we also add two shell scripts at the root :
- BuildAndRun.sh
- StopAndRemove.sh
The first one BuildAndRun.sh will simply build your containers using the docker build command and run it on the machine where you are running this script with the command docker run like explained in the previous section.
Here is the contain of the script :
#!/bin/bash

#Build your docker images manually on the server
docker build -t mypartsunlimited/db ./Database
docker build -t mypartsunlimitedmrp/order ./Order
docker build -t mypartsunlimitedmrp/web ./Clients

#Run your docker images manually on the server
docker run -it -d --name db -p 27017:27017 -p 28017:28017 mypartsunlimitedmrp/db
docker run -it -d --name order -p 8080:8080 --link db:mongo mypartsunlimitedmrp/order
docker run -it -d --name web -p 80:8080 mypartsunlimitedmrp/web

#Feed the database
docker exec db mongo ordering /tmp/MongoRecords.js
The second one StopAndRemove.sh, will stop the containers and remove the image that you built in the previous script :
#!/bin/bash

#Stop your docker container and remove it manually on the server
docker rm db --force
docker rm order --force
docker rm web --force

#Remove the images manually on the server
docker rmi mypartsunlimitedmrp/db
docker rmi mypartsunlimitedmrp/order
docker rmi mypartsunlimitedmrp/web
With this two simple scripts it will be much faster to stop and run your containers.
You should be able to find all this scripts and folder structure inside the deploy folder, under the docker folder.
Conclusion
We just pass through the manual way to build, ship and run Parts Unlimited MRP using Docker. The next step will be to add automation and make sure that we are deploying eveytime the lastest version of the application modified in our repo and hook an automatically deployment.
Continuous Feedbacks
Issues / Questions about this HOL ??
Thanks