Continuous Deployment with Jenkins
In this lab, you will learn how to deploy the Parts Unlimited MRP App, with automation, to a Linux Virtual Machine (VM) with no agent.
After this lab, you will have a working, automated pipeline in Jenkins that will build, test, and deploy the Parts Unlimited MRP app to a VM in Azure.
DevOps MPP Course Source:
- This lab is used in course DevOps200.3x: Continuous Integration and Continuous Deployment - Module 4.
Pre-Requisites:
- Completion of the lab Set up Jenkins in Azure.
- Completion of the lab Continuous Integration with Jenkins.
Lab Tasks:
- Install the SSH Agent plugin.
- Create a pair of SSH keys.
- Create the VM to run the Parts Unlimited MRP application.
- Update the Jenkins pipeline.
- Commit file updates to kick off a continuous deployment.
Estimated Lab Time:
- Approx. 60 minutes
Task 1: Install the SSH Agent plugin
During this lab, we will implement the Continuous Delivery of the artifacts that we built in the previous lab.
In this task, we are going to install the SSH Agent plugin on Jenkins. This plugin will allow Jenkins to connect via SSH to the target VM and deploy the artifacts.
1. Switch to the existing SSH session terminal to your Jenkins server (or open a new SSH session if you have closed the one from the previous lab), and type the following command:
sudo java -jar /var/cache/jenkins/war/WEB-INF/jenkins-cli.jar -s http://jenkins:Passw0rd@127.0.0.1:8080/ install-plugin ssh-agent
- The result should produce the following output:
Installing ssh-agent from update center
NOTE: Remember to create a Tunnel to localhost:8080 (by following the steps from the pre-requisite lab) when connecting using Putty, otherwise you will not be able to login to Jenkins.
2. Type the following command into the SSH terminal to restart the Jenkins server, and activate the newly installed plugin.
sudo java -jar /var/cache/jenkins/war/WEB-INF/jenkins-cli.jar -s http://jenkins:Passw0rd@localhost:8080/ safe-restart
- Keep your SSH session open.
Task 2: Create a pair of SSH keys
In this task, we will create a pair of SSH keys to allow us to connect automatically to the deployment server.
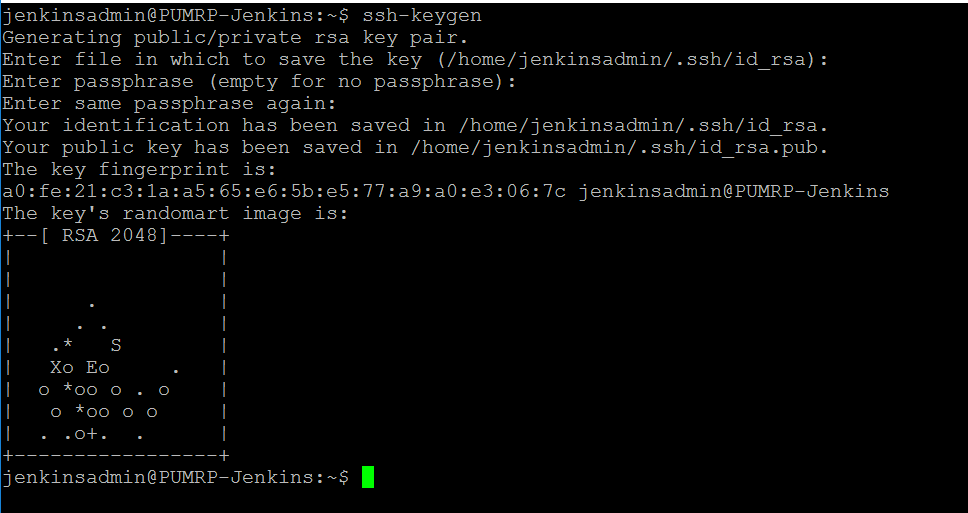
1. Type the following command into the SSH session terminal:
ssh-keygen
2. Press Enter to leave the default values for the filename and passphrase.
3. Copy the private key file to /var/lib/jenkins/.ssh by typing the following commands:
sudo mkdir /var/lib/jenkins/.ssh/
sudo chown jenkins:jenkins /var/lib/jenkins/.ssh
sudo cp .ssh/id_rsa /var/lib/jenkins/.ssh/id_rsa
sudo chown jenkins:jenkins /var/lib/jenkins/.ssh/id_rsa
4. Create Jenkins credentials.
-
Using a web browser, navigate to
http://localhost:8080and log into Jenkins. -
Because of the restart, you may have to authenticate again with the following credentials:
- Username:
jenkins- Password:
Passw0rd
- After you have logged in, navigate to
http://localhost:8080/credentials/store/system/domain/_/newCredentials
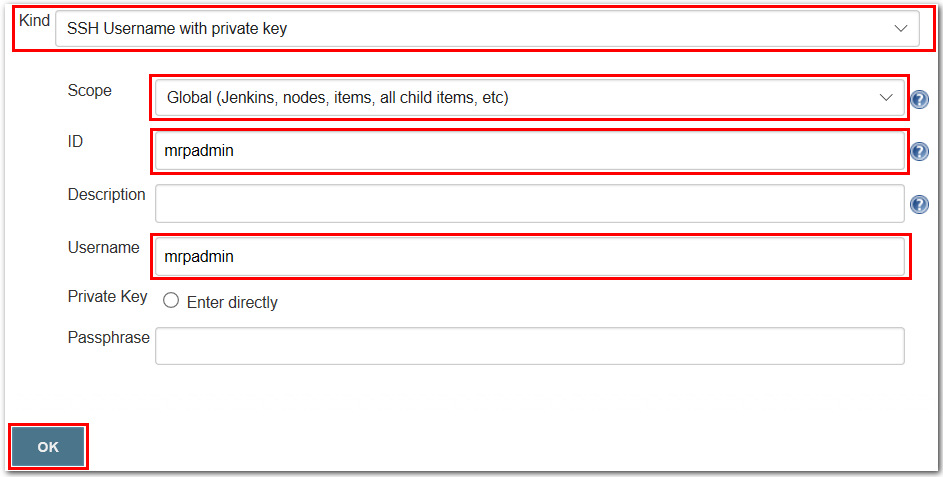
5. Enter the values for the credentials as follows:
- Set the Kind option to SSH Username with private key.
- Leave the scope as Global(Jenkins, nodes, items, all child items, etc).
- Type
mrpadminfor the ID. - Leave the Description empty.
- Type
mrpadminfor the Username. - Leave the Enter directly option unchecked for the Private Key. Alternatively, if the option is available, select the From the Jenkins master ~/.ssh checkbox.
- Leave the Passphrase empty.
- Select OK.
Task 3: Create the VM to run the Parts Unlimited MRP application
1. In your SSH session terminal type the following:
cat ./.ssh/id_rsa.pub
- Select the text returned, and copy it to the clipboard, we will use it in step 3.

2. Click the Deploy to Azure button below, and follow the wizard to deploy the MRP VM and it’s resources to Azure. You may need to log in to the Azure Portal.


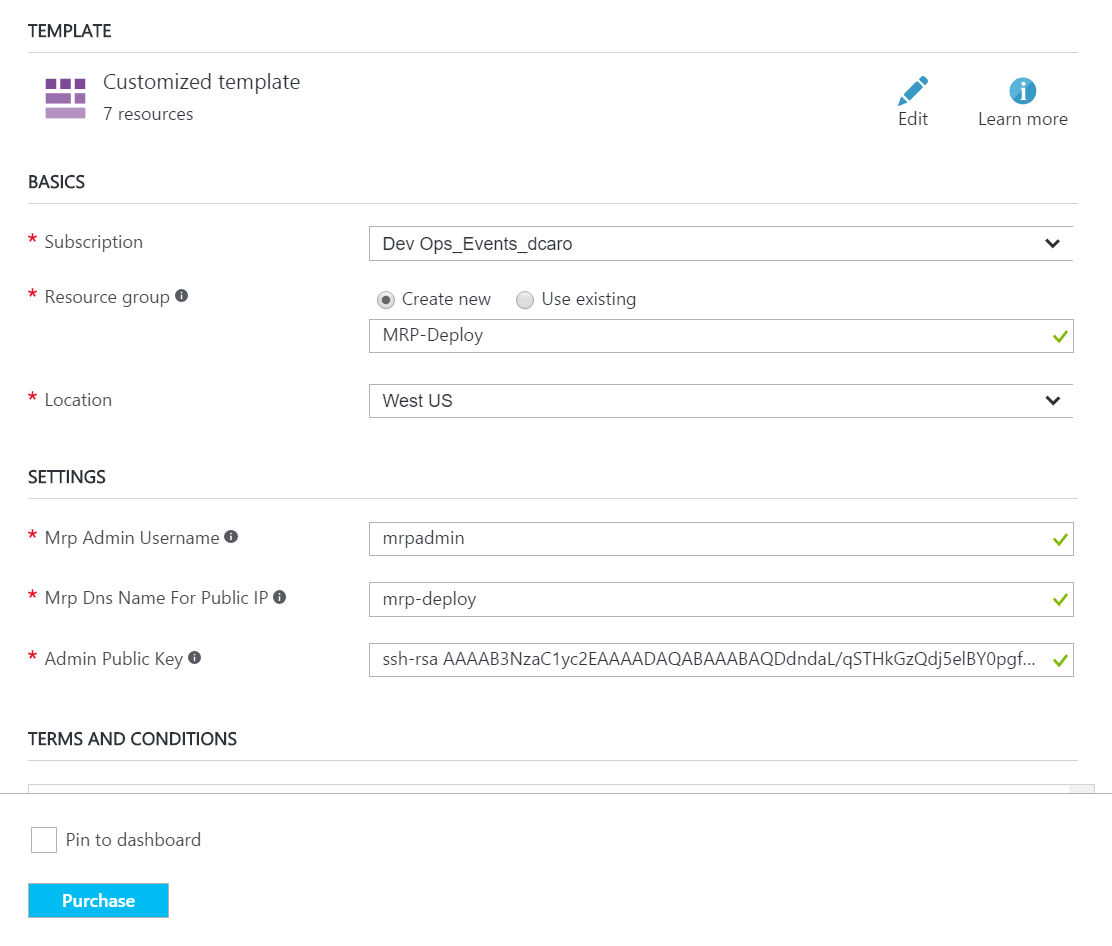
3. Enter the values as follows:
- Select the Subscription that you want to use for the deployment.
- Choose Create new for the Resource Group.
- Enter a name for the Resource Group. For example,
mrp-deploy(or a name of your choice). - Use the Location of your choice.
- Mrp Admin Username:
mrpadmin. - Mrp Dns Name for Public IP: Use any name you want, this name must be unique.
- Admin Public Key: Paste in the string that you copied in Task 3.1 (i.e. your public SSH key).
- Scroll down, and agree to the terms and conditions.
- Choose Purchase to start the deployment.
NOTE: This deployment may take several minutes, due to the post deploy script that will install all necessary pre-requisites on the virtual machine. Please wait for the deployment to complete before you go to the next step.
4. When the deployment has completed, obtain the DNS Name (FQDN) of the new virtual machine in Azure Portal.
NOTE: Write down the FQDN of your newly deployed virtual machine, we will call it MRP machine. You can get the FQDN by following the steps used in the previous lab: Set up Parts Unlimited MRP with Jenkins. The FQDN should be in the following format: name_specified_above.region_selected.cloudapp.azure.com
Task 4: Update the Jenkins pipeline
In this task we will update the Jenkins pipeline to automatically deploy the artifacts, after they have been built.
- In a web browser, navigate to the configuration of your pipeline:
http://localhost:8080/job/PartsUnlimitedMRP/configure
- In the pipeline tab, go to the end of the script. Insert the following code before the final closing brace “
}”.
    stage ('Save MongoRecords.js') {
        dir('deploy') {
            archiveArtifacts artifacts: 'MongoRecords.js', excludes: '**/docker'
        }
    }

    def mrphostname

    stage ('Get MRP hostname') {
        mrphostname = input(
            id: 'mrhphostname', message: 'Please enter the MRP VM FQDN', parameters: [
                [$class: 'TextParameterDefinition', defaultValue: 'mrp-deploy.westus.cloudapp.azure.com', description: 'This is the FQDN by which the VM can be remotely accessed', name: 'mrphostname']
                ])
        echo ("MRP HostName: ${mrphostname}")
    }

     stage ("ssh") {
        sshagent(['mrpadmin']) {
            sh "ssh -o StrictHostKeyChecking=no -l mrpadmin  ${mrphostname} 'curl -O ${env.BUILD_URL}artifact/build/libs/mrp.war'"
            sh "ssh -o StrictHostKeyChecking=no -l mrpadmin  ${mrphostname} 'curl -O ${env.BUILD_URL}/artifact/build/libs/integration-service-0.1.0.jar'"
            sh "ssh -o StrictHostKeyChecking=no -l mrpadmin  ${mrphostname} 'curl -O ${env.BUILD_URL}/artifact/build/libs/ordering-service-0.1.0.jar'"
            sh "ssh -o StrictHostKeyChecking=no -l mrpadmin  ${mrphostname} 'curl -O ${env.BUILD_URL}/artifact/MongoRecords.js'"
            sh "ssh -o StrictHostKeyChecking=no -l mrpadmin  ${mrphostname} 'curl -sL https://raw.githubusercontent.com/Microsoft/PartsUnlimitedMRP/master/Labfiles/DevOps200.3x-CIandCD/CDwithJenkins/env/deploy_mrp_app.sh | sudo bash -'"
            }
        sh "curl -sL -w \"%{http_code}\\n\" http://${mrphostname}:9080/mrp/ -o /dev/null"
    }
- Select Save.
NOTE: We implemented Continuous Integration (CI) in the previous lab. Any changes you make to the source code will automatically trigger a new build. From now, you do not need to trigger the builds manually. We will experiment with this in the next task.
- Your full pipeline script should now be similar to the following:
node{

    stage ("Checkout") {
        git url: 'https://github.com/URL-FOR-YOUR-REPO.git'
    }

    env.JAVA_HOME = "${tool 'JDK 8'}"
    env.PATH = "${env.JAVA_HOME}/bin:${env.PATH}"
    sh 'java -version'

    stage ('Build IntegrationService') {
        dir('src/Backend/IntegrationService') {
            sh 'chmod +x gradlew'
            sh './gradlew build'
            archiveArtifacts artifacts: '**/integration-service*.jar', excludes: null
        }
    }

    stage ('Build OrderService') {
        dir('src/Backend/OrderService') {
            sh 'chmod +x gradlew'
            sh './gradlew build'
            archiveArtifacts artifacts: '**/ordering-service*.jar', excludes: null
            junit '**/TEST-*.xml'
        }
    }

    stage ('Build Client') {
        dir('src/Clients') {
            sh 'chmod +x gradlew'
            sh './gradlew build'
            archiveArtifacts artifacts: '**/mrp.war', excludes: null
        }
    }

    stage ('Save MongoRecords.js') {
        dir('deploy') {
            archiveArtifacts artifacts: 'MongoRecords.js', excludes: '**/docker'
        }
    }

    def mrphostname

    stage ('Get MRP hostname') {
        mrphostname = input(
            id: 'mrhphostname', message: 'Please enter the MRP VM FQDN', parameters: [
                [$class: 'TextParameterDefinition', defaultValue: 'mrp-deploy.westus.cloudapp.azure.com', description: 'This is the FQDN by which the VM can be remotely accessed', name: 'mrphostname']
                ])
        echo ("MRP HostName: ${mrphostname}")
    }

     stage ("ssh") {
        sshagent(['mrpadmin']) {
            sh "ssh -o StrictHostKeyChecking=no -l mrpadmin  ${mrphostname} 'curl -O ${env.BUILD_URL}artifact/build/libs/mrp.war'"
            sh "ssh -o StrictHostKeyChecking=no -l mrpadmin  ${mrphostname} 'curl -O ${env.BUILD_URL}/artifact/build/libs/integration-service-0.1.0.jar'"
            sh "ssh -o StrictHostKeyChecking=no -l mrpadmin  ${mrphostname} 'curl -O ${env.BUILD_URL}/artifact/build/libs/ordering-service-0.1.0.jar'"
            sh "ssh -o StrictHostKeyChecking=no -l mrpadmin  ${mrphostname} 'curl -O ${env.BUILD_URL}/artifact/MongoRecords.js'"
            sh "ssh -o StrictHostKeyChecking=no -l mrpadmin  ${mrphostname} 'curl -sL https://raw.githubusercontent.com/Microsoft/PartsUnlimitedMRP/master/Labfiles/DevOps200.3x-CIandCD/CDwithJenkins/env/deploy_mrp_app.sh | sudo bash -'"
            }
        sh "curl -sL -w \"%{http_code}\\n\" http://${mrphostname}:9080/mrp/ -o /dev/null"
    }
}
Task 5: Commit file update to kick off a continuous deployment
1. Go to the source code on your GitHub repository.
2. Edit the file src/Clients/Web/index.html.
- You can change the Title of the page, for example.
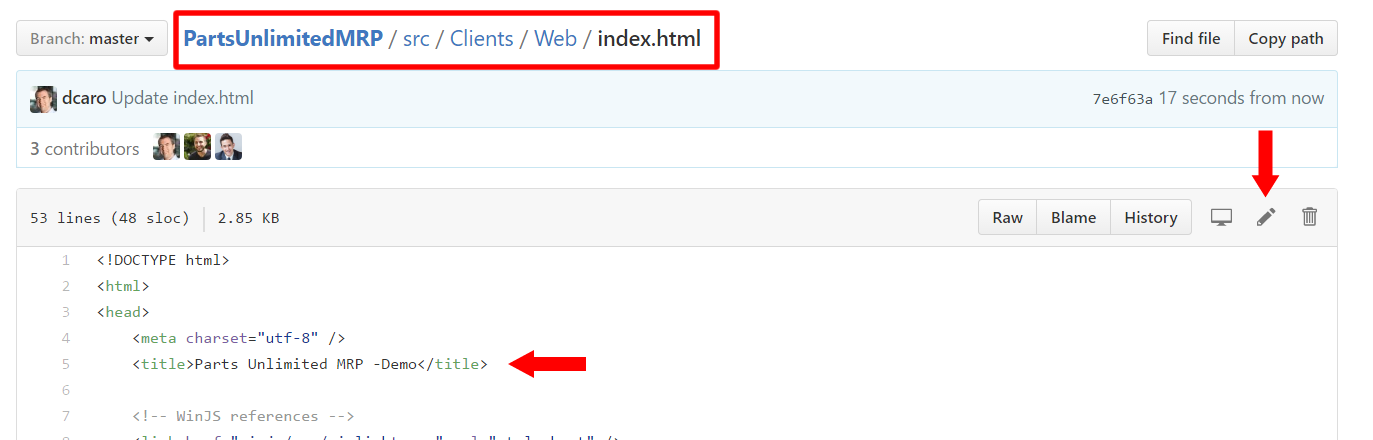
3. Select Commit changes.
4. Navigate to your browser to view the build progress on the Jenkins Master.
http://localhost:8080/job/PartsUnlimitedMRP/
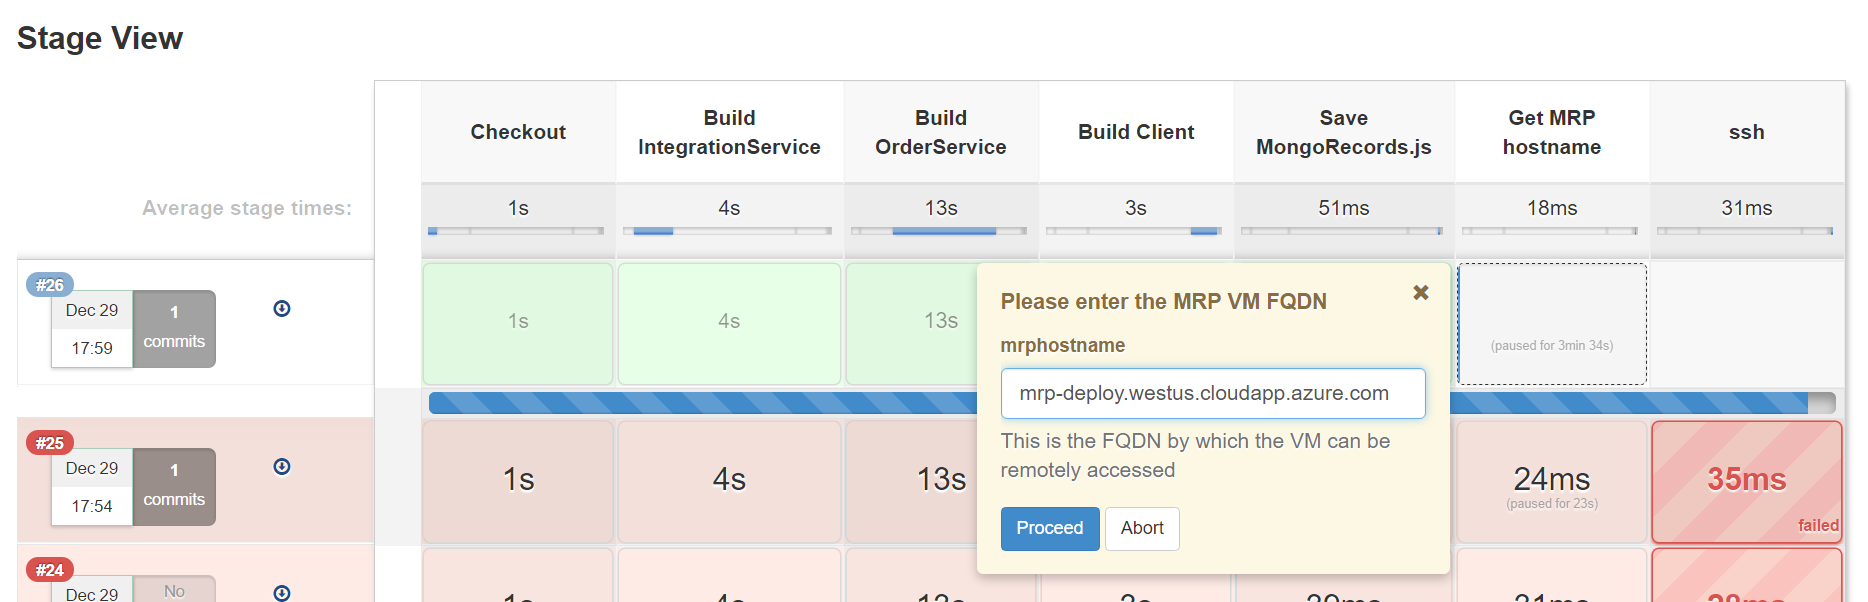
5. The pipeline will stop at the stage Get MRP hostname, and prompt you to enter the FQDN of the MRP machine (if you have not entered it already).
-
When prompted, click on the step that is paused and enter the FQDN of the MRP machine (this FQDN is for the VM that you deployed in this lab in Task 2.3).
-
Choose Proceed.
6. Wait for the pipeline to complete.
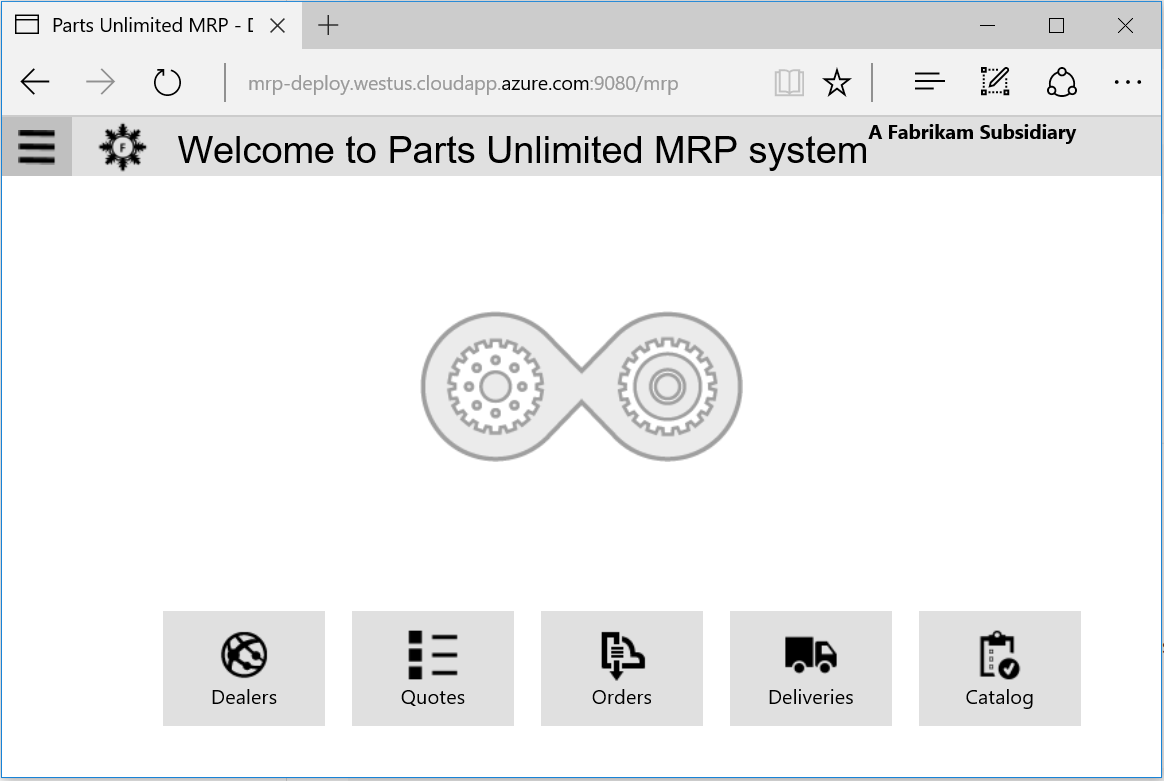
7. In a web browser, navigate to the following address:
http://FQDN_of_the_mrp_deployment_machine:9080/mrp
The FQDN of the MRP deployment machine is the DNS Name of the MRP machine you deployed in Task 2.3.
Verify that the web page Title in your browser is the same as the title that you specified in the source code (Task 5.2).
Explore the Parts Unlimited MRP application in your browser to confirm that it functions correctly.
Summary:
In this lab, you learned how to implement Continuous Deployment for the Parts Unlimited Application.
This allows you to reduce the time needed to release a build to production, and to get feedback if your changes are okay. Implemented with Continuous Integration, the changes performed by developers are pushed, in a continuous manner, to production without removing the element of human control.
Continuous Feedback - Issues / Questions
If you encounter issues or have questions during this lab, please open an issue on GitHub.
Thanks.