Setup Continuous Deployment with Puppet
In this multi-part lab, we will set up the Puppet Master in Azure Stack, that will be used for Continuous Deployment of the Parts Unlimited MRP project. We’ll then step through using that environment to showcase its CD capabilities. Puppet is a configuration management system that allows you to automate provisioning and configuration of machines by describing the state of your infrastructure as code. Infrastructure as Code is an important pillar of good DevOps.
Prerequisites
There are a couple of key things you’ll need to have in place before setting up this lab environment, which, if you’ve been following the steps across other labs so far, you should already have most of them :-)
- A configured Azure Stack, logged into the Azure Stack Development Kit Host
- The Azure Stack Tools downloaded to the Azure Stack Development Kit Host (Details here)
- An Ubuntu base image in the Platform Image Repository (Details here)
- Putty installed on the Azure Stack Development Kit Host (use the script below, from an administrative PowerShell console to download)
Invoke-Webrequest https://the.earth.li/~sgtatham/putty/latest/x86/putty.exe -OutFile C:\putty.exe
Once you’ve got all those sorted, you’re ready to deploy the environment. In this lab you will work with two machines: a Puppet Master machine and another machine known as a node which will host the MRP application. The only task you will perform on the node is to install the Puppet agent - the rest of the configuration will be applied by instructing Puppet how to configure the node though puppet programs on the Puppet Master. Specifically, you’ll perform:
- Provisioning a Puppet Master and node (both Ubuntu VMs) in Azure Stack using ARM templates
- Install Puppet Agent on the node
- Configure the Puppet Environment
- Test the Environment Configuration
- Create a Puppet program to describe the environment for the MRP application
Provisioning the Puppet Enterprise Master | Deployment Options
Now, you have 2 options for deployment.
- ARM Template & Custom Deployment -> for this option, you will perform a new custom template deployment from Azure Stack, using a JSON file that will be provided for you. You will enter a number of key values for the parameters, and then deploy. This is the quicker option.
- Create a Custom Marketplace Item for Deployment -> for this option, in the same way you (optionally) added an Ubuntu 16.04-LTS item to the Azure Stack Marketplace, you will add a new .azpkg to your Azure Stack, and configure the deployment from this, providing the same parameters as per option 1.
The end result of both of these options is the same, however if you’d like to populate your gallery with more items, use option 2.
*Option 1 - ARM Template & Custom Deployment
If you’re not interested in creating a Marketplace item for Puppet, then this quick and easy approach should make things, well, quick and easy for you!
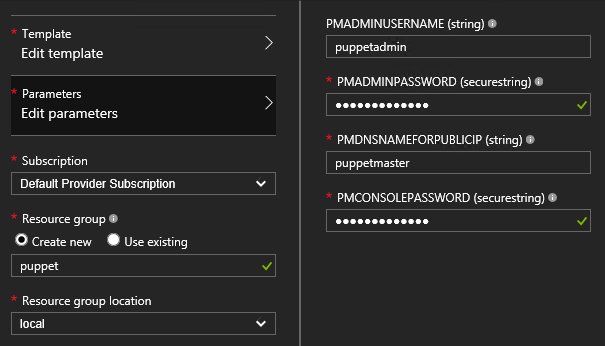
Firstly, from your Azure Stack Development Kit Host machine, you need to click on the button below, and fill in the parameter fields. The link should open the Azure Stack portal, and if you’re not already logged in, it’ll prompt you for your Azure Stack credentials, then take you immediately to the custom template blade.

You’ll need to enter information for the following fields:
- PMADMINPASSWORD - choose a password of your choice.
- PMDNSNAMEFORPUBLICIP - for testing purposes, use puppetmaster.
- PMCONSOLEPASSWORD - choose a password of your choice.
- Resource Group - for testing purposes, use puppet.
- Location - seeing as this is the Azure Stack Development kit, you’ll just be able to choose local for now.
If you’re interested in taking a deeper look at the ARM template that is used for deployment, you could either click Edit Template within the custom template deployment blade, and that will present the template that will be used for the deployment, or alternatively, you could grab the ARM template from here
Depending on your hardware, the deployment of the key artifacts, the virtual machine, and its respective automated configuration, may take a while. Expect around 20-30 mins for the deployment, unless you have new hardware, and a bank of SSDs for storage!
Once the deployment has completed, you’re ready to proceed with configuring the Puppet Master.
*Option 2 - Create a Custom Marketplace Item for Deployment
If you are interested in adding a custom marketplace item for Puppet Enterprise, to your Azure Stack Marketplace, then these steps will help. I’ve already made the package for you, so you should just be able to follow these steps, and import it right into your Azure Stack.
As we saw earlier, when we added our Ubuntu base image to the Azure Stack marketplace, things are much easier when something is packaged for you, so to start things off, pull down the .azpkg file for our Puppet environment, that I’ve stored on GitHub. From your Azure Stack Development Kit Host machine, do the following:
- Navigate to your Puppet.PuppetEnterprise.1.0.0.azpkg file, you downloaded earlier
- Move it to a newly created folder C:\MyMarketPlaceItems.
It’s important to note that if you are going to use the package I have provided, you need to have used the following info when you uploaded your Ubuntu base VHD image to the platform image repository earlier. Any differences, and the package I’m providing will not reference your uploaded image. If you used an exact copy of my PowerShell upload script, you’re all set.
- Publisher "Canonical"
- Offer "UbuntuServer"
- SKU "16.04.3-LTS"
Now that we have the package ready to upload, we need somewhere in Azure Stack to upload it to. Fortunately, we created a storage account for this very purpose earlier, so we’ll use the same storage account for this package.
- Connect to your Azure Stack via an administrative PowerShell console. If you’re not still connected from the earlier steps, run the following:
  cd\
  cd C:\AzureStack-Tools-master\connect
  Import-Module .\AzureStack.Connect.psm1
  Add-AzureStackAzureRmEnvironment -Name "AzureStackAdmin" -ArmEndpoint "https://adminmanagement.local.azurestack.external"
  $TenantID = Get-DirectoryTenantID -AADTenantName "<myaadtenant>.onmicrosoft.com or customdomain.com" -EnvironmentName AzureStackAdmin
  $UserName='<username@myaadtenant.onmicrosoft.com or username@customdomain.com>'
  $Password='<administrator or user password>'| `
  ConvertTo-SecureString -Force -AsPlainText
  $Credential= New-Object PSCredential($UserName,$Password)
  Login-AzureRmAccount -EnvironmentName "AzureStackAdmin" -TenantId $TenantID -Credential $Credential
- Now, let’s access the storage account to hold this package. If you recall, we named the storage account tenantartifacts and this is located in a dedicated resource group of the same name:
  $StorageAccount = Get-AzureRmStorageAccount -ResourceGroupName tenantartifacts -Name tenantartifacts
  $GalleryContainer = Get-AzureStorageContainer -Name gallery -Context $StorageAccount.Context
- With the resource group, storage account and gallery container now accessible, we can push our new Puppet Enterprise marketplace package into Azure Stack.
$GalleryContainer | Set-AzureStorageBlobContent -File "C:\MyMarketPlaceItems\Puppet.PuppetEnterprise.1.0.0.azpkg"
$GalleryItemURI = (Get-AzureStorageBlob -Context $StorageAccount.Context -Blob 'Puppet.PuppetEnterprise.1.0.0.azpkg' -Container 'gallery').ICloudBlob.uri.AbsoluteUri
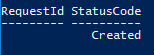
Add-AzureRMGalleryItem -GalleryItemUri $GalleryItemURI -Verbose
When successful, you should see a StatusCode of Created
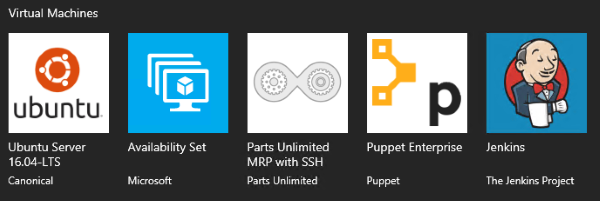
Go back and refresh the portal, and under New -> Virtual Machines -> See All, you should see your newly added Puppet Enterprise marketplace item
With your newly created marketplace item created and pushed to the Azure Stack Marketplace, we’re ready to deploy an instance of the environment.
- On the Azure Stack Development Kit Host machine, in your Azure Stack portal, click on New, then Virtual Machines, then See all.
- Select the Puppet Enterprise item in the marketplace, and click Create.
- Provide the information for the following fields:
- PMADMINPASSWORD - choose a password of your choice.
- PMDNSNAMEFORPUBLICIP - for testing purposes, use puppetmaster.
- PMCONSOLEPASSWORD - choose a password of your choice.
- Resource Group - for testing purposes, use puppet.
- Location - seeing as this is the Azure Stack Development Kit, you’ll just be able to choose local for now.
Once you’ve filled in the fields, it should look like this:
- Click OK to confirm the parameters, and then Create to start the deployment.
Depending on your hardware, the deployment of the key artifacts, the virtual machine, and its respective automated configuration, may take a while. Expect around 20-30 mins for the deployment, unless you have new hardware, and a bank of SSDs for storage! Once the deployment has completed, you’re ready to proceed with configuring your Puppet Enterprise Master.
Puppet Enterprise Master Setup | Final Steps
Regardless of using Option 1, or Option 2, your Puppet Enterprise Master should now be deployed. You can now continue with the configuration of the Puppet Enterprise environment specifically.
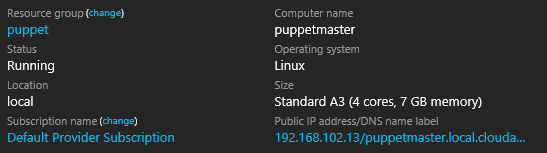
- In the Azure Stack portal, click on Resource Groups and locate the puppet resource group.
- Inside the resource group, click on the puppetmaster virtual machine, and take note of its Public IP address/DNS name label
The dnsaddress will be of the form machinename.local.cloudapp.azurestack.external. Open a browser to https://dnsaddress. (Make sure you’re going to http__s__, not http). You will be prompted about an invalid certificate - it is safe to ignore this for the purposes of this lab. If the Puppet configuration has succeeded, you should see the Puppet Console sign in page:
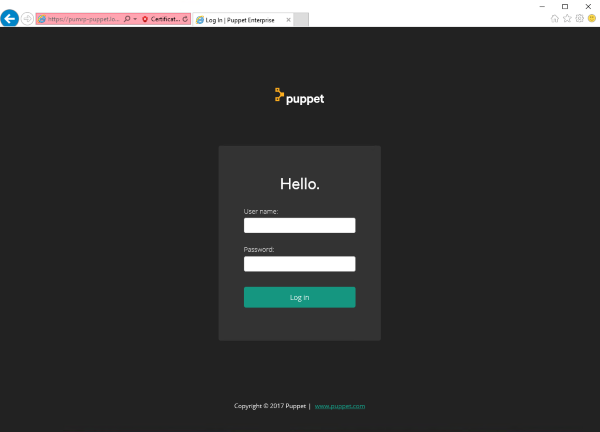
- On the Puppet Enterprise sign-in screen, enter the username
adminand the password you set during the deployment. When you log in, you should see a page like this:
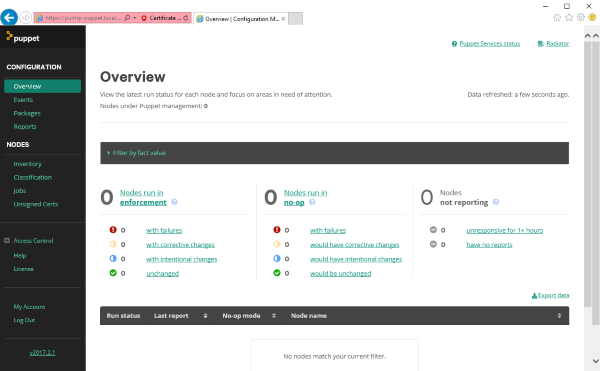
Now that we’re successfully logged into the Puppet Enterprise Master, we’ll quickly deploy an additional virtual machine that will be used for configuration tasks with Puppet.
Provisioning the Parts Unlimited MRP Node | Deployment Options
Now that you have your Puppet Enterprise Master deployed, the fastest way to bring another node under its management will be to deploy an additional VM, into the same resource group and the same virtual network. That way, the 2 VMs can talk to one another easily, resolve DNS easily etc. It also simplifies management with them within this small POC network.
Now in order to streamline this, I’ve created an ARM template for you to use - all you need to do is grab it from here:
Alternatively, for those of you who like to press buttons, and would like a simple option for deploying without copying and pasting, click the button below from your Azure Stack Development Kit Host machine, and fill in the parameter fields. The link should open the Azure Stack admin portal, and if you’re not already logged in, it’ll prompt you for your Azure Stack credentials, then take you immediately to the custom template blade:
This node is based on the Ubuntu base image that we added to the Azure Stack marketplace earlier. The only difference here is, the template creates the corresponding VM inside the same resource group, and virtual network as our Puppet Enterprise Master, and opens a couple of necessary ports in the network security group.
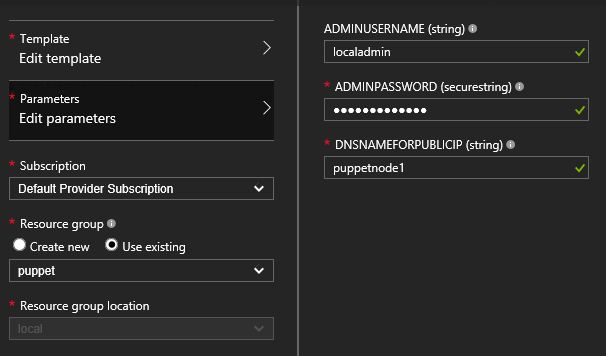
You’ll need to enter information for the following fields:
- ADMINUSERNAME - accept the default of localadmin.
- ADMINPASSWORD - choose a password of your choice.
- DNSNAMEFORPUBLICIP - for testing purposes, use puppetnode1.
- Resource Group - for testing purposes, select existing, and use the drop down to select puppet.
- Location - this will already be selected based on the resource group you choose.
If you’re interested in taking a deeper look at the ARM template that is used for deployment, you could either click Edit Template within the custom template deployment blade, and that will present the template that will be used for the deployment.
Depending on your hardware, the deployment of the virtual machine, and its respective automated configuration, may take a while. Expect around 20-30 mins for the deployment, unless you have new hardware, and a bank of SSDs for storage!
Once the deployment has completed, you’re ready to proceed with configuring the Puppet Master.
Next steps
In this lab, you learned how to setup deploy Puppet Enterprise on Azure Stack, and deploy an initial node that will be configured with Puppet Enterprise. In the next lab, you’ll walk through deploying the Parts Unlimited MRP app, to this node, from Puppet Enterprise.