Continuous Integration with Visual Studio Team Services
In this lab, we have an application called Parts Unlimited MRP. We want to set up Azure DevOps (Visual Studio Team Services) to be able to continuously integrate code into the master branch of code. This means that whenever code is committed and pushed to the master branch, we want to ensure that it integrates into our code correctly to get fast feedback. To do so, we are going to be creating a build definition that will allow us to compile and run unit tests on our code every time a commit is pushed to Azure DevOps (Visual Studio Team Services).
NOTE: Visual Studio Team Services recently changed its name to Azure DevOps. We are updating all labs but you will encounter references to both product names as you step through this lab until that process is complete.
DevOps MPP Course Source
- This lab is used in course DevOps200.3x: Continuous Integration and Continuous Deployment - Module 1.
Pre-Requisites:
- An active Azure DevOps (Visual Studio Team Services) account. Sign up for Azure DevOps (Visual Studio Team Services)
- Complete the lab task Setup PartsUnlimited MRP with VSTS.
Lab Tasks:
- Create a Continuous Integration Build
Estimated Lab Time:
- approx. 60 minutes
Task 1. Create a Continuous Integration Build
In this step, you will create a build definition in Azure DevOps (Visual Studio Team Services) that will be triggered every time a commit is pushed to your repository in Azure DevOps (Visual Studio Team Services).
NOTE: Ensure that you have an existing PartsUnlimitedMRP team project that also contains the Git repository cloned from GitHub. If not, complete the Setup PartsUnlimited MRP with VSTS lab before going through this lab.
In this lab, we will be using the Hosted agent accessed via Azure DevOps (Visual Studio Team Services). If you would like to use a Self-hosted agent, either running on your local machine or running on a VM in Azure (Azure subscription needed), you can follow instructions for setting an agent up with this link.
A continuous integration build will give us the ability to automate whether the code we checked in can compile and will successfully pass any automated tests that we have created against it. By using an automated build pipeline, we can quickly validate if our code changes have “broken the build” and fix code before it gets to production.
1. Go to your account’s homepage:
https://<account>.visualstudio.com
2. Go to your profile page and select your team project, in the screenshot below it is PUMRP1.

3. Click on the Build and Release then under Builds click on New Pipeline.

4. In the Select your repository page accept the default values for Select a source, Team project, Repository and default branch… to point to your project repo and its master branch, as in the screenshot below, and click Continue.

5. In the Select a template pane choose Empty Pipeline, and click Apply.

6. In the new Build Pipeline, under Tasks and then Pipeline in the Agent pool drop down box select Hosted VS2017 as the agent type

7. Click on the Agent job 1 section, click the + button to add a task, click on Build and scroll down to find the Gradle task. Then, click the Add button three times next to the Gradle task to add three Gradle tasks to the build pipeline. Gradle will be used to build the Integration Service, Order Service, and Clients components of the MRP app.

8. Select the first Gradle task and in the Display name box enter the task IntegrationService and set the Gradle wrapper value to the following location (either type or browse using the … button):
src/Backend/IntegrationService/gradlew

9. Set the Working Directory to src/Backend/IntegrationService and then uncheck the checkbox in JUnit Test Results to Publish to TFS/Team Services, since we will not be running automated tests in the Integration Service.

10. Select the second Gradle task and in the Display name box enter the the task OrderService and set the Gradle Wrapper to the following location:
src/Backend/OrderService/gradlew

11. Set the Working Directory to the location src/Backend/OrderService then, under the JUnit Test Results , check the checkbox to Publish to TFS/Team Services , and set the Test Results Files field to **/TEST-*.xml.
Since the Order Service does have unit tests in the project, we can automate running the tests as part of the build by adding in a test in the Gradle tasks field.

12. Select the third Gradle task and in the Display name box enter the the task Clients and set the Gradle Wrapper to the following location:
src/Clients/gradlew

13. Set the Working Directory to the location src/Clients and then uncheck the checkbox in JUnit Test Results to Publish to TFS/Team Services since we will not be running automated tests in Clients.

14. Click on the Agent job 1 section, click the + button to add a task, click on Utility and scroll down to find the Copy Files task. Then, click the Add button twice to add two copy files tasks.

15. Still in the Add tasks pane under Utility and scroll down to find the Publish Build Artifacts task. Then, click the Add button twice to add two Publish Build Artifact tasks.

16. Select the first Copy Files to: task, and fill in the input values with the following:
- Source Folder: $(Build.SourcesDirectory)\src
- Contents: **/build/libs/!(buildSrc)*.?ar
- Target Folder: $(build.artifactstagingdirectory)\drop

We will copy the files we want from the build and repo and place them in a stagig area on the agent, to be later picked up from there and published as build pipeline artifacts which we can later use in our release pipeline. To view more details about the variables that we are using in the tasks you can take a lok at the page Predefined build variables
17. Select the second Copy Files to: task, and fill in the input values with the following:
- Source Folder: $(Build.SourcesDirectory)
- Contents:	 **/deploy/SSH-MRP-Artifacts.ps1
			**/deploy/deploy_mrp_app.sh
			**/deploy/MongoRecords.js
- Target Folder: $(build.artifactstagingdirectory)

Try to get the formatting as it appears in the screenshot to ensure the task works smoothly. Ultimately when you check the build artifacts at the end of the lab, you will know if the task is working correctly or not and can troubleshoot or amend as you need.
18. Select the first Publish Build Artifact task, and fill in the input values with the following:
- Path to publish: $(build.artifactstagingdirectory)\drop
- Artifact Name: drop
- Artifact publish location: Visual Studio Team Services/TFS

In these publish tasks, we aretaking the items from the agent staging area and publishing them as build pipeline artifacts for later use in our release pipeline.
19. Select the scond Publish Build Artifact task, and fill in the input values with the following:
- Path to publish: $(build.artifactstagingdirectory)\deploy
- Artifact Name: deploy
- Artifact publish location: Visual Studio Team Services/TFS

20. Go to the Triggers tab and select Continuous Integration (CI).

21. Click Save and Queue, and then select Save from the drop down options. Don’t select the Queue or Save and Queue options as these will trigger a manual build. We will trigger a build using continuous integration rather than a manual trigger.

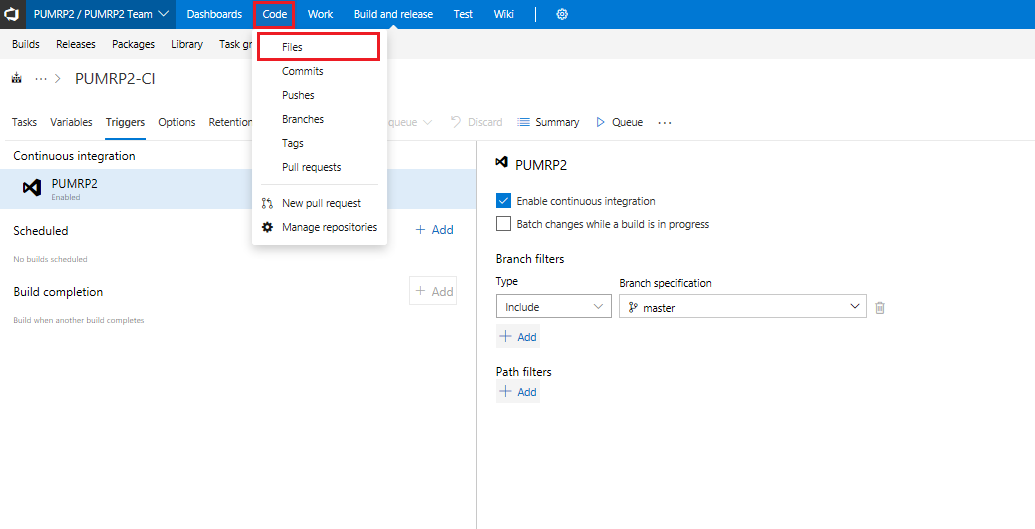
22. Go to the Code and then select Files tab, to go to your repo source
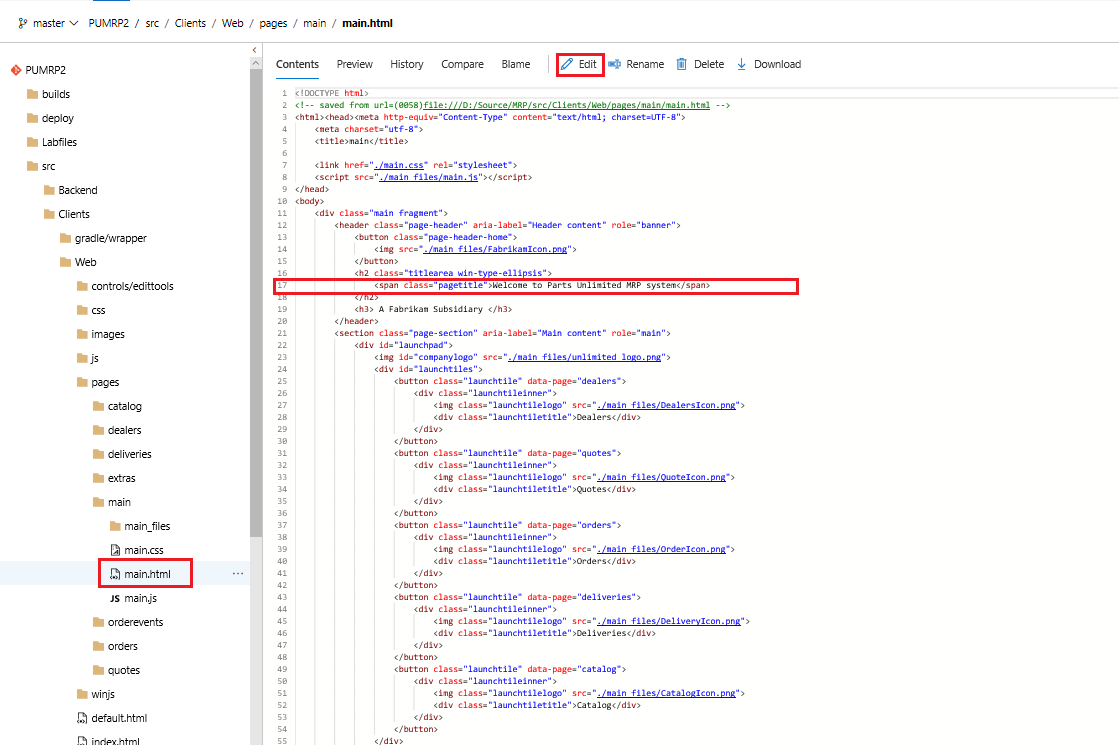
22. In the repo go to the location /src/Clients/Web/pages/main/main.html select Edit and modify line 17 from
Welcome to Parts Unlimited MRP system
to
Welcome to Parts Unlimited MRP system - CI1
or something similar.
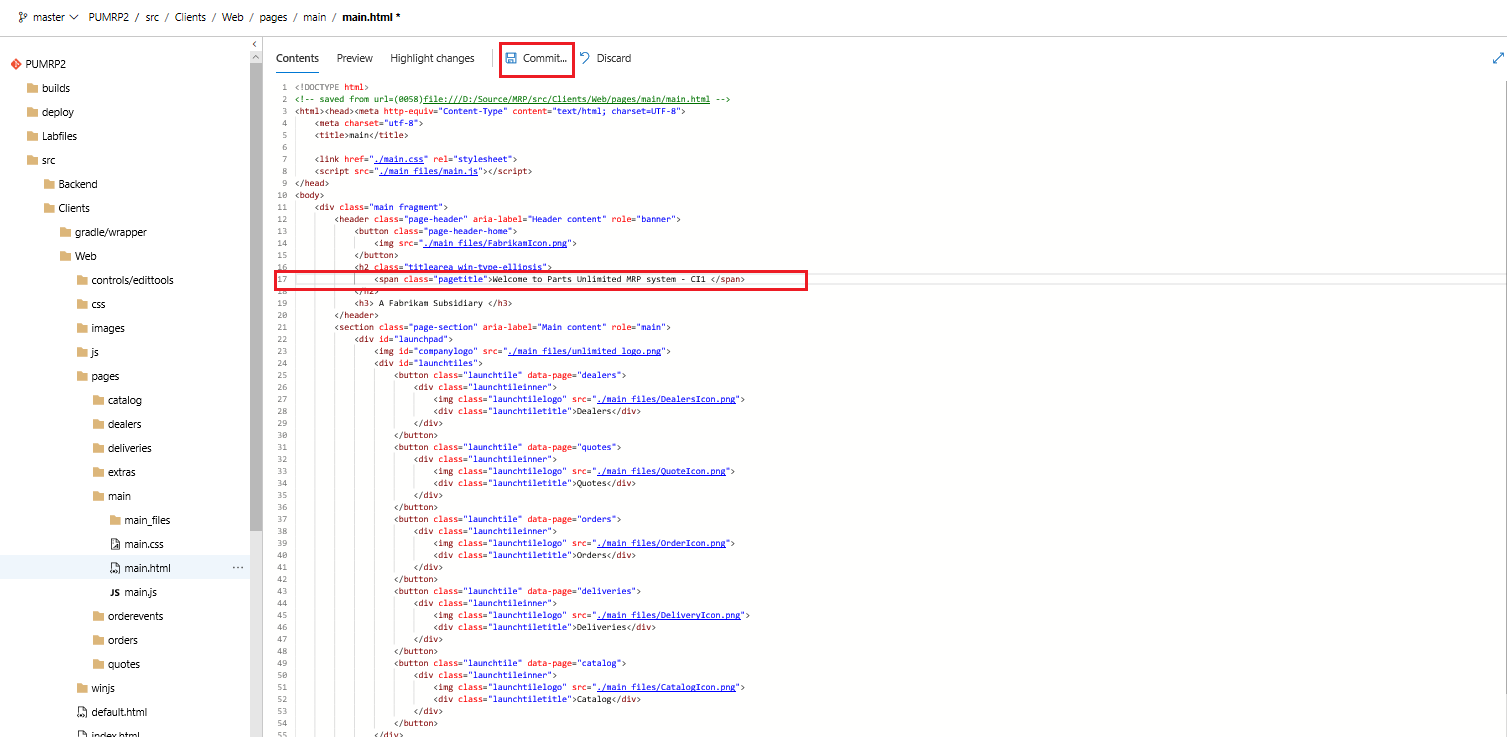
23 Then click Commit to trigger a continuous Integration build
24. This should have triggered the build definition we previously created. Click the Build tab to see the build in action. Once complete, you should see build summary similar to the output below, which includes test results:


24. The main items of interest we want to check here once successfully completed are the build artifacts. There are two here,
- deploy: scripts and templates to configure and deploy the app to our mrp app server
- drop: containing the actual application to be deployed.
To view these, once the build has successfully completed, click on Artifacts and then select firstly deploy followed by drop


We will use these build artifacts in our subsequent continuous deployment lab, where we will deploy our application, thus extending our pipeline to include build and release. You can download and have a look through these build artifacts if you have time.
NOTE: If the artifacts are not successfully generated in the formats as in these screenshots, you may encounter errors when you go to complete the Continuous Deployment lab. As deployment scripts will expect artifacts files to be in a particulatr format and structure i order to manipulate them and deploy them.
Summary
In this lab, you learned how to create a Continuous Integration build that runs when new commits are pushed to the master branch. This allows you to get feedback as to whether your changes made breaking syntax changes, or if they broke one or more automated tests, or if your changes are okay. Try these labs out for next steps:
Continuous Feedback
Issues / Questions about this HOL ??
Thanks