Adding VM Images to Azure Stack
Azure Stack enables administrators to make VM images, such as their organization’s custom VHD, available to their tenants. Images can be referenced by Azure Resource Manager templates or added to the Azure Marketplace UI with the creation of a Marketplace item. No images are included by default in the Azure Stack Development Kit.
An image can be added to your Azure Stack Platform Image Repository (PIR) in 2 ways - via the portal, or programmatically. We’ll focus on the programmatical approach, specifically with PowerShell, as it’s faster, and more repeatable. Plus, you can copy and paste my code ;-)
Downloading an Image
Firstly, you should be logged into you Azure Stack environment, and specifically, on the Azure Stack Development Kit host.
For the purpose of our testing, we’re going to focus on Linux images. Microsoft has worked with a number of Linux vendors to provide a set of Azure Stack-compatible images for use in your Azure Stack environments:
We’ll be focusing on Ubuntu 16.04 LTS, so that’s the one you should be downloading too. When you click on the Ubuntu 16.04 LTS link above, you’ll automatically be downloading the latest build. If you accept the default name, and save location, you’ll end up with a 490+MB zip file, located in the downloads folder.
Once downloaded, extract the zip file, to end up with a single 30GB VHD, with the name xenial-server-cloudimg-amd64-disk1.vhd.
- Rename the VHD file to Ubuntu1604LTS.vhd
- Move the file to a new folder called C:\Images
- Optional - to free up space, delete the original ZIP file you just downloaded.
Connecting to Azure Stack via PowerShell
Before we can begin adding an image to the Azure Stack PIR, we’ll need to be able to connect to the Azure Stack via PowerShell, and there are a couple of steps we need to perform to do that.
Install Azure Stack PowerShell cmdlets & dependencies
-
Azure Stack uses the same AzureRM cmdlets that you’d use if you were connecting to Azure. These are installed from the PowerShell Gallery. To begin, open an elevated (as administrator) PowerShell Console and run the following command to return a list of PowerShell repositories available and ensure the gallery is trusted:
Get-PSRepository Set-PSRepository -Name "PSGallery" -InstallationPolicy Trusted -
Before installing the required version, make sure that you uninstall any existing Azure PowerShell modules. To uninstall, close all the active PowerShell sessions and run the following command:
Get-Module -ListAvailable | where-Object {$_.Name -like "Azure*"} | Uninstall-Module -
Azure Stack compatible AzureRM modules are installed through API version profiles. To learn about API version profiles and the cmdlets provided by them, refer to the manage API version profiles article. The AzureRM.Bootstrapper module provides PowerShell commands that are required to work with API version profiles. Use the following command to install the AzureRM.Bootstrapper module:
Install-Module -Name AzureRm.BootStrapper -
Run the following command to install the 2017-03-09-profile version of the AzureRM modules for Compute, Storage, Network, Key Vault etc:
Use-AzureRmProfile -Profile 2017-03-09-profile -
In addition to the AzureRM modules, you should also install the Azure Stack-specific PowerShell modules such as AzureStackAdmin, and AzureStackStorage by running the following command:
Install-Module -Name AzureStack -RequiredVersion 1.2.11 -
To confirm the installation, run the following command:
Get-Module -ListAvailable | where-Object {$_.Name -like "Azure*"}
If the installation is successful, the AzureRM and AzureStack modules are displayed in the output. Once verified, we need to ensure we have the relevant tools in place to connect to Azure Stack via PowerShell. These could also be used for Azure, but may lack some of the latest Azure features. The tools are all hosted on GitHub. To grab them, run the following in an elevated PowerShell console:
cd\
Invoke-Webrequest https://github.com/Azure/AzureStack-Tools/archive/master.zip -OutFile master.zip
Expand-Archive master.zip -DestinationPath . -Force
cd AzureStack-Tools-master\connect
Import-Module .\AzureStack.Connect.psm1
Set-ExecutionPolicy Unrestricted
Connect to Azure Stack
With the Azure Stack connection module now imported, you can use the following commands to connect to your Azure Stack. Note, AzureRM cmdlets can be targeted at multiple Azure clouds such as Azure China, Government, and Azure Stack. To target your Azure Stack instance, an AzureRM environment needs to be registered as follows.
Note - The below instructions are based on the use of Azure Active Directory for login. If you chose to install with Active Directory Federation Services instead, please use the documentation to connect.
Add-AzureStackAzureRmEnvironment -Name "AzureStackAdmin" -ArmEndpoint "https://adminmanagement.local.azurestack.external"
Get the GUID value of the Active Directory(AD) tenant that is used to deploy the Azure Stack. Note, you’ll need to change the AADTenantName to reflect your AAD Tenant used for installation.
$TenantID = Get-DirectoryTenantID -AADTenantName "<myaadtenant>.onmicrosoft.com" -EnvironmentName AzureStackAdmin
After the AzureRM environment is registered to target the Azure Stack instance, you can use all the AzureRM commands in your Azure Stack environment. Use the following steps to sign in your Azure Stack environment:
$UserName='<Username of the service administrator or user account>'
$Password='<administrator or user password>'| `
ConvertTo-SecureString -Force -AsPlainText
$Credential= New-Object PSCredential($UserName,$Password)
The above will store the store the administrator or user account’s credentials in a variable. We’ll be using the administrator’s account to keep things simple, so just replace those details in the PowerShell commands above. You’ll then use the following commands to log into the environment:
Login-AzureRmAccount `
  -EnvironmentName "AzureStackAdmin" `
  -TenantId $TenantID `
  -Credential $Credential
Once you’ve run through all of these commands, you should be successfully connected.
Note, if you need info on connecting to your Azure Stack via VPN, see the Azure Stack documentation.
Once logged in, you’re ready to start adding images to your Azure Stack.
Add VM Image to Platform Image Repository with PowerShell
The first thing we’ll need to do to upload an image with PowerShell, is import the Compute module, from our tools folder.
cd ..
cd .\ComputeAdmin\
Import-Module .\AzureStack.ComputeAdmin.psm1
We’re then ready to push our Ubuntu image that we downloaded earlier, into our Azure Stack PIR. Now, the code below is accurate assuming you used the same naming conventions I did, earlier. If not, adjust as necessary.
Add-VMImage `
  -publisher "Canonical" `
  -offer "UbuntuServer" `
  -sku "16.04.3-LTS" `
  -version "1.0.0" `
  -osType Linux `
  -osDiskLocalPath 'C:\Images\Ubuntu1604LTS.vhd' `
  -TenantId $TenantID `
  -EnvironmentName "AzureStackAdmin" `
  -azureStackCredentials $Credential `
  -CreateGalleryItem $false
The command above does the following:
- Authenticates to the Azure Stack environment
- Uploads the local VHD to a newly created temporary storage account
- Adds the VM image to the VM image repository
- Removes the temporary storage account
You’ll notice at the end of the command, there was a parameter called -CreateGalleryItem, and the value for this, I declared as false. By default, when you run this command without using this parameter, a default marketplace item will be created for this particular image. A marketplace item would consist of a logo, description etc, and deployable graphically via the Portal. For this Ubuntu image, we’ll skip the marketplace creation for now, and will create a more professional, complete one later. Once you’ve executed the command, leave the PowerShell window open for later.
If you’re interested in understanding a bit more about the other parameters used with the command above, check out the docs.
Explore the Platform Image Repository
With the upload complete, it’s important to confirm that the image now exist in the PIR. To do so, follow these steps:
- Open the Azure Stack Admin Portal and log in as the Service Administrator.
- On the dashboard, click on the Region Management tile.
- In the Region Management blade, click on local and then in the Resource Providers box, click on Compute.
- In the Compute blade, under Content, click on VM Images.
-
In the VM Images blade, you should see your Ubuntu image listed.
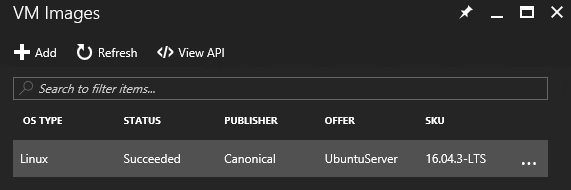
- Close all open blades and return to the dashboard.
Next Step
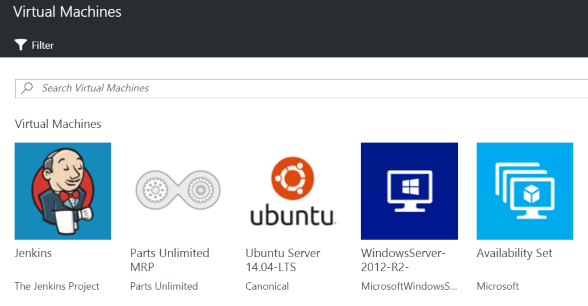
You’re now ready to start the deployment of the Parts Unlimited MRP environment, or explore any one of the DevOps scenarios provided within this documetation. These include CI/CD with Jenkins, Configuration Management with Chef, and Configuration Management with Puppet, with more to come in the future. Check out the Getting Started with Parts Unlimited page to go forward.
If you’re interested in understanding how to create more professional marketplace items, so that your users can deploy the base Ubuntu image, along with any other future images, direct from the Azure Stack marketplace, then read on…
*Optional - Create a Marketplace item for your Ubuntu Base Image
If you’d like something like this, in your Azure Stack gallery: