Continuous Deployment with Chef
In this lab, you will learn how to deploy the Parts Unlimited MRP App in an automated fashion onto a Linux VM with Chef Server 12. After this lab, you will have a working continuous deployment environment in Chef that will deploy the Parts Unlimited MRP app to a Virtual Machine in Azure Stack.
Pre-Requisites:
- Completion of the lab Setup Continuous Deployment with Chef
In the previous lab, we setup the environment. This involved deploying a Chef Server, syndicating and deploying a Windows Server VM, that will act as our workstation, and finally, we deployed a single Linux node which will eventually host our Parts Unlimited MRP application.
To recap, here’s what we’ll be doing during this part of the lab:
- Configure the Chef Workstation: You will learn how to set up the Chef Starter Kit on the workstation.
- Create a Cookbook: You will create an MRP cookbook and create a recipe for the MRP app’s dependencies.
- Create a Role: This step will show you how to create a role to define a baseline set of cookbooks and attributes that can be applied to multiple servers.
- Bootstrap the MRP App Server and Deploy the Application: You will bootstrap the MRP app and use the role that you previously created to deploy the app.
- Remediating Configuration Changes: You will see how Chef reacts when changes happen to the configuration and how Chef resolves issues.
Configure the Chef Workstation
Earlier, you deployed a Windows Server virtual machine that will act as our administrative workstation for Chef administration. During that deployment, as the ARM template was being executed, a custom PowerShell script was being called, that performed the following task on that Windows Server virtual machine:
# Set PowerShell execution policy
Set-ExecutionPolicy RemoteSigned -Force

# Install Chocolatey
iwr https://chocolatey.org/install.ps1 -UseBasicParsing | iex

refreshenv

# Install Chocolatey packages
& choco install poshgit -y
& choco install googlechrome -y
& choco install firefox -y
& choco install notepadplusplus -y
& choco install putty -y
& choco install chefdk -y

refreshenv
This PowerShell script essentially installed a Package Manager called Chocolatey, which in turn, installed a number of applications that we will be using on our workstation. As you can see from the list, it includes Google Chrome, Firefox, Putty and more.
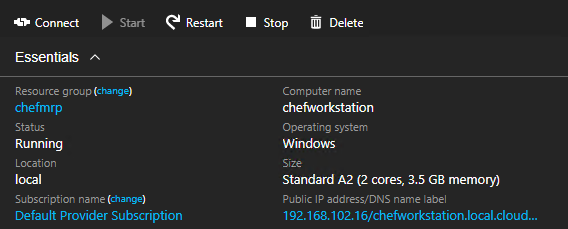
Now in order to start using the Windows Server workstation, we need to connect to it via Remote Desktop Protocol, or RDP. In the Azure Stack portal, click on Virtual Machines, then the name of your Chef Workstation virtual machine. In the Essentials blade, you’ll see both the IP address and the DNS name, but at the top of the blade, you’ll also see a Connect button. Note, you may need to allow popups in your browser to see the RDP download prompt. It will likely be saved to your Downloads folder for future reference.
Open the RDP file and enter the appropriate credentials. In our case, this was localadmin and your chosen password.
Once you are successfully logged into the Chef Workstation VM, we can start the configuration:
-
From the desktop, open Chrome or Firefox and navigate to the Chef Manage web page. The address will be of the form chefservername.local.cloudapp.azurestack.external. Open a browser to https://dnsaddress. (Make sure you’re going to http__s__, not http). You will be prompted about an invalid certificate - it is safe to ignore this for the purposes of this lab. You should see the Chef Manage login page.

-
Sign in with your credentials that you provided when you deployed the Chef Server. If you followed the guide, you’ll have used chefadmin and a password of your choice.
- Minimize the browser, and from the desktop, launch the Chef Development Kit.
-
Once opened, run
chef verify. A list of components will be returned, however the chef verify command will return errors that git was not configured with your identity information. We’ll configure that now.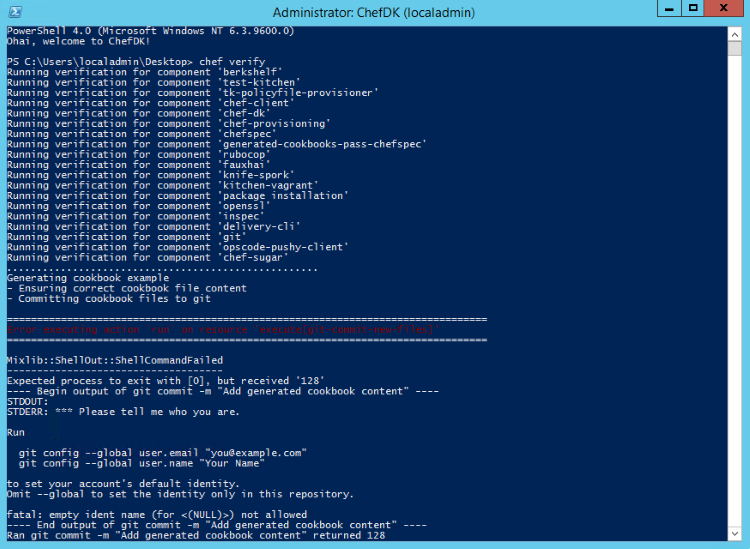
-
Configure your global git variables with your name and email address
 git config --global user.name "YourName"
 git config --global user.email "you@yourdomain.com"
Run
chef verifyagain to ensure no further errors exist. -
Go back to the Chef Manage website, go to the Administration tab, then select the partsunlimited organization. Click on the Starter Kit on the left, then Download Starter Kit.

-
Extract the Chef starter kit files to a directory like
C:\Users\<username>\chef-starter\. -
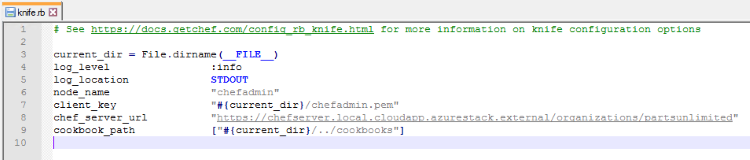
Open the knife.rb file in chef-repo\ .chef and check that the chef_server_url matches the external FQDN (e.g. https://chef-server-dns-name.local.cloudapp.azurestack.external/organizations/partsunlimited). Then, save and close the file.
-
Change directories to the chef-repo directory in the Chef DK shell (i.e.
cd C:\Users\<username>\Downloads\chef-starter\chef-repo). Run the following git commands:git init git add -A git commit -m "starter kit commit" -
Our Chef server has an SSL certificate that is not trusted. As a result, we have to manually trust the SSL certificate in order to have our workstation communicate with the Chef server. This can also be addressed by importing a valid SSL certificate for Chef to use. Run the knife ssl fetch command:
knife ssl fetch -
View the current chef-repo contents.
dir -
Synchronize the Chef repo.
knife download / -
Run the
dircommand from Step 11 again, and observe that additional files and folders have been created in the chef-repo directory.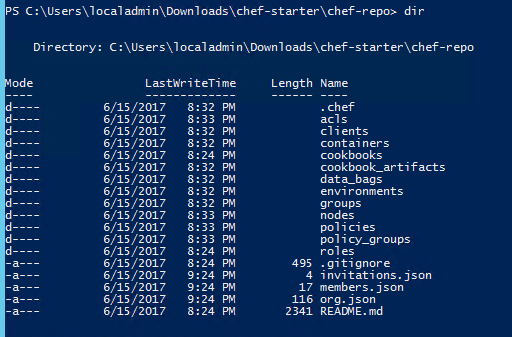
-
Commit the added files into the git repository:
git add -A
git commit -m "knife download commit"
Create a Chef Cookbook
In this exercise, we will create a cookbook to automate the installation of the Parts Unlimited MRP application and upload it to the Chef server.
-
Use the knife tool to generate a cookbook template.
knife cookbook create mrpappA cookbook is a set of tasks for configuring an application or feature. It defines a scenario and everything required to support that scenario. Within a cookbook, there are a series of recipes that define a set of actions to perform. Cookbooks and recipes are written in the Ruby language.
This creates an mrpapp directory in the chef-repo/cookbooks/ directory that contains all of the boilerplate code that defines a cookbook and a default recipe.

-
Edit the metadata.rb file in our cookbook directory. Open chef-repo/cookbooks/mrpapp/metadata.rb for edit
Cookbooks and recipes can leverage other cookbooks and recipes. Our cookbook will use a pre-existing recipe for managing APT repositories.
Add the following line at the end of the file:
depends ‘apt’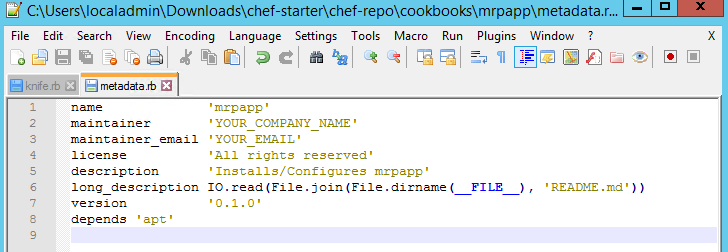
Save and close the file.
-
We need to install three dependencies for our recipe: the apt cookbook, the windows cookbook, and the chef-client cookbook. This can be accomplished using the knife cookbook site command, which will download the cookbooks from the official Chef cookbook repository, https://supermarket.chef.io/cookbooks.
Install the apt cookbook:
knife cookbook site install aptInstall the windows cookbook:
knife cookbook site install windowsInstall the chef-client cookbook:
knife cookbook site install chef-client -
Switch back to the master branch (this should happen automatically but may fail).
git checkout master -
Copy the full contents of the recipe from here: https://raw.githubusercontent.com/Microsoft/PartsUnlimitedMRP/master/docs/HOL_Deploying-Using-Chef/final/default.rb.
-
Open chef-repo/cookbooks/mrpapp/recipes/default.rb for edit. The file should look like this to start:
# # Cookbook Name:: mrpapp # Recipe:: default # # Copyright 2017, YOUR_COMPANY_NAME # # All rights reserved - Do Not Redistribute # -
Paste the contents of the recipe into the default recipe file, then save and close the file.
-
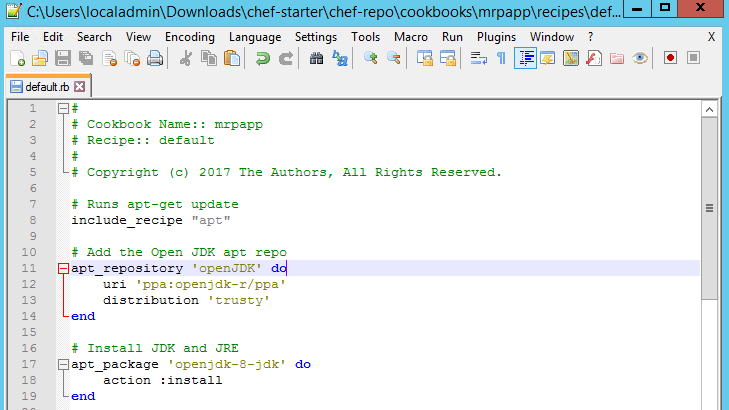
The following explains what the recipe is doing to provision the application.
The first thing the recipe will do will be to run the ‘apt’ resource – this will cause our recipe to execute ‘apt-get update’ prior to running, to make sure the package sources on the machine are up-to-date.
 # Runs apt-get update
 include_recipe "apt"
Now we add an apt_repository resource to make sure that the OpenJDK repository is part of our apt repository list and up-to-date.
 # Add the Open JDK apt repo
 apt_repository 'openJDK' do
 uri 'ppa:openjdk-r/ppa'
 distribution 'trusty'
 end
Next, we will use the apt-package recipe to ensure that the OpenJDK and OpenJRE are installed.
 # Install JDK and JRE
 apt_package 'openjdk-8-jdk' do
 action :install
 end

 apt_package 'openjdk-8-jre' do
 action :install
 end
Next, we set the JAVA_HOME and PATH environment variables to reference OpenJDK.
 # Set Java environment variables
 ENV['JAVA_HOME'] = "/usr/lib/jvm/java-8-openjdk-amd64"
 ENV['PATH'] = "#{ENV['PATH']}:/usr/lib/jvm/java-8-openjdk-amd64/bin"
Next, we’ll install the MongoDB database engine and Tomcat web server.
 # Install MongoDB
 apt_package 'mongodb' do
 action :install
 end

 # Install Tomcat 7
 apt_package 'tomcat7' do
 action :install
 end
At this point, all of our dependencies will be installed, so we can start configuring the applications. First, we need to ensure that our MongoDB database has some baseline data in it. The remote_file resource will download a file to a specified location. It’s idempotent – if the file on the server has the same checksum as the local file, it won’t take any action. This also uses the “notifies” command – if the resource runs (e.g. there’s a new version of the file), it sends a notification to the specified resource, telling it to run.
 # Load MongoDB data
 remote_file 'mongodb_data' do
 source 'https://github.com/Microsoft/PartsUnlimitedMRP/tree/master/deploy/MongoRecords.js'
 path './MongoRecords.js'
 action :create
 notifies :run, "script[mongodb_import]", :immediately
 end
Now we use a “script” resource to define what command line script should be executed to load the MongoDB data we downloaded in the previous step. This resource has its “action” set to “nothing” – this means it won’t run on its own. The only time this resource will run is when it’s notified by the remote_file resource we used in the previous step. So every time a new version of the MongoRecord.js file is uploaded, the recipe will download it and import it. If the MongoRecords.js file doesn’t change, nothing is downloaded or imported.
 script 'mongodb_import' do
 interpreter "bash"
 action :nothing
 code "mongo ordering MongoRecords.js"
 end
Next, we need to set the port that Tomcat will run our MRP application on. This uses a script resource to invoke a regular expression to update the /etc/tomcat7/server.xml file. The “not_if” action is a guard statement – if the code in the “not_if” action returns true, the resource won’t execute. This lets us make sure the script will only run if it needs to run. Another thing to note: We are referencing an attribute called #{node[‘tomcat’][‘mrp_port’]}. We haven’t defined this value yet, but we will in the next exercise. With attributes, you can set variables, so the MRP application can run on one port on one server, or a different port on a different server. If the port changes, you see that it uses “notifies” to invoke a service restart.
 # Set tomcat port
 	script 'tomcat_port' do
 interpreter "bash"
 code "sed -i 's/Connector port=\".*\" protocol=\"HTTP\\/1.1\"$/Connector port=\"#{node['tomcat']['mrp_port']}\" protocol=\"HTTP\\/1.1\"/g' /etc/tomcat7/server.xml"
 not_if "grep 'Connector port=\"#{node['tomcat']['mrp_port']}\" protocol=\"HTTP/1.1\"$' /etc/tomcat7/server.xml"
 notifies :restart, "service[tomcat7]", :immediately
 end
Now we can download the MRP application and start running it in Tomcat. If we get a new version, it signals the Tomcat service to restart.
 # Install the MRP app, restart the Tomcat service if necessary
 remote_file 'mrp_app' do
 source 'https://github.com/Microsoft/PartsUnlimitedMRP/tree/master/builds/mrp.war'
 action :create
 notifies :restart, "service[tomcat7]", :immediately
 end
We can define the Tomcat servce’s desired state, which is “running”. This will cause the script to check the Tomcat service, and start it if it isn’t running. We can also signal this resource to “restart” with “notifies” (see above).
 # Ensure Tomcat is running
 	service 'tomcat7' do
 	action :start
 	end
Finally, we can make sure the ordering service is running. This uses a combination of remote_file and script resources to check if the ordering service needs to be killed and restarted, or if it’s not running at all when it should be. The end result of this is that the ordering service will always be up and running.
remote_file 'ordering_service' do source 'https://github.com/Microsoft/PartsUnlimitedMRP/tree/master/builds/ordering-service-0.1.0.jar' path './ordering-service-0.1.0.jar' action :create notifies :run, "script[stop_ordering_service]", :immediately end # Kill the ordering service script 'stop_ordering_service' do interpreter "bash" # Only run when notified action :nothing code "pkill -f ordering-service" only_if "pgrep -f ordering-service" end # Start the ordering service. script 'start_ordering_service' do interpreter "bash" code "/usr/lib/jvm/java-8-openjdk-amd64/bin/java -jar ordering-service-0.1.0.jar &" not_if "pgrep -f ordering-service" end -
Commit the added files into the git repository:
git add . git commit -m “mrp cookbook commit” -
Now that the recipe is written, we can upload the cookbooks to the Chef server. From the command line, run:
knife cookbook upload mrpapp --include-dependencies
knife cookbook upload chef-client --include-dependencies
Now that we have a recipe created and all of the dependencies installed, we can upload our cookbooks and recipes to the Chef server with the knife upload command.
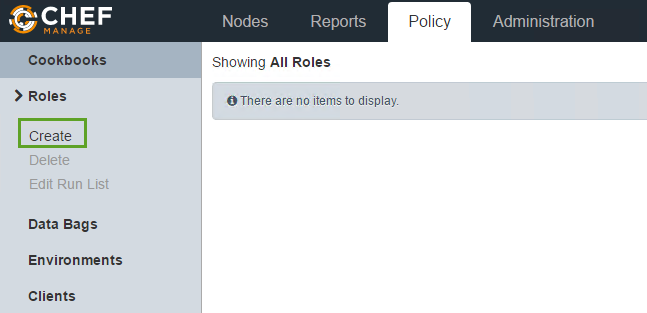
Create a Role
In this exercise, you will use the Chef Manage web site to create a role to define a baseline set of cookbooks and attributes that can be applied to multiple servers.
At the start of this task, you should be logged in to the Chef Manage web site.
-
Click on the “Policy” tab. Then, click on the “Roles” tab and then “Create.”
-
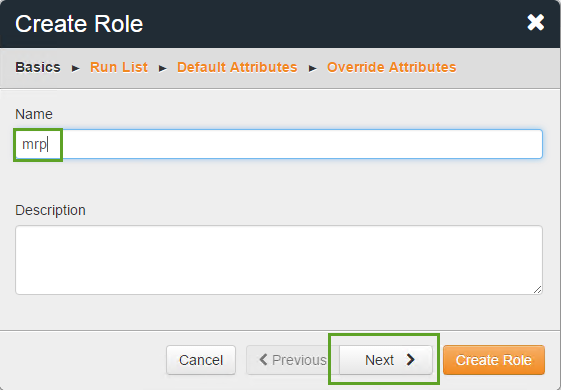
Enter the role name mrp then the “Next” button.
-
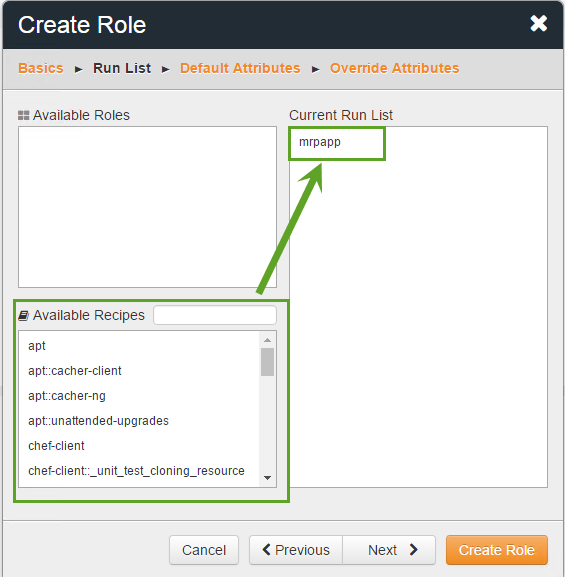
Under Available Recipes, find the mrpapp recipe.
A run list is a series of recipes to apply. We’re defining a role that can be applied to as many servers as we want that will run the MRP application.
Drag the mrpapp recipe to the Current Run List box.
-
Repeat for the chef-client::service recipe.
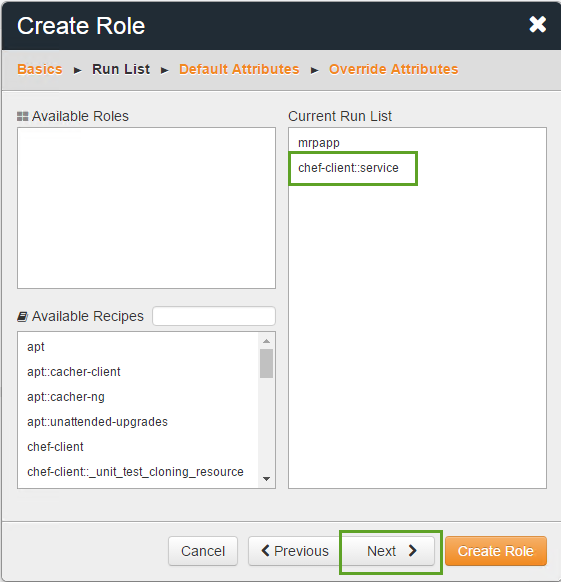
The run list should be:
 mrpapp
 chef-client::service
Click Next.
-
In the Default Attributes box, paste the text:
{ “tomcat”: { “mrp_port”: 9080 } }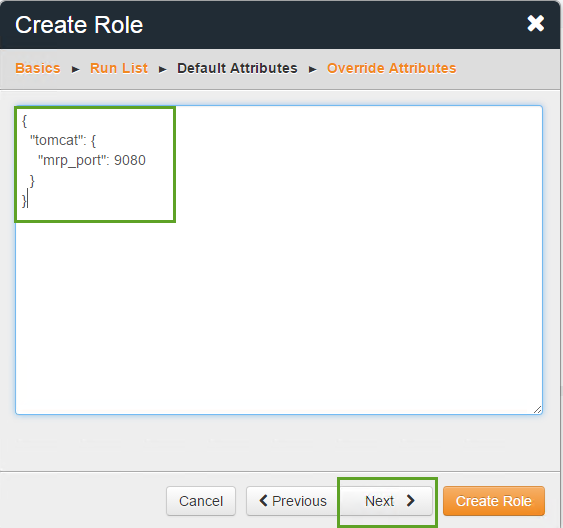
In the previous exercise, we referenced an attribute called
['tomcat']['mrp_port']in our recipe. This was referencing a JSON object. Now we can define default values to provide.Click Next.
-
Paste the following JSON in the Override Attributes box:
{"chef_client": { "interval": "60", "splay": "1" } }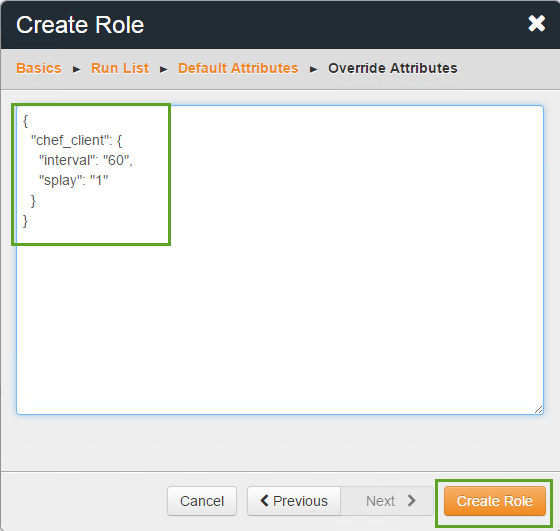
The second recipe we added to the run list was chef-client:: service. This recipe ensure that the Chef client will run on a regular basis to ensure that the environment is in sync with what is defined in our recipe. However, the default value for the chef client service is to sync every 30 minutes. We can override that value here and set it to a more frequent interval.
Then, click Create Role.
Bootstrap the MRP App Server and Deploy the Application
In this exercise, you will run the knife command to bootstrap the Parts Unlimited MRP app server and assign the MRP application role.
-
Use knife to boostrap the VM. If you have followed the steps in the guide, your FQDN should be chefnode1.local.cloudapp.azurestack.external, your username for the additional node should be localadmin and you used a password of your choice.
knife bootstrap <FQDN-for-MRP-App-VM> --ssh-user <mrp-app-admin-username> --ssh-password <mrp-app-admin-password> --node-name mrp-app --run-list role[mrp] --sudo --verbose
The script will take a few minutes to run. You will see it do the following things:
- Install Chef on the VM
- Assign the mrp Chef role to the VM and execute the mrpapp recipe.
Once the deployment is complete, you should be able to navigate to the MRP application website and use it normally.
-
Open the URL you chose for your public DNS name in a browser. The URL should be something like
http://<mrp-dns-name>.local.cloudapp.azurestack.external:9080/mrp.. If you followed the guide specifically, your DNS name should be http://chefnode1.local.cloudapp.azurestack.external:9080/mrp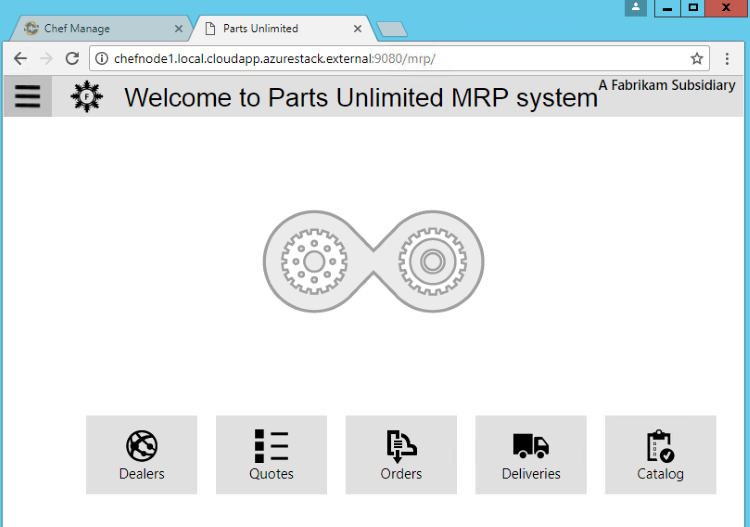
-
Click around the site and observe that it functions normally.
Remediating Configuration Changes
In this exercise, you will make a change to the configuration of your MRP application server, then observe as Chef automatically corrects the issue.
-
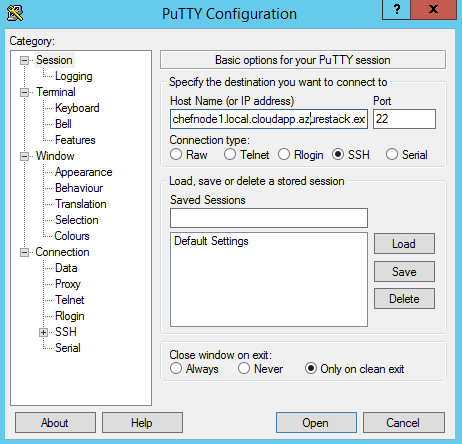
Click on the Start button and search for Putty. CLick on PuTTY.exe (which has already been installed on the Chef workstation) and enter the host name of the MRP application server, which if you’ve followed the guide, should be chefnode1.local.cloudapp.azurestack.external. Then click Open.
Click Yes to cache the server host key.
-
When prompted for a user name, enter the MRP admin username, which should be localadmin and press Enter.
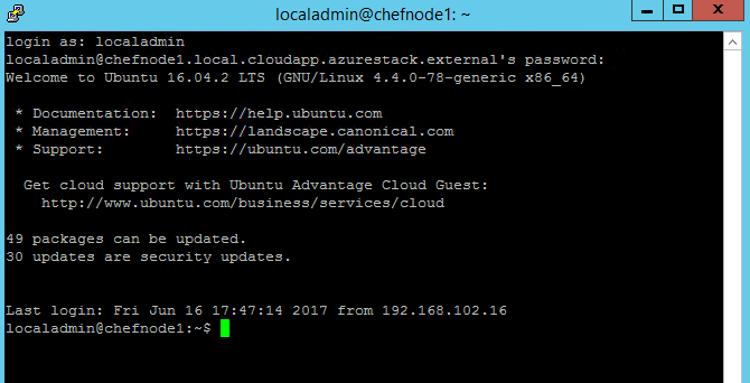
When prompted for a password, enter the MRP admin password and press Enter.
Wait for the command prompt to appear.
-
In PuTTY on the MRP Server, execute the following command to stop the Tomcat service:
sudo service tomcat7 stop -
In your browser, refresh the MRP app tab and observe that it is no longer accessible.
-
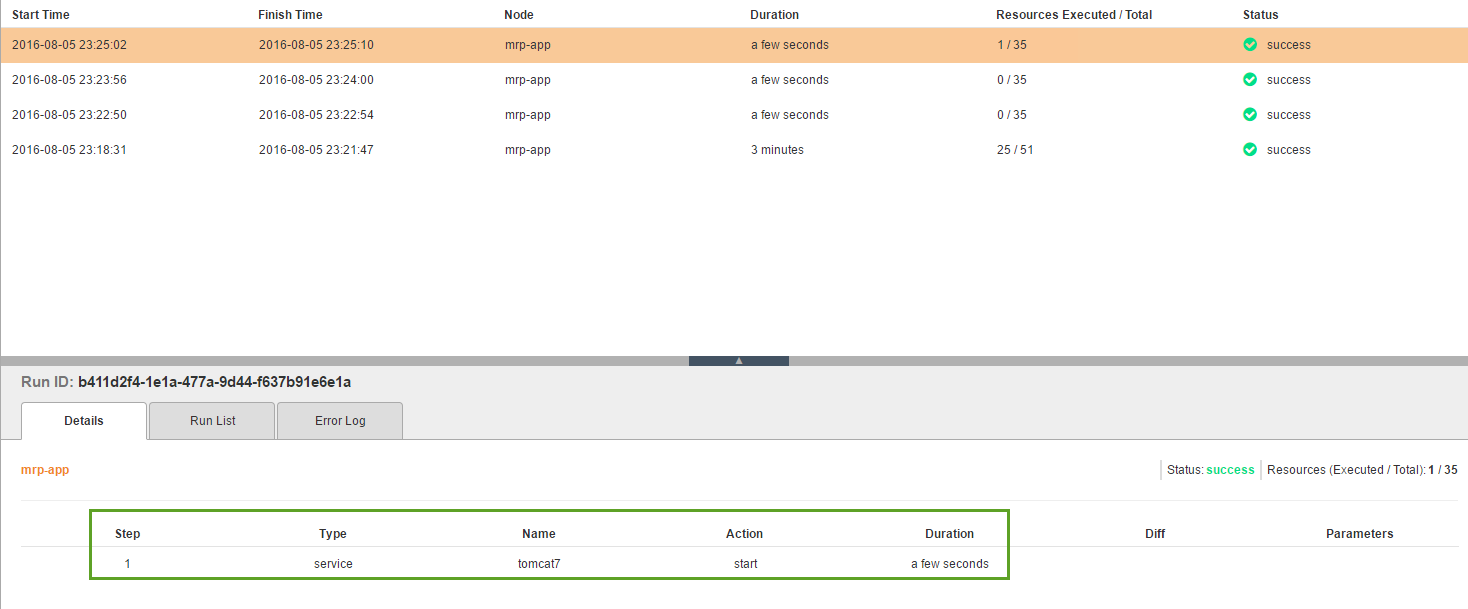
Go to the Chef Manage web site and click on the Reports tab. This will take you to the dashboard where you can see statistics about your deployments.
Click Run History.
Observe that the node has a first successful run that executed 26/55 resources, and possibly additional runs that executed 0/39 resources. This is because the chef client installed on the server runs every 60 seconds and checks for environmental discrepancies.

-
Click on the run that shows 1/39 resources executed. In the Details tab, it shows that the action executed was starting tomcat7.
-
Reload the MRP application site, and you should see the site successfully load.
Next steps
In this hands-on lab you explored some of the new features and capabilities of deploying the MRP App via Chef Server in Azure Stack. You also learned about Marketplace Syndication between Azure and Azure Stack. This hands-on lab was designed to point out new features, discuss and describe them, and enable you to understand these features as part of the DevOps Lifecycle.
If you’re interested in learning more about DevOps tooling on Azure Stack, check out these Hands-On-Labs: