Azure Orchestration with SaltStack
Salt is a configuration management software and remote execution engine. It is also used to orchestrate software-defined datacenters, create CI/CD pipelines, manage servers configurations, create event-driven tasks, schedule jobs, and provision Cloud.
Salt is Open Source, portable and python-based. It is similar to tools like Ansible, Puppet, and Chef. It can interact with some private and public cloud systems like Azure.
In this practice lab, we will use Salt in order to provision Azure servers.
DevOps MPP Course Source
- This lab is used in course DevOps200.2x: Infrastructure as Code - Module 4.
Pre-requisites:
- An Azure Subscription
Lab Tasks:
- Provision and Configuring Azure Infrastructure Using SaltStack
- Install and Configure Azure CLI
- Create and Configure Salt Master
- Create a Salt Minion
- Provisioning an Azure VM Using Salt
Estimated Lab Time:
- approx. 90 minutes
Task 1: Provision and Configure Azure Infrastructure Using SaltStack
Installing Azure CLI
-
If you are using Windows, you can install Azure CLI with its MSI.
-
If you are using Linux or MacOs, you should have Python installed. You can execute the following Curl command:
curl -L https://aka.ms/InstallAzureCli | bash
- You can also use Ubuntu on Windows and use these commands:
echo "deb [arch=amd64] https://packages.microsoft.com/repos/azure-cli/ wheezy main" | \
     sudo tee /etc/apt/sources.list.d/azure-cli.list
sudo apt-key adv --keyserver packages.microsoft.com --recv-keys 417A0893
sudo apt-get install apt-transport-https
sudo apt-get update && sudo apt-get install azure-cli
- In order to use Azure CLI, you should start by logging in:
az login
Task 2: Create and Configure Salt Master
- Let’s start by creating an Azure Resource Group
az group create --name saltGroup --location eastus
- We are going to create a public (frontend) subnet that will be used for the Master.
az network vnet create \
    --resource-group saltGroup \
    --name saltVnet \
    --address-prefix 10.0.0.0/16 \
    --subnet-name masterSubnet \
    --subnet-prefix 10.0.1.0/24
- You can list the subnet configuration using:
az network vnet subnet list --resource-group saltGroup --vnet-name saltVnet
- The next step is creating a DNS name for the master:
az network public-ip create \
    --resource-group saltGroup \
    --name masterPublicIP \
    --dns-name mysaltmaster
- You may notice that this is the created server name:
mysaltmaster.eastus.cloudapp.azure.com
- Let’s create a Network Security Group for the master VM:
az network nsg create \
    --resource-group saltGroup \
    --name masterSecurityGroup
- To inspect the Security Group, you can type:
az network nsg list --resource-group saltGroup
- Salt Master communicates with Minions using the ports 4505 and 4506 (TCP), that’s why we should make these ports accessible. In order to access our machine using SSH, we will also allow the ports 22 to be open.
These are the different commands we need to execute to keep these ports open:
az network nsg rule create \
    --resource-group saltGroup \
    --nsg-name masterSecurityGroup \
    --name masterSecurityGroupRuleSSH \
    --protocol tcp \
    --priority 1000 \
    --destination-port-range 22 \
    --access allow
az network nsg rule create \
    --resource-group saltGroup \
    --nsg-name masterSecurityGroup \
    --name masterSecurityGroupRule4505 \
    --protocol tcp \
    --priority 1001 \
    --destination-port-range 4505 \
    --access allow
az network nsg rule create \
    --resource-group saltGroup \
    --nsg-name masterSecurityGroup \
    --name masterSecurityGroupRule4506 \
    --protocol tcp \
    --priority 1002 \
    --destination-port-range 4506 \
    --access allow
- Since we are going to create a VM for the master, we will create a public IP address that will be associated with the virtual NIC.
az network nic create \
    --resource-group saltGroup \
    --name masterNic \
    --vnet-name saltVnet \
    --subnet masterSubnet \
    --public-ip-address masterPublicIP \
    --network-security-group masterSecurityGroup
- Finally, let’s create an Ubuntu machine for the Salt master:
az vm create \
    --resource-group saltGroup \
    --name masterVM \
    --location eastus \
    --nics masterNic \
    --image UbuntuLTS \
    --admin-username azureuser \
    --generate-ssh-keys
- Now we can use SSH to access this VM:
ssh azureuser@mysaltmaster.eastus.cloudapp.azure.com
Salt is compatible with some operating systems. Depending on your Operating System, follow the instructions in [the official documentation](https://docs.saltstack.com/en/latest/topics/installation/index.html).

If you are using your localhost, you can execute remote tasks on an Azure infrastructure or create a Salt minion, but we are going to use a master VM created on our Azure cloud.
- To install Salt minion on a Windows VM, you can select one of the latest builds in this list:
- Python2 x86: Salt-Minion-2017.7.4-x86-Setup.exe
- Python2 AMD64: Salt-Minion-2017.7.4-AMD64-Setup.exe
- Python3 x86: Salt-Minion-2017.7.4-x86-Setup.exe
- Python3 AMD64: Salt-Minion-2017.7.4-AMD64-Setup.exe
-
You can get more details about installing a Salt minion on a Windows VM in the official documentation.
-
In this practice lab, we are using an Ubuntu VM; we will install a Salt master and provision the Azure infrastructure using it.
apt-get install salt-cloud
apt-get install salt-master
- After the installation, uncomment the following lines from
/etc/salt/master
file_roots:
  base:
    - /srv/salt
- The next step is creating the folder
/srv/salt:
mkdir /srv/salt
- In order to use Salt Cloud, you need to create an Azure provider configuration. Open
/etc/salt/cloud.providers.d/azure.confand add these lines:
my-azure-provider:
  driver: azure
  subscription_id: 332b184f-faaf-455d-a1d8-0110e1131ab
  certificate_path: /etc/salt/azure.pem

  minion:
    master: mysaltmaster.eastus.cloudapp.azure.com
-
You need to adjust this configuration file to your case (subscription id, master DNS ..).
-
Furthermore, we need to create the .pem file. Execute the following command on your master VM:
openssl req -x509 -nodes -days 365 -newkey rsa:1024 -keyout /etc/salt/azure.pem -out /etc/salt/azure.pem
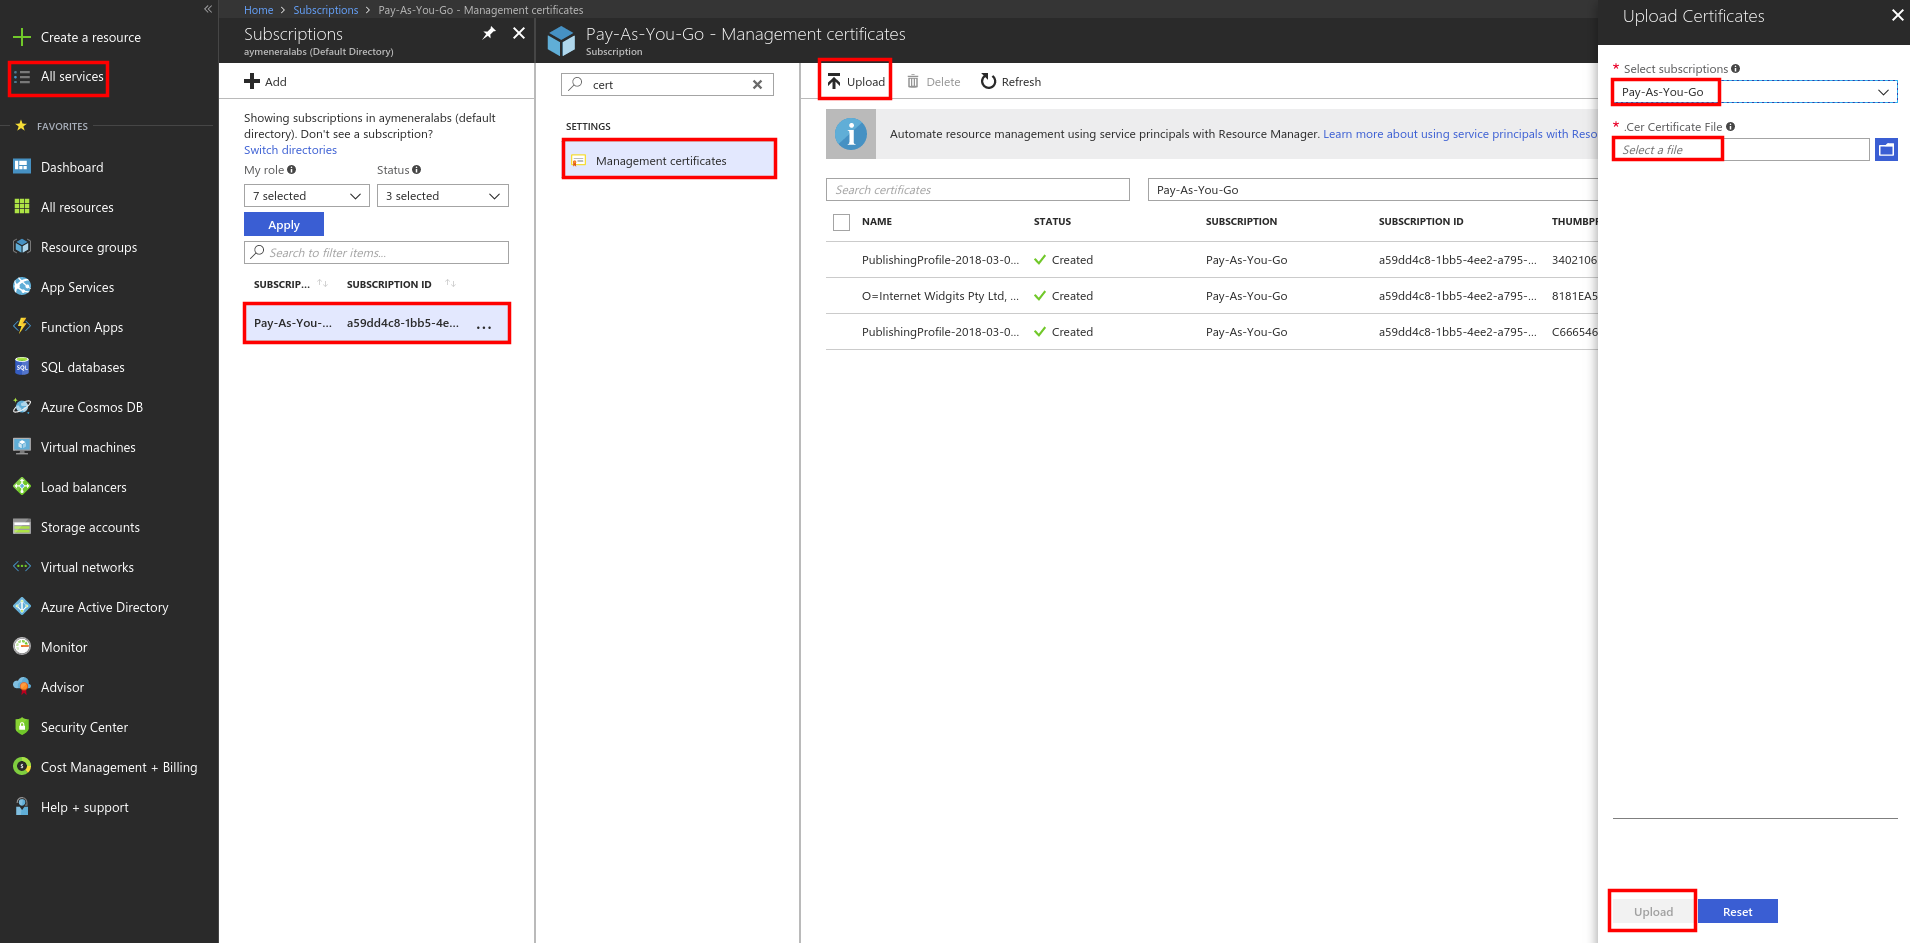
- Create the .cer file using the following command:
openssl x509 -inform pem -in /etc/salt/azure.pem -outform der -out /etc/salt/azure.cer
- To allow Saltstack to manage Azure resources, we need to upload the .cer file to the Azure subscription manager. Find this in the list of all services then click on your subscription id and choose to upload a new certificate:
Task 3: Create a Salt Minion
- Now that we have a Salt master installed in Azure VM, we can create a minion VM and start provisioning it with Salt.
If you need the minion to be a private VM, you can use the same steps we used to create a public virtual network and create a private subnet instead of a public one. The minion machine will be attached to this private subnet.
# The virtual network
az network vnet subnet create \
  --name minionSubnet \
  --address-prefix 10.0.2.0/24 \
  --vnet-name saltVnet \
  --resource-group saltGroup

# The network security group
az network nsg create \
    --resource-group saltGroup \
    --name minionSecurityGroup

# The network security group rule
az network nsg rule create \
    --resource-group saltGroup \
    --nsg-name minionSecurityGroup \
    --name minionSecurityGroupRuleSSH \
    --protocol tcp \
    --priority 1000 \
    --destination-port-range 22 \
    --access allow

# The virtual NIC
az network nic create \
    --resource-group saltGroup \
    --name minionNIC \
    --subnet minionSubnet \
    --private-ip-address 10.0.2.4 \
    --vnet-name saltVnet
- In this example, we are going to create a public minion VM. If you want to use a minion public machine, you can create a public subnet:
az network vnet subnet create --name minionSubnet --address-prefix 10.0.2.0/24 --vnet-name saltVnet --resource-group saltGroup
az network public-ip create --resource-group saltGroup --name minionPublicIP --dns-name mysaltminion
az network nsg create --resource-group saltGroup --name minionSecurityGroup
az network nsg rule create --resource-group saltGroup --nsg-name minionSecurityGroup --name minionSecurityGroupRuleSSH --protocol tcp --priority 1000 --destination-port-range 22 --access allow
az network nic create --resource-group saltGroup --name minionNic --vnet-name saltVnet --subnet minionSubnet --public-ip-address minionPublicIP --network-security-group minionSecurityGroup
- Let’s go back to the master VM and create a configuration for the minion. Create a new Salt profile under
/etc/salt/cloud.profiles.d/azure.confand add a profile for an Ubuntu machine:
azure-ubuntu:
  provider: my-azure-provider
  image: 'b39f27a8b8c64d52b05eac6a62ebad85__Ubuntu-16_04-LTS-amd64-server-20171121.1-en-us-30GB'
  size: Small
  location: 'East US'
  ssh_username: azureuser
  ssh_password: eb20c74f281de8c746307e46fdf15103
  media_link: 'https://mysaltstorage.blob.core.windows.net/vhds'
  virtual_network_name: saltVnet
  subnet_name: minionSubnet
  security_group: minionSecurityGroup
  slot: production
- Before executing the Salt Cloud tool to enroll the VM, we need to create a storage:
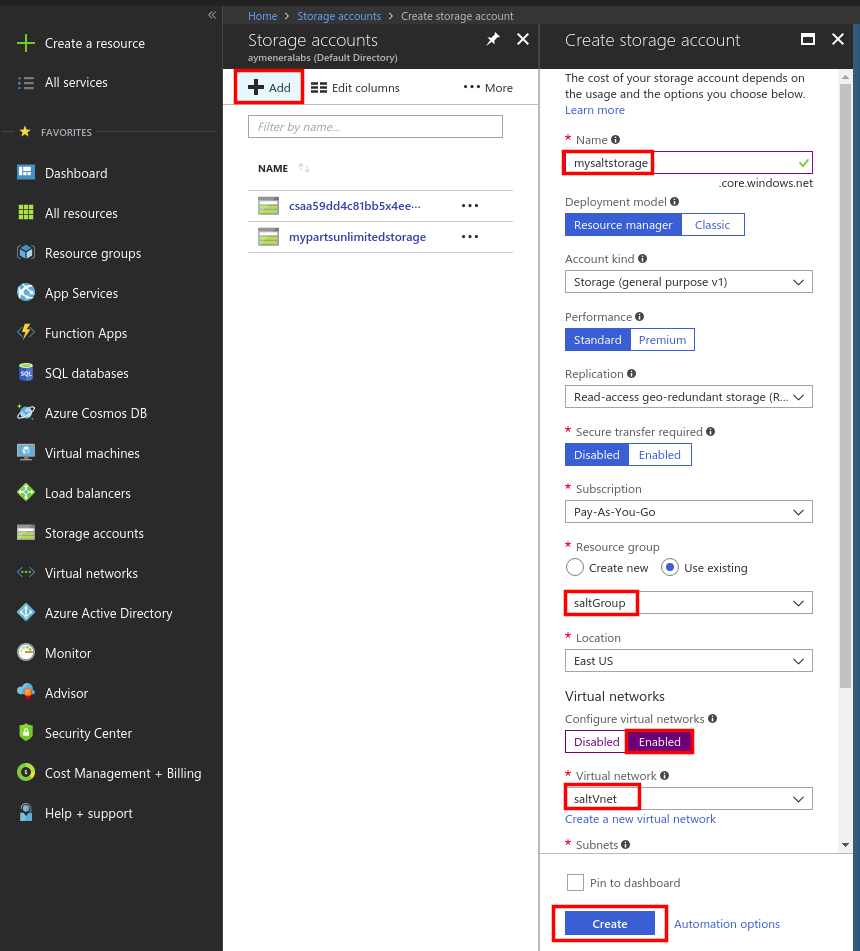
- Now we can use Salt Cloud to create a new VM:
salt-cloud -p azure-ubuntu myMinionVM
-
After creating the minion VM, type
salt-keyon the master terminal. Salt-key is a management tool used for authentication of minions on a master.If you see that your minion has the status unaccepted:
Accepted Keys:
Denied Keys:
Unaccepted Keys:
myMinionVM
Rejected Keys:
Type the following command to authenticate the minion:
salt-key -a myMinionVM
- Finally, type
salt myMinionVM test.pingto verify if the authentication was done correctly.
Task 4: Provision an Azure VM Using Salt
Using Saltstack, we can provision, install and configure any software on an Azure VM. The Salt master is responsible for controlling minion VMs and remote executing software installation and configurations on these machines.
In this example, we are going to install Nginx on the minion VM.
- Let’s start by creating a state file
/srv/salt/nginx/init.sls. This is the YAML configuration file that Salt will use to install Nginx on a remote minion:
nginx:
  pkg:
    - installed
  service.running:
    - watch:
      - pkg: nginx
-
In Salt, the top file should contain a mapping between groups of machines on a network and the configuration roles that should be applied to them. We are going to use this file to tell Saltstack to apply the Nginx SLS file to the “myMinionVM” VM.
This is how a basic configuration looks like:
base:
  'myMinionVM':
    - nginx
- This file is located under
/srv/saltand it’s calledtop.sls:
/srv/salt/top.sls
- Now we can apply a high state to check if all minions satisfy the description provided if the top.sls file and execute the new state files:
salt '*' state.highstate
The high state command will install Nginx on the minion VM.
- We can also tell Salt to restart Nginx on the remote machine when some configuration files changes.
e.g:
- /etc/nginx/nginx.conf
- /etc/nginx/sites-available/default
In this case, this is how our init.sls file will look like:
nginx:
  pkg:
    - installed
  service.running:
    - watch:
      - pkg: nginx
      - file: /etc/nginx/nginx.conf
      - file: /etc/nginx/sites-available/default
Summary
In this practice lab, we have seen how using Salt with Azure simplifies and automates provisioning of VMs. Other improvements could be added to what we created, like security, user management, and configuration management, but since our system is scalable, adding new features does not require starting another one from scratch.