Setup Jenkins in Azure
In this lab, we will set up a Jenkins Master that will be used for the Parts Unlimited MRP project. Jenkins is an open source automation server that provides capabilities for building, deploying and automating any project.
This lab will configure the pre-requisites on the Jenkins Master. If you are familiar with Jenkins, and already have a Jenkins Master, you may want to skip to the next lab for Continuos Integration with Jenkins.
DevOps MPP Course Source:
- This lab is used in course DevOps200.3x: Continuous Integration and Continuous Deployment - Module 1.
Pre-Requisites:
- An active Azure Subscription. If you do not have an Azure Subscription, you can sign up for a trial subscription.
- A tool to connect to a Linux Virtual Machine (VM) using Secure Shell (SSH). In this tutorial we will use the Putty SSH client.
Lab Tasks:
- Create Jenkins Master in Azure using Ubuntu VM.
- Configure Jenkins Master.
- Configure Jenkins by installing JDK and Gradle.
Estimated Lab Time:
- Approx. 60 minutes.
Task 1: Create Jenkins Master in Azure using Ubuntu VM
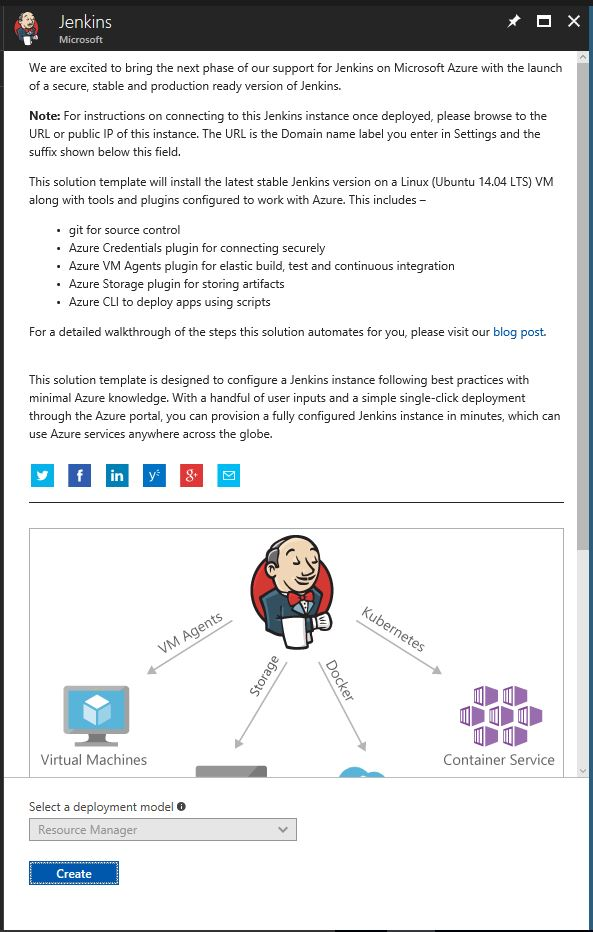
We will use the pre-configured VM image that is available on the Azure Marketplace to deploy our Jenkins master.
1. Deploy the Jenkins Master to Azure by choosing the Deploy to Azure button below, and sign into Azure Portal. Alternatively, in Azure Portal, choose New and search for the Jenkins image from Microsoft.


-
Select the Create button to start the new resource configuration.
-
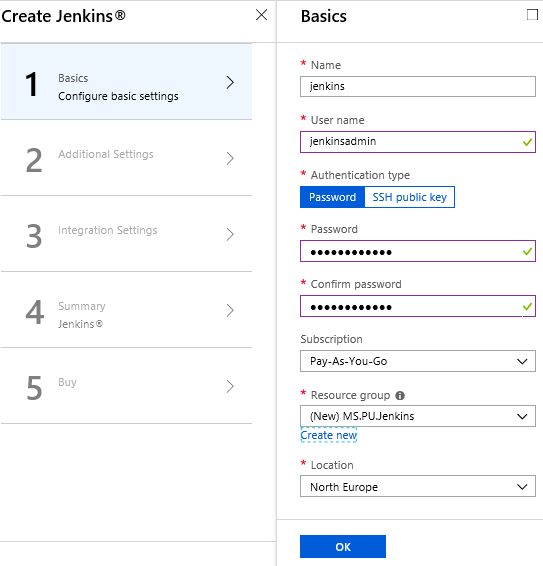
Basics
- Enter
jenkinsas the Name for the resource. - Create a User name, for example
jenkinsadmin. - Leave the Authentication type set to
Password. - Type a Password for the user account.
- Confirm your password.
- Select a Subscription.
- Under Resource group, select Create new, and enter
MS.PU.Jenkinsas the Name of the Resource Group. - Select a Location to deploy your resource, for example
West Europe. - Choose the OK button to go to the next step.
- Enter
-
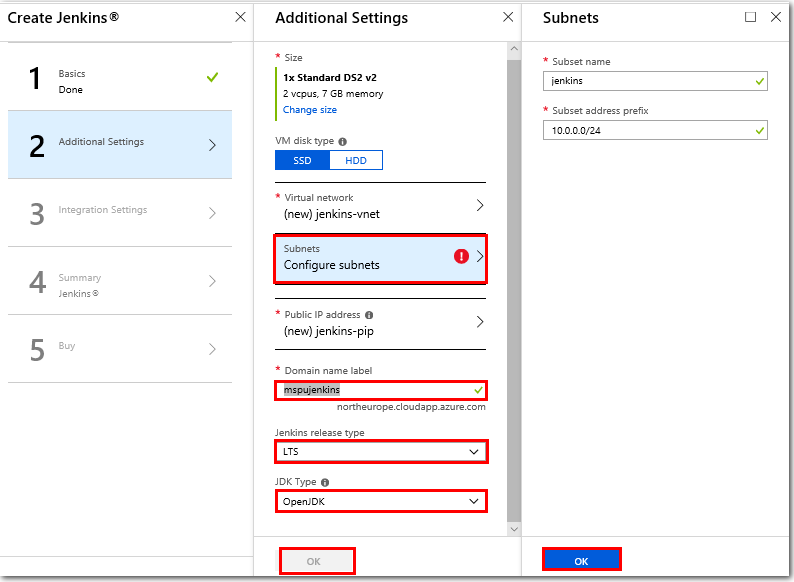
Additional Settings
- Leave the Size, and Virtual network settings at their default values.
- Select Subnets - Configure subnets, to open the Subnets blade.
- In the Subnets blade, leave the Subnets name and Subnet address prefix options at their default values. Choose the OK button to close the Subnets blade.
- Leave the Public IP address option at the default value.
- Enter a unique Domain name label, for example
mspujenkins. - Leave the Jenkins release type set at
LTS. - Using the dropdown, choose
OpenJDKas the JDK Type. - Select the OK button.
-
Integration Settings
- Leave the options listed in the Jenkins Integration Settings blade at their default values.
- Choose the OK button to proceed.

-
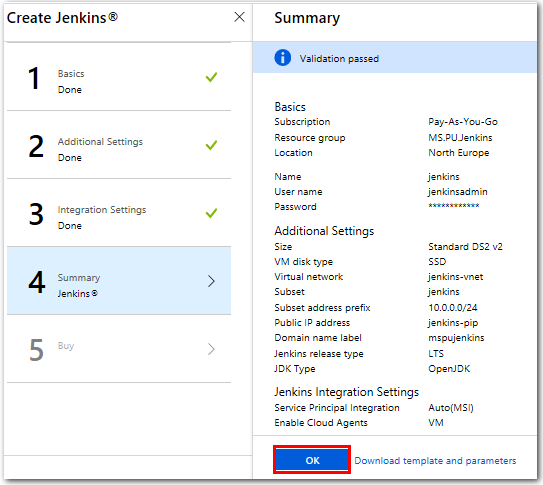
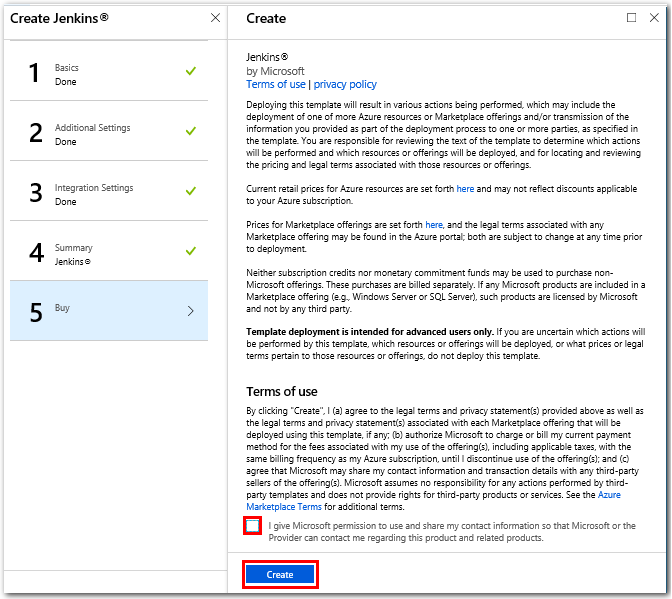
Summary
- After the validation has passed, review the information and choose OK.
-
Buy
- Check the checkbox to agree to the Terms of use.
- Select the Create button to start the deployment.
2. Wait until the deployment complete. It may take some minutes.
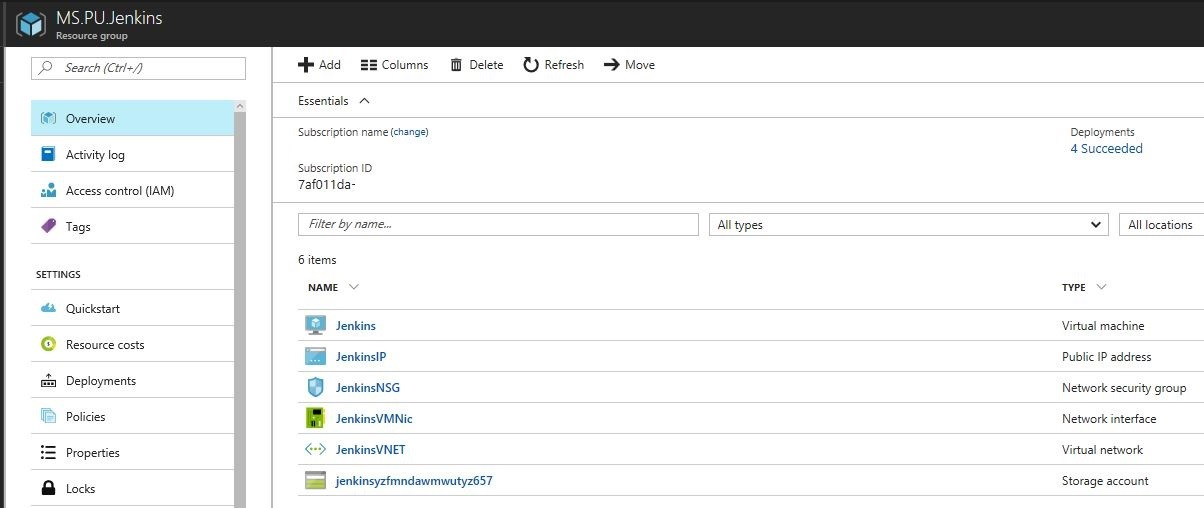
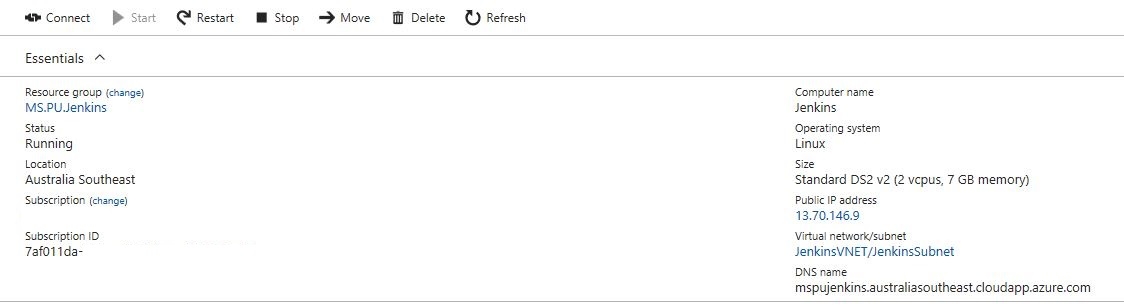
3. Obtain the Public IP of the Jenkins master VM.
- In Azure Portal, find the Resource Group you created in the previous step.
- Select the jenkins VM from the resources listed under the Resource Group.
- On the Overview tab, find the DNS Name and Public IP address values for the Jenkins VM.
- Make a note of the DNS Name (FQDN) and Public IP address values for the Jenkins VM.
4. SSH into the Jenkins Master VM
- Open the Putty SSH client to create a new SSH connection session.
- Set the Host Name as the Jenkins VM DNS Name (FQDN) value that you noted previously, with the User name as a prefix (i.e.
jankinsadmin@FQDN). For example,jenkinsadmin@mspujenkins.australiasoutheast.cloudapp.azure.com.
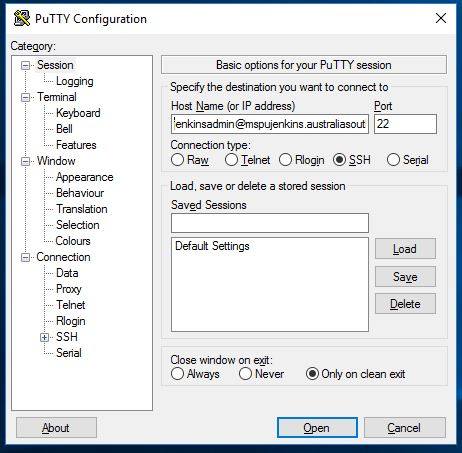
- Expand the Connection > SSH menu on the left, and choose Tunnels.
- Under Add new forwarded port, enter
8080into the Source port text entry field, andlocalhost:8080into the Destination text entry field. - Choose Add.
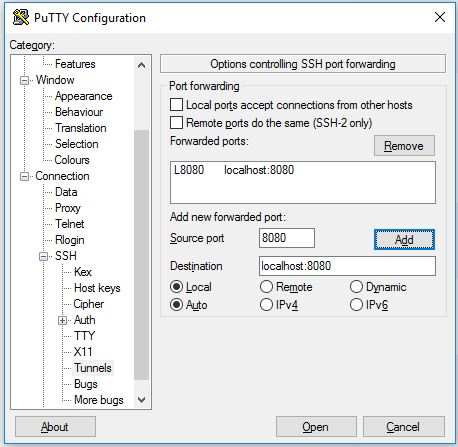
- Select Open.
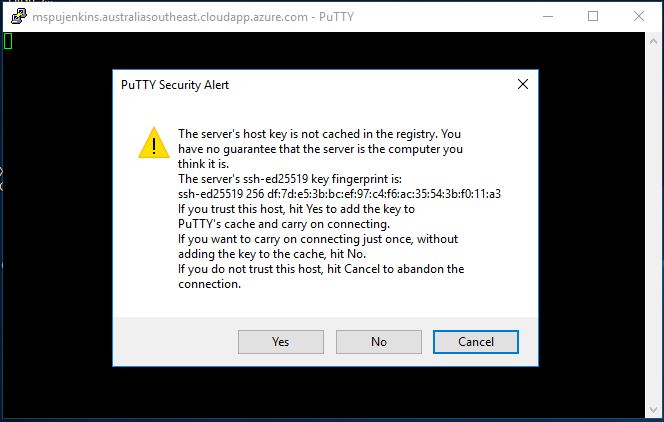
- Choose Yes on the Security Alert.
- Type the password that you specified for
jenkinsadminwhen you deployed the VM to Azure. - Keep this SSH session open until we finish this lab. Do not close the Putty application.
NOTE: We will use a Tunnel to allow access to Jenkins from a Public IP. By default, Jenkins is configured to block Public IP access for security reasons. This tutorial will not cover how to configure a secure Jenkins environment for Public access. Please check the Jenkins documentation for details on how to configure Jenkins with security certificates.
Task 2: Configure Jenkins Master
In this task, we will perform the basic configuration of the Jenkins Master Server and install the necessary plugins used for Continuous Integration (CI).
1. Obtain the initial admin password.
- Using the SSH session that you opened at the end of Task 1, type the following command to obtain the initial admin password.
sudo cat /var/lib/jenkins/secrets/initialAdminPassword
- Copy the value returned by the command. Keep the SSH session open, we will return to it at the end of this task and labs that follow this lab.
NOTE: To copy from the Putty terminal, select the text you want to copy. To paste, use the mouse right click/ button.
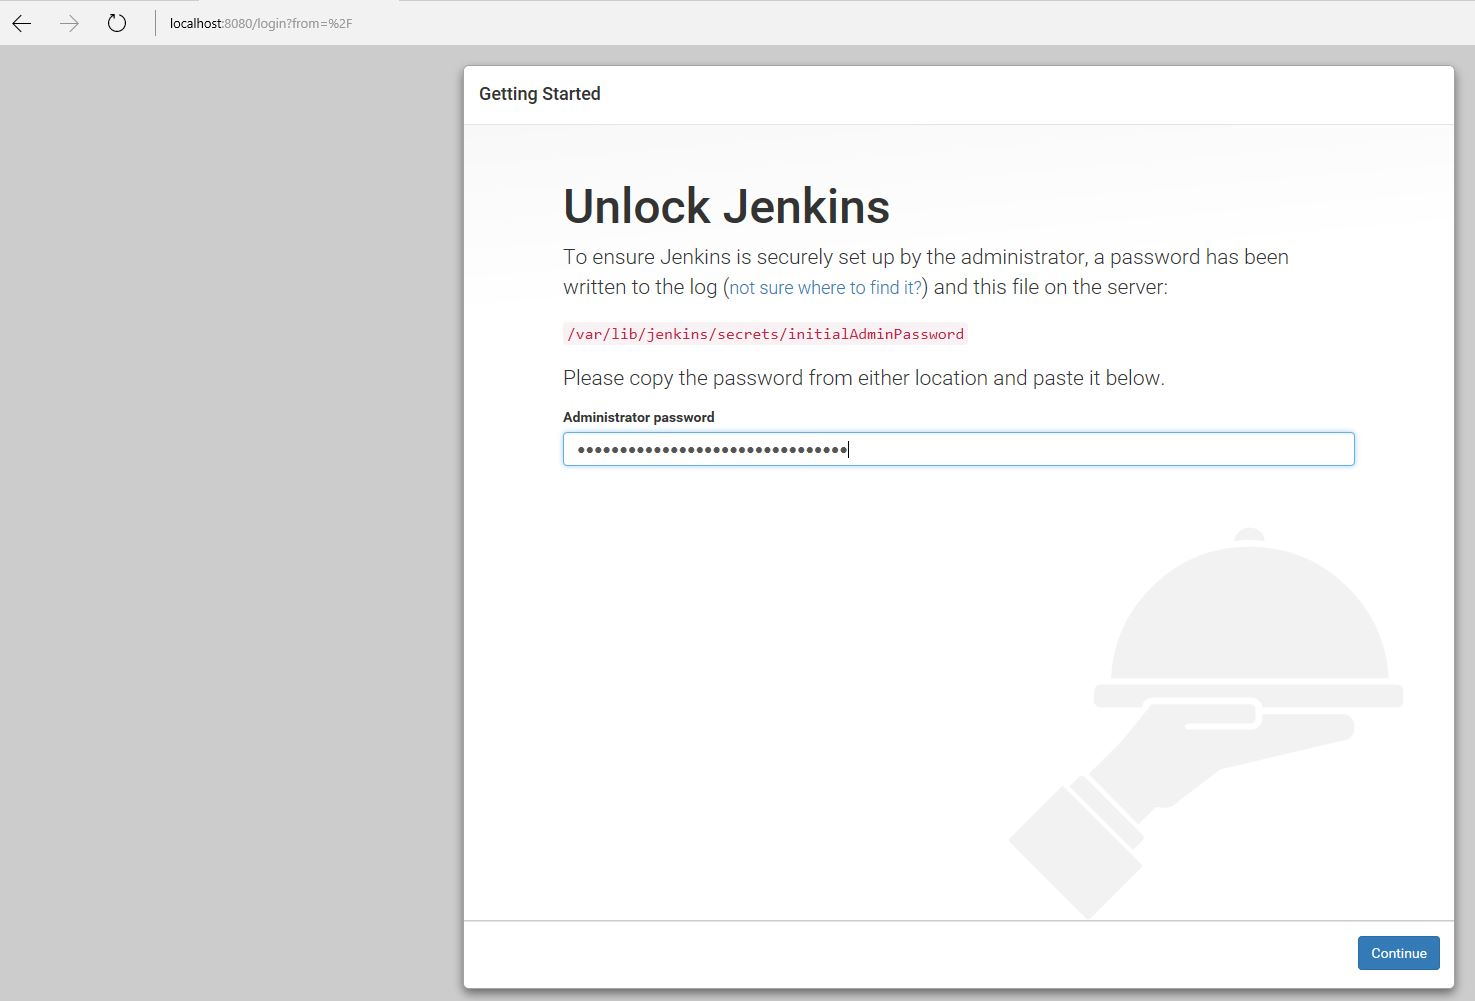
2. Unlock the Jenkins Master.
- With a web browser, navigate to the default page of the Jenkins Master at
http://localhost:8080, using the Tunnel you created.
NOTE: If you did not define a Tunnel in Putty, as specified in Task 1.4, or you have closed Putty, you will get an error from Jenkins when you try to access the default page at http://localhost:8080. If you try to access Jenkins using the Public DNS Name (FQDN), you will also get an error.
- Paste the initial admin password you obtained earlier to unlock your instance of Jenkins, and choose Continue.
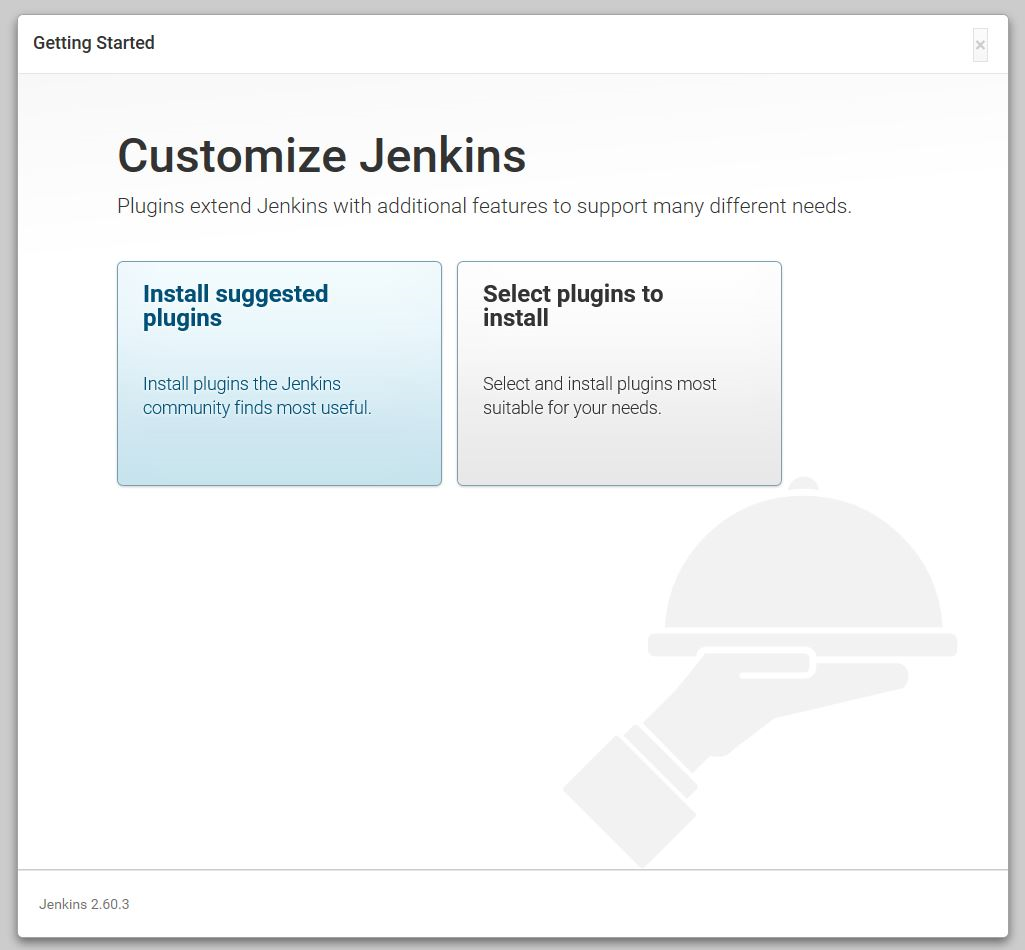
- Select Install suggested plugins, and wait for the plugins to be installed.
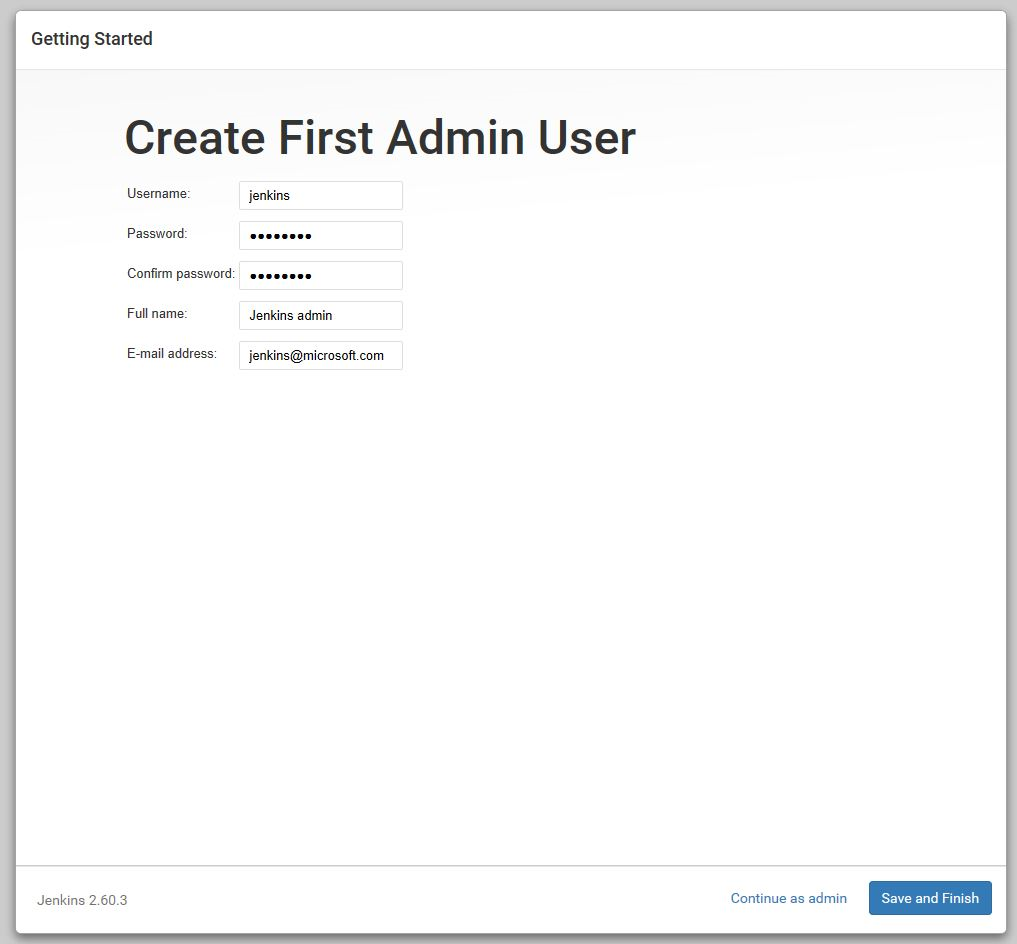
3. Create the first admin user.
-
Enter the following values on the Create First Admin User page:
- Username:
jenkins - Password:
Passw0rd - Full name:
Jenkins admin - E-mail address:
jenkins@microsoft.com
- Username:
-
Choose Save and Continue.
4. Start using Jenkins.
- Select the Start using Jenkins button to login as admin.
- You now have a VM in Azure running Jenkins as a Master.
NOTE: You may need to logon to the Jenkins Master again with the credentials you provided in the previous step (i.e. Username: jenkins, and Password: Passw0rd).
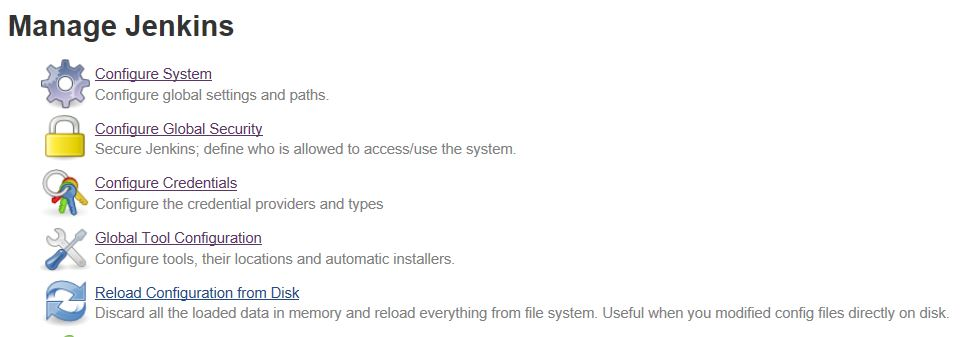
5. Navigate to the Configure System page at http://localhost:8080/configure
- Scroll down to the Jenkins URL field. Verify that the Jenkins URL value is the same as the DNS Name (FQDN) of your Jenkins Master VM. For example,
http://FQDN_of_your_jenkinsmaster/. If the Jenkins URL does not match your Jenkins Master VM FQDN, update the Jenkins URL field with the Jenkins Master VM FQDN.

- Choose Save.
6. Install Git
- Switch to the Putty SSH session you opened in Step 2.1.
- Type the following command:
sudo apt-get install git -y
Task 3: Configure Jenkins by installing JDK and Gradle
There are three tools we will configure to create our pipeline in Jenkins.
1. Configure the JDK
-
In a browser, open the Manage page for the Jenkins Master at
http://localhost:8080/manage. -
Choose the Global Tool Configuration.
-
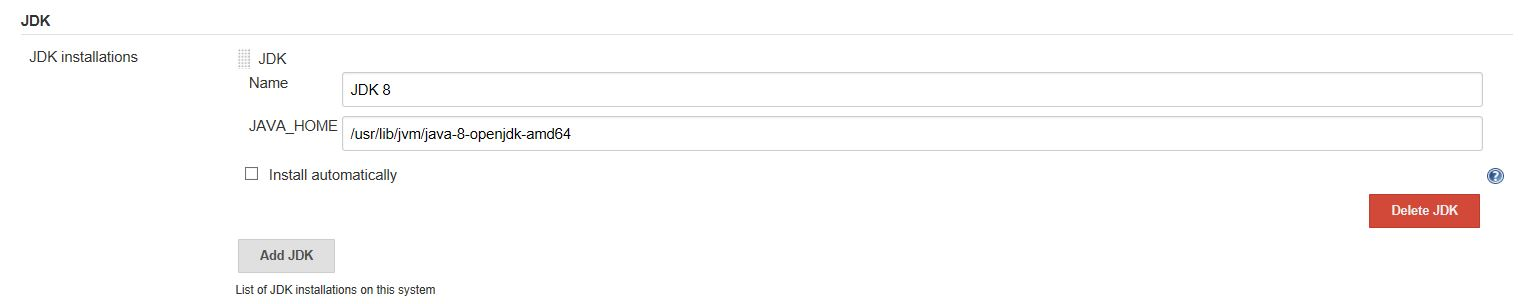
To build the Parts Unlimited MRP application we need to install JDK. Choose Add JDK, and enter the following:
- Type
JDK 8for the Name. - Un-check the box Install automatically.
- Set JAVA_HOME to
/usr/lib/jvm/java-8-openjdk-amd64
- Type
2. Configure Gradle.
Gradle will be used to build the Parts Unlimited MRP application. You could use Maven or Ant as well, and the configuration would be similar.
- In the Global Tool Configuration, scroll down and select Add Gradle, and enter the following:
- Type
Gradlefor the Name.- Verify that the Install automatically box is checked
- Select the latest version of Gradle from the dropdown list (currently
Gradle 5.2.1).
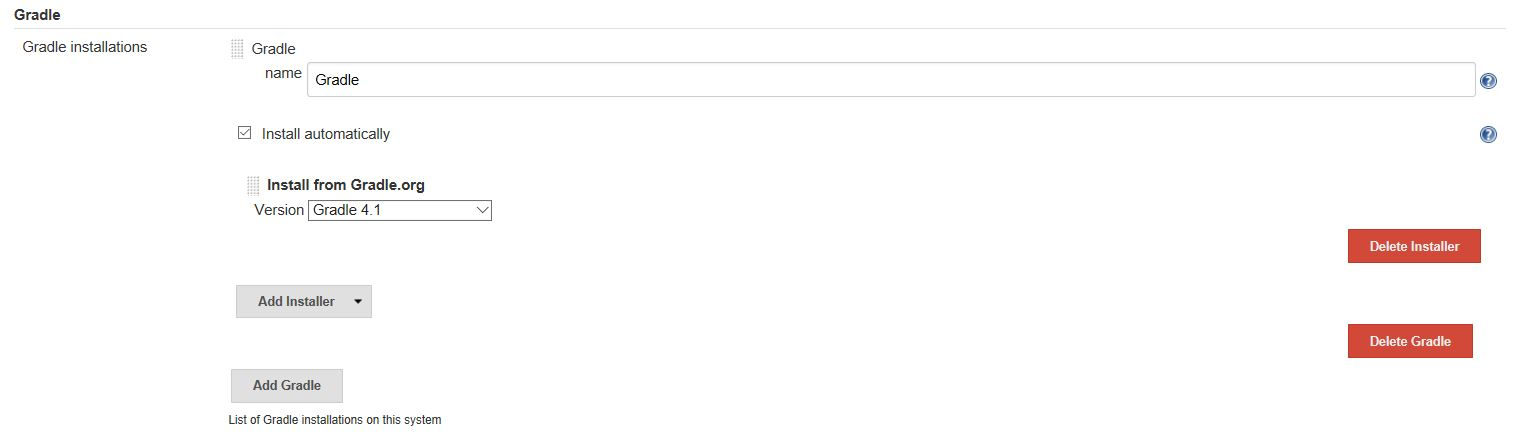
- Choose Save, at the bottom of the page.
Summary:
In this lab, you learned how to install and configure a Jenkins Master in Azure. You completed the following tasks:
- Created Jenkins Master in Azure using Ubuntu VM.
- Configured Jenkins Master.
- Configured Jenkins by installing JDK and Gradle.
Continuous Feedback - Issues / Questions
If you encounter issues or have questions during this lab, please open an issue on GitHub.
Thanks.