Continuous Deployment with VSTS and VSTS Hosted Agent
In this lab, you will learn how to deploy the Parts Unlimited MRP App in an automated fashion onto a Linux VM using a hosted agent. After this lab, you will have a working, automated build in Azure DevOps (Visual Studio Team Services) that will build, test, and deploy the Parts Unlimited MRP app to a Virtual Machine in Azure.
NOTE: Visual Studio Team Services recently changed its name to Azure DevOps. You will see encounter references to both product names as you step through these lab steps as we update the labs to take account of this update.
Note: If you would like to trigger continuous deployments using a local agent installed on the VM instead of a hosted agent, see this lab.
DevOps MPP Course Source
- This lab is used in course DevOps200.3x: Continuous Integration and Continuous Deployment - Module 4.
Pre-Requisites:
- Completion of the Set up Parts Unlimited MRP with VSTS lab.
- Completion of the lab Continuous Integration with Visual Studio Team Services
- An active Azure Subscription
- An active Visual Studio Team Services (VSTS) account
Lab Tasks:
In this lab, you will work with one machine which will serve as both the deployment agent and the MRP server.
- Provision an MRP machine (Ubuntu VM) in Azure using an ARM template.
- Configure the release definition
- Trigger a build for continuous deployment
Estimated Lab Time:
- approx. 60 minutes
Task 1: Provision an MRP machine (Ubuntu VM) in Azure using an ARM template
-
Instead of manually creating the VM in Azure, we are going to use an Azure Resource Management (ARM) template. Simply click the Deploy to Azure button below and follow the wizard to deploy the machine. You will need to log in to the Azure Portal.


The VMs will be deployed to a Resource Group along with a virtual network (VNET) and some other required resources. You can delete the resource group in order to remove all the created resources at any time.
-
You will need to select a subscription and region to deploy the Resource Group to and supply an admin username, password, and unique name for the machine. The machine will be a Standard D1_V2.
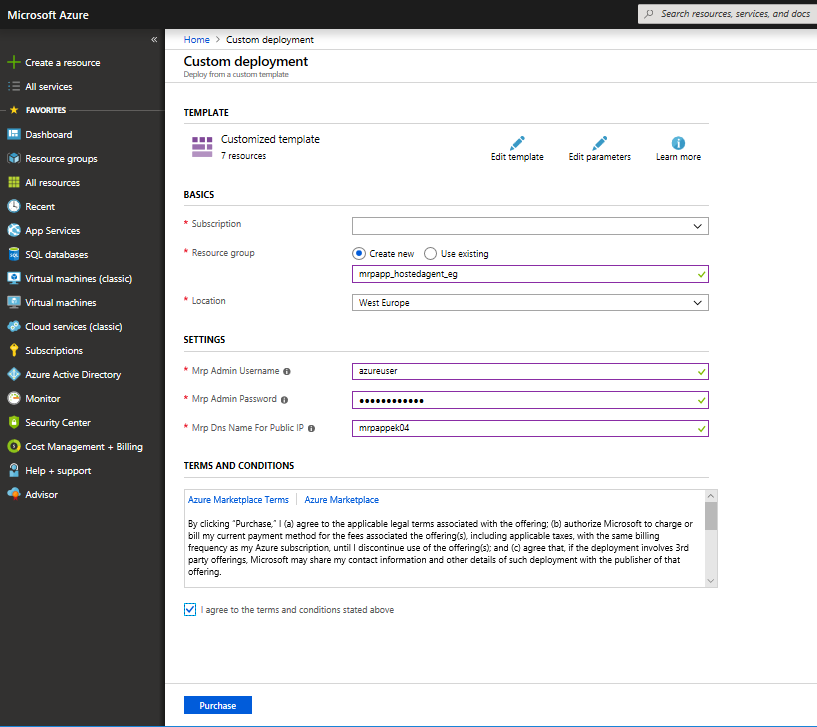
Make sure you make a note of the region as well as the username and password for the machine as these will be required later in the lab when creating our release pipeline. Allow about 10 minutes for deployment and MRP dependency configuration.
-
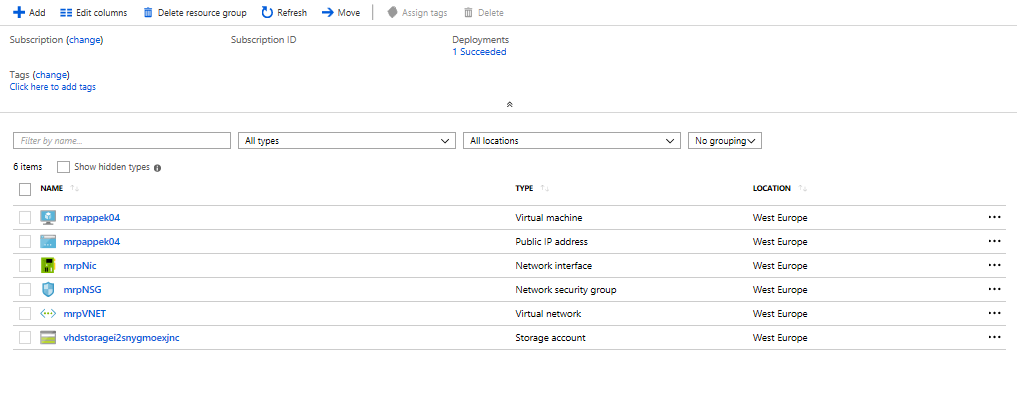
When the deployment completes, you should see the following resources in the Azure Portal:
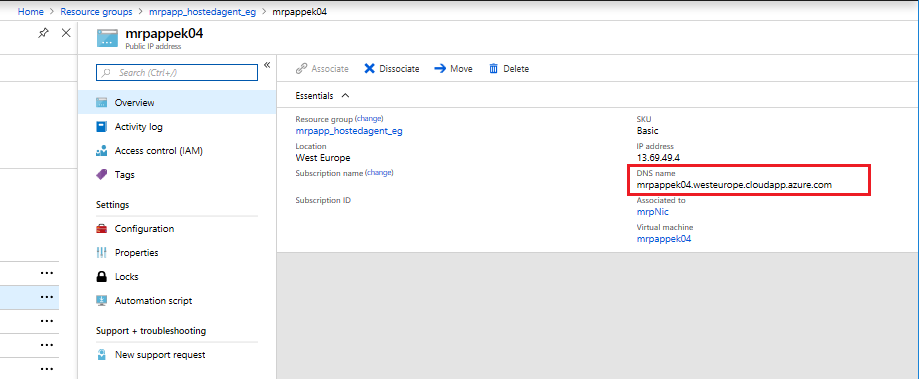
Click on the Public IP Address for your deployment. Then make a note of the DNS name:
Note: The lab requires several ports to be open, such as SSH ports and the Parts Unlimited MRP app port on the partsmrp machine. The ARM template opens these ports on the machine for you. If you have time you can look through the deployment template json and .sh script that are used to deploy the Linux VM and install the dependancies for the MRP app, both are available here
https://github.com/Microsoft/PartsUnlimitedMRP/tree/master/Labfiles/DevOps200.3x-CIandCD/CDwithHostedAgent/env
Task 2: Configure the release definition
Now we will configure a release definition in VSTS that picks up build artifacts and triggers whenever new artifacts are produced.
-
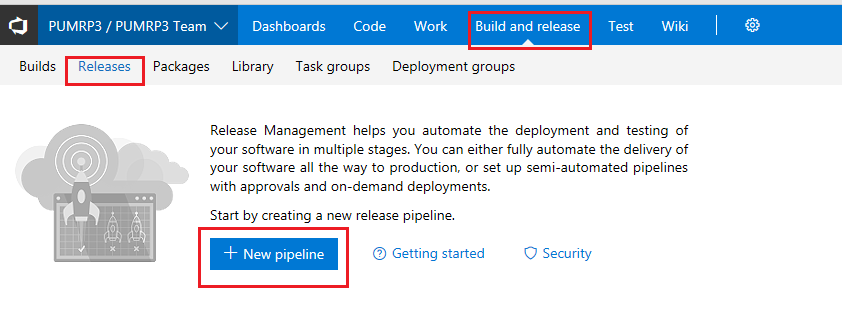
At the homepage of the PartsUnlimitedMRP team project in Visual Studio Team Services, click on the Build and Release and then Release in the upper-left corner of the page. Then, click the + New pipeline button on the home page.
-
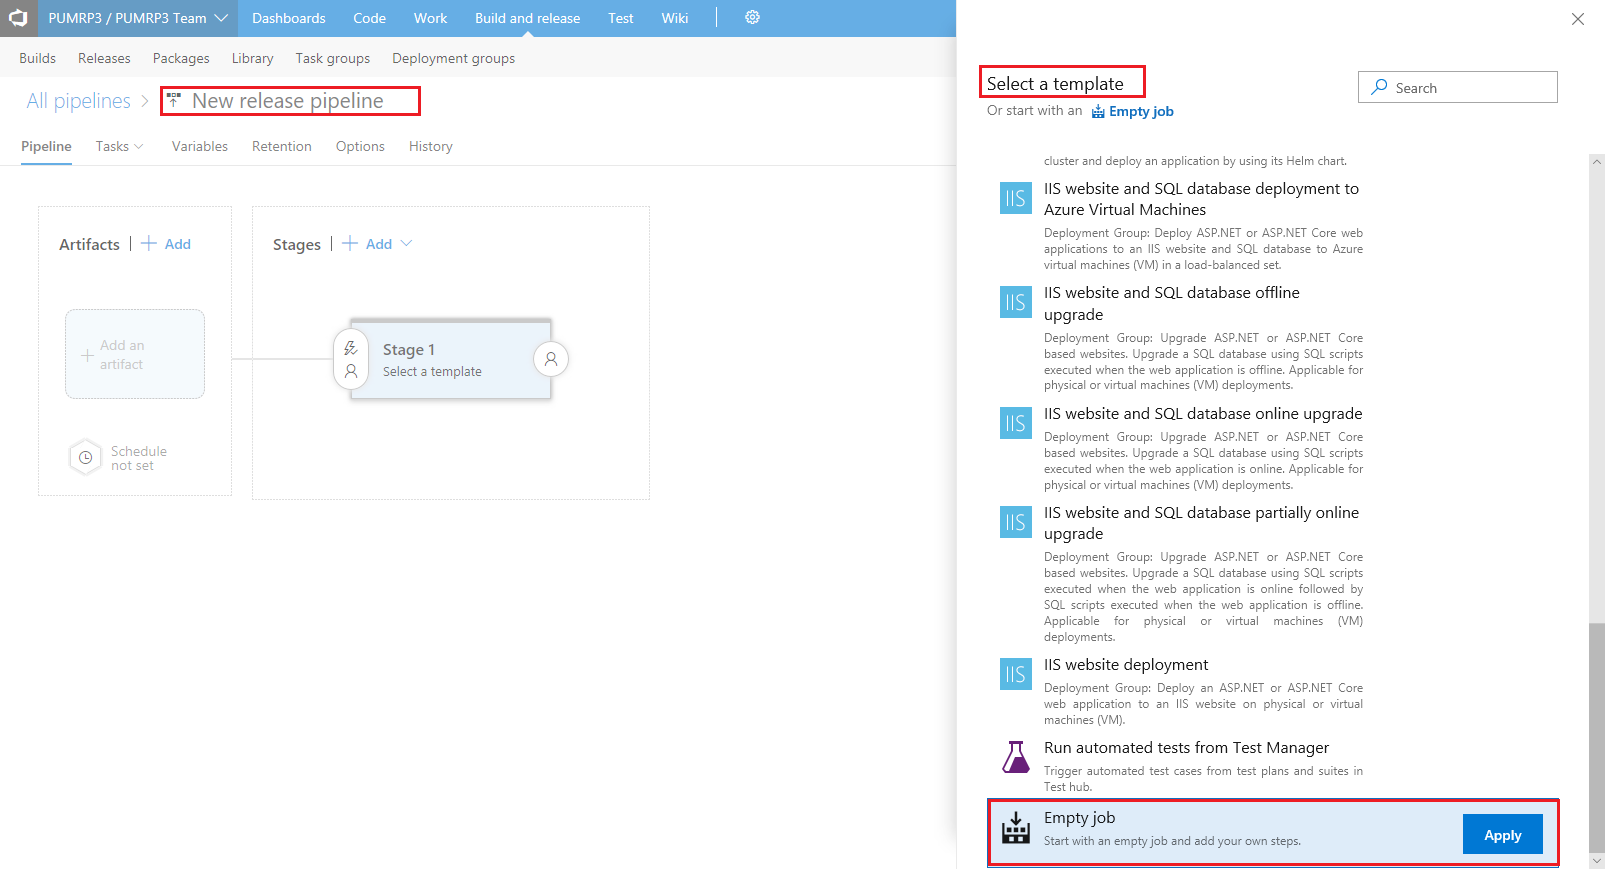
In the New release pipeline dialog, on the Select a template pane choose an empty template then the Apply* button.
-
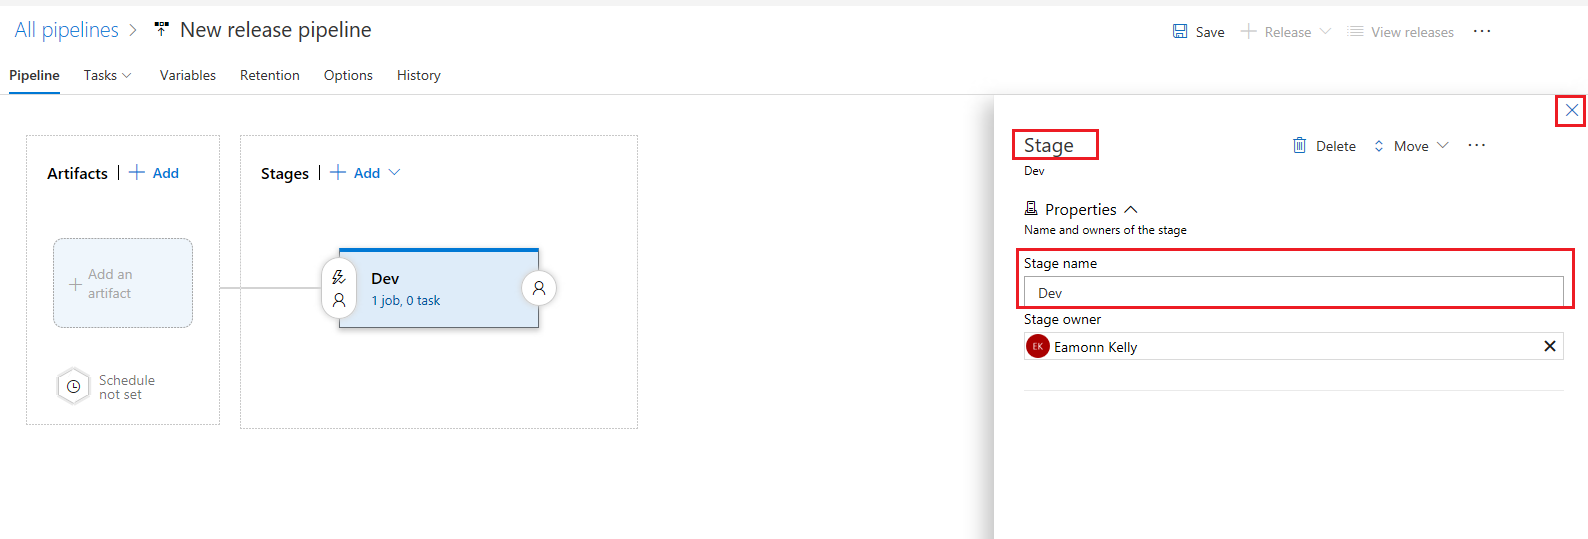
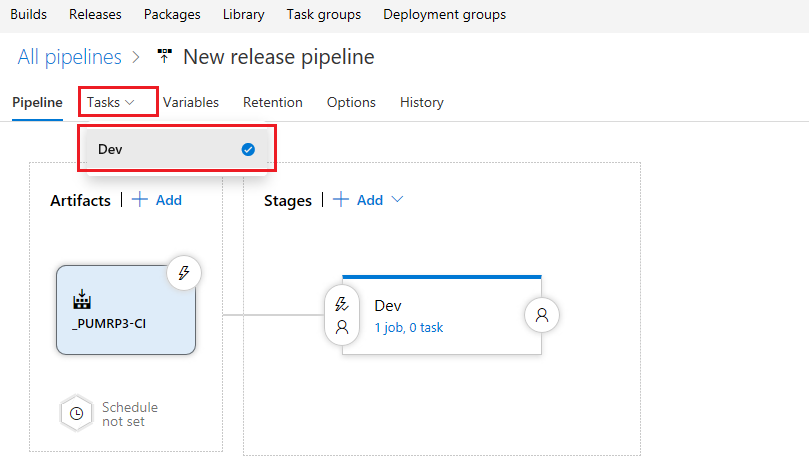
On the Stage pane, change the Stage name to Dev, leave the remainder of the values as they are and click the X in the top right hand corner to close the pane.
-
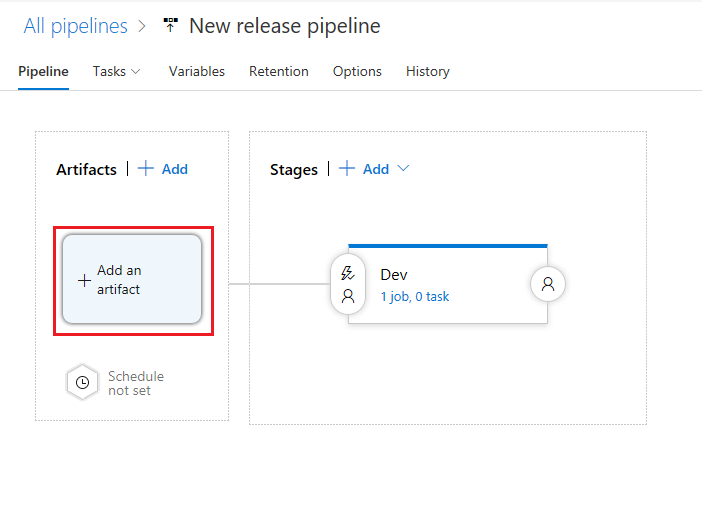
In the Pipeline click + Add an artifact
-
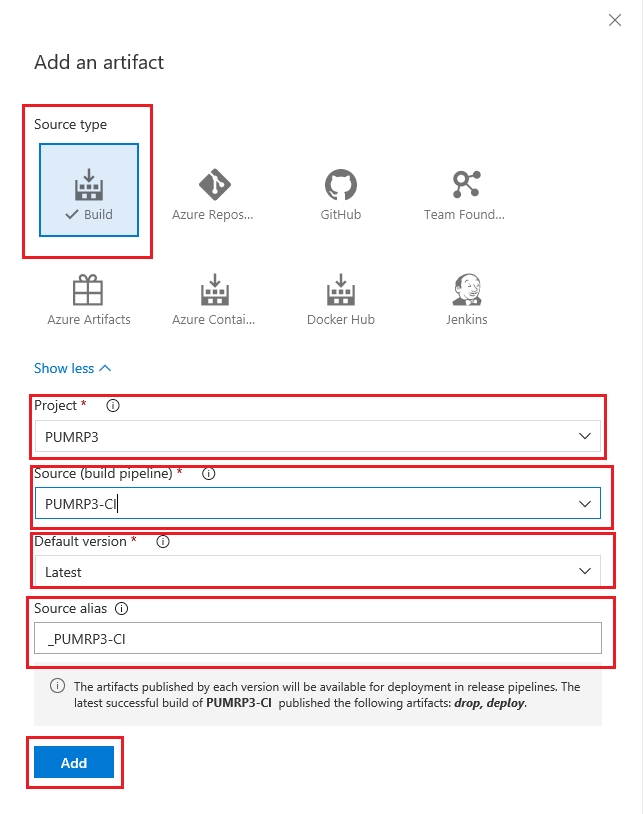
In the Add an artifact pane choose the values then click Add
- Source Type: Build
- Project: < your project name >
- Source (build pipeline): your build pipeline name as should be listed in the drop down, it may be the only or the default value.
- default version: < accept default i.e. Latest>
- Source alias: < accept default i.e. _PUMRP2-CI>
-
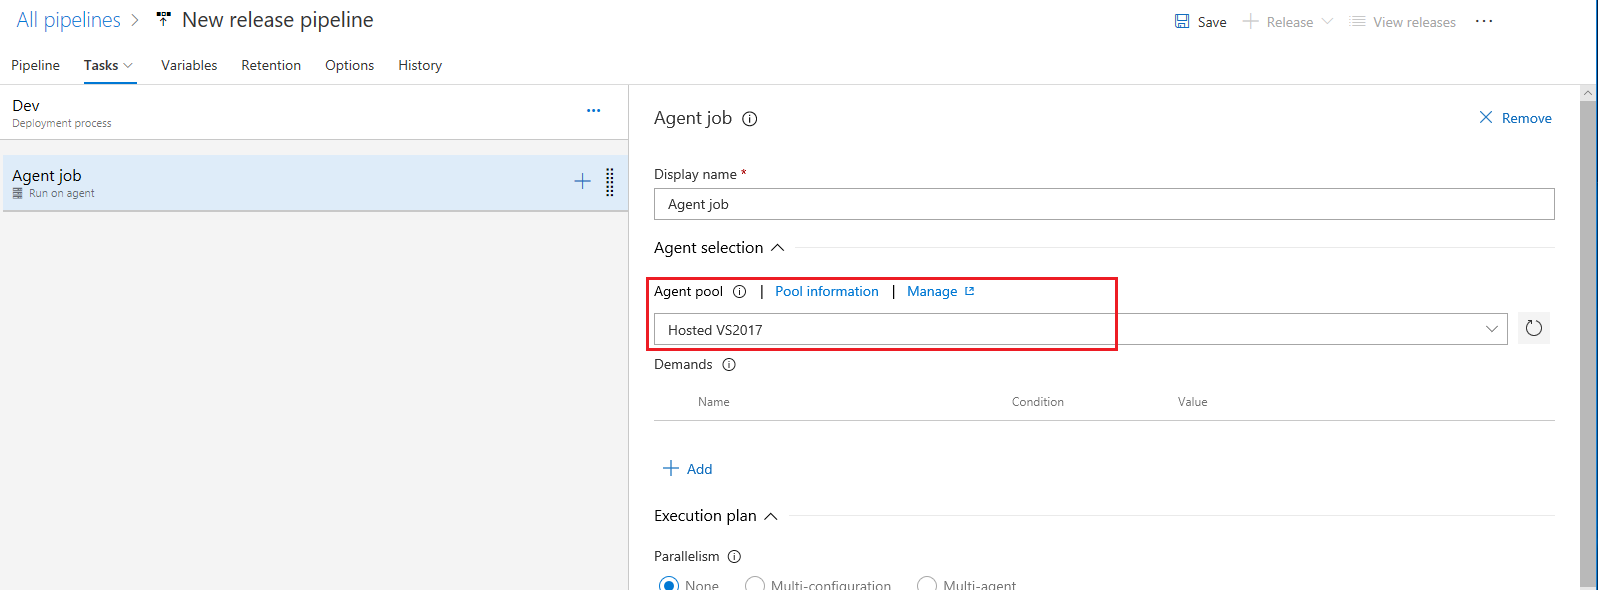
Select Tasks and then Dev
-
On Agent job pane select Hosted VS2017 as the agent, leave the remaining values as their defaults.
-
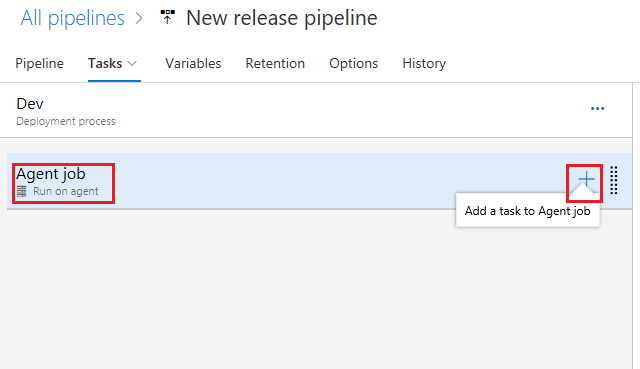
On the Agent job section select the + sign to add a task
-
Add a PowerShell task (under the Utility category) and click Add.
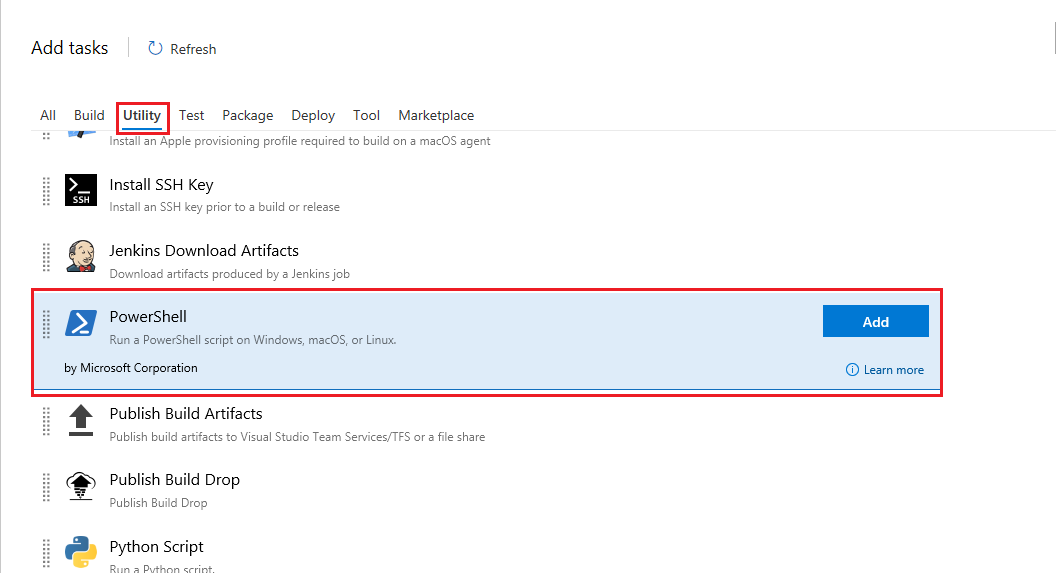
We are deploying a Java based app to a Linux VM, but we are using a Windows based agent for the build and release. So we are using a powershell script to co-ordinate the deployment and config, it will create the files necessary and kick off .sh scripts in the Linux VM to config and deploy the MRP app.
-
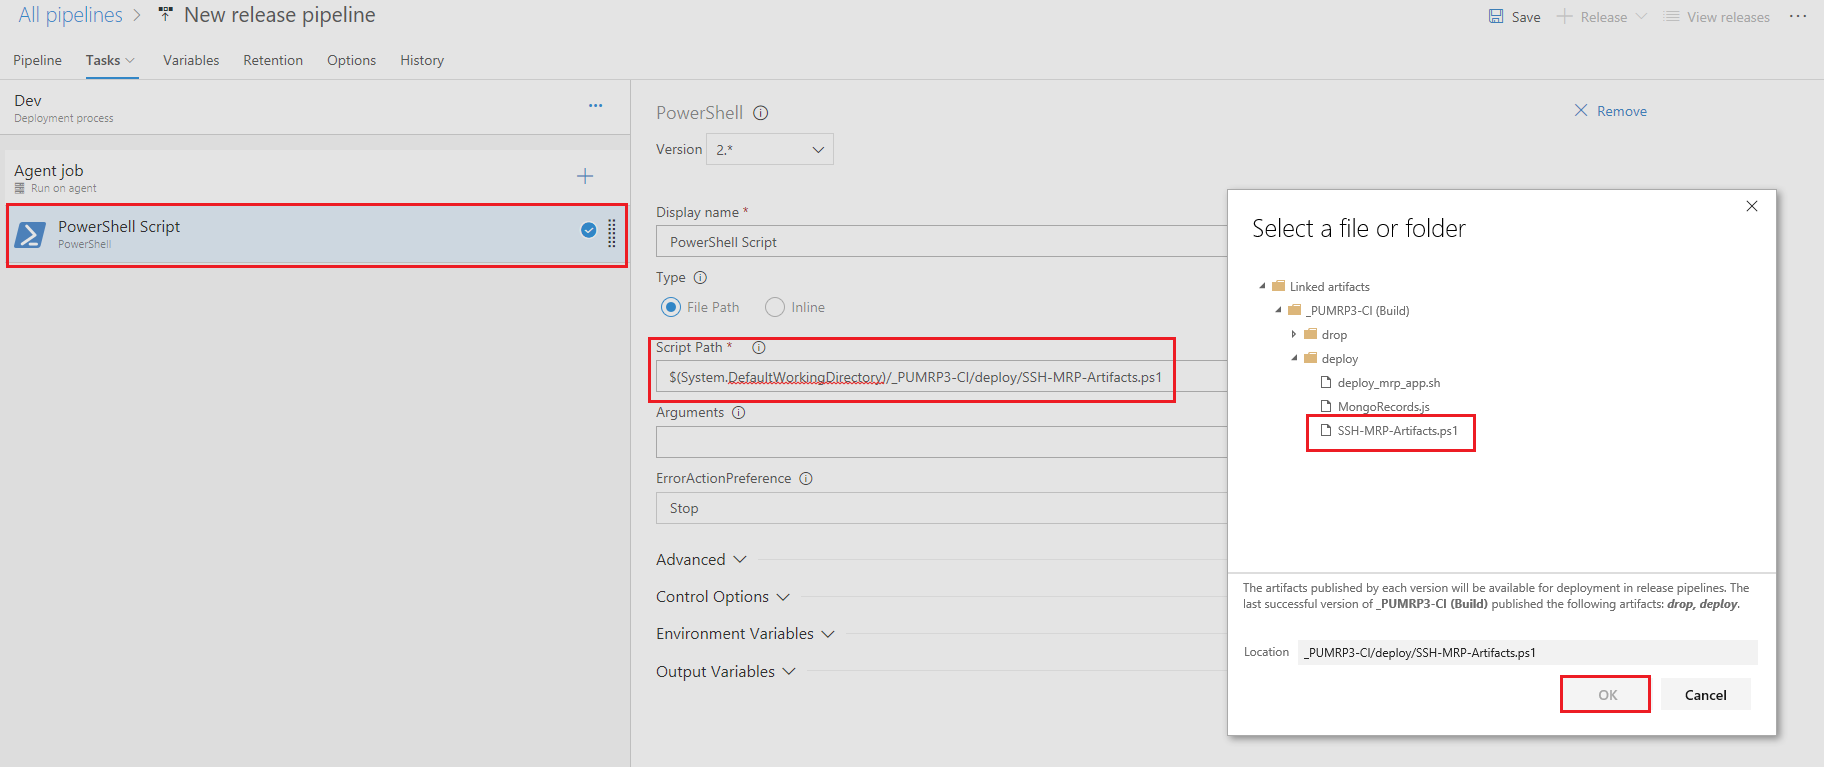
In the Powershell script task point to the SSH-MRP-Artifacts.ps1 build artifact as the Script Path in the task. The file is made available via a linked build pipeline artifact we generated in the Continuous Integration lab earlier.
-
Still in the PowerShell script task, add in the arguments with a hyphen and the variable name, followed by $(variablename). The arguments should look like the below:
-sshUser $(sshUser) -sshPassword $(sshPassword) -sshTarget $(sshTarget)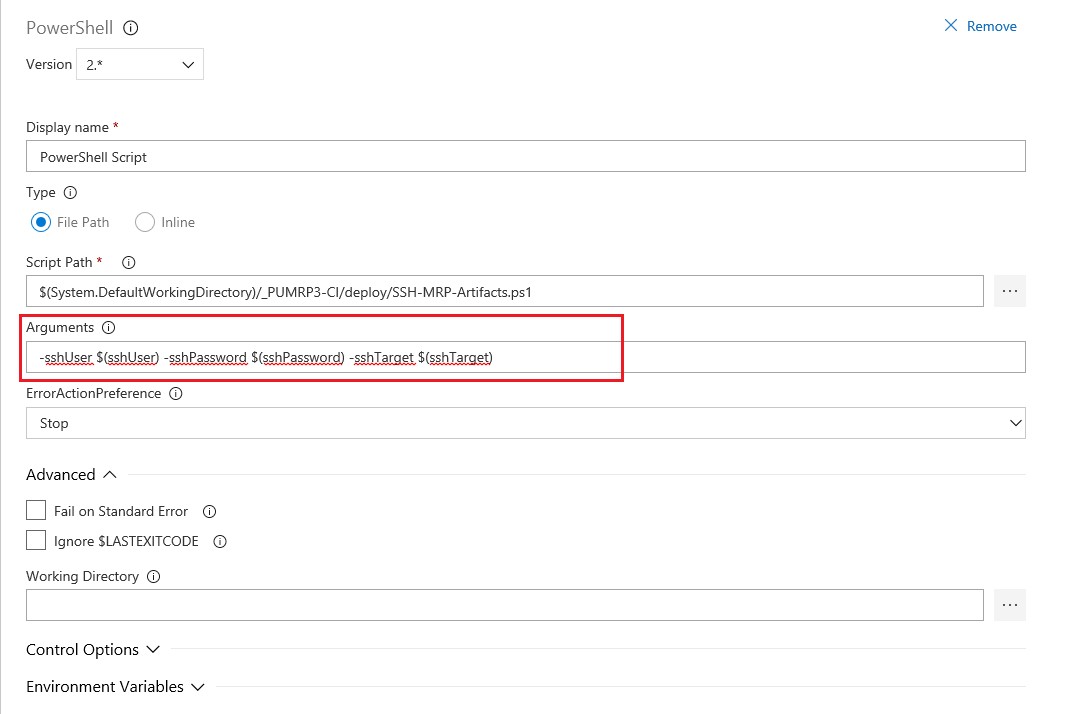
The powershell script requires these variables defined when it is run, if you open the SSH-MRP-Artifacts.ps1you will see those parameters listed as mandatory parameters. We will define them in our pipeline shortly.
-
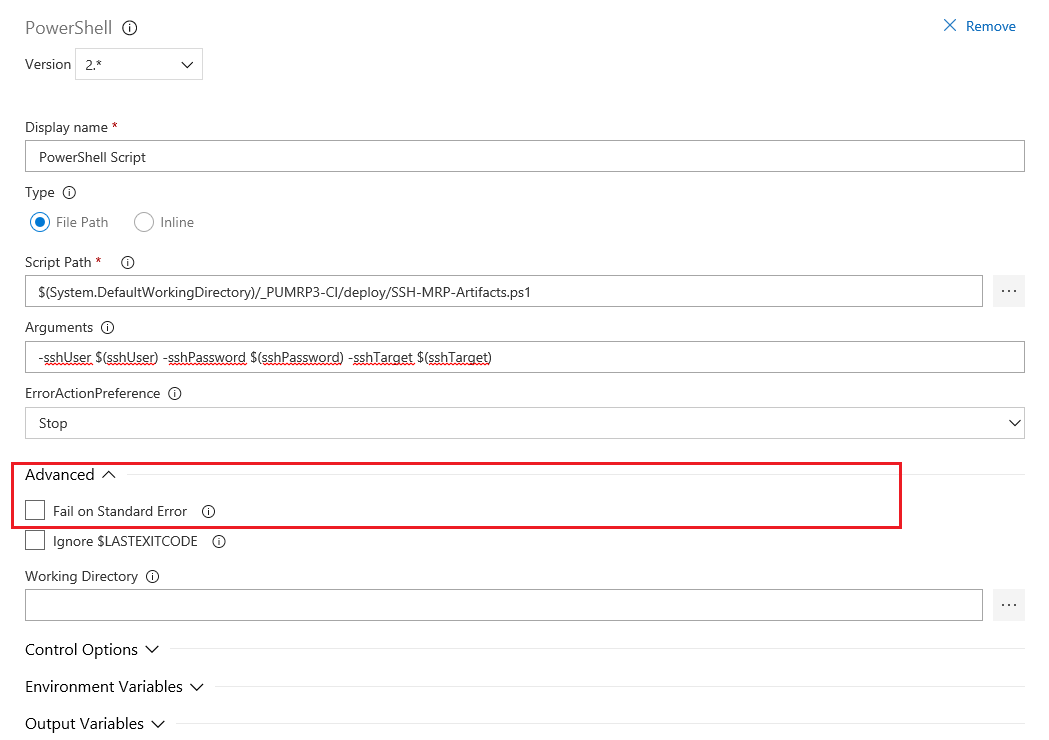
Click on Advanced to extand the panel and ensure that the option : Fail on Standard Error is unchecked to avoid some garbage warning.
-
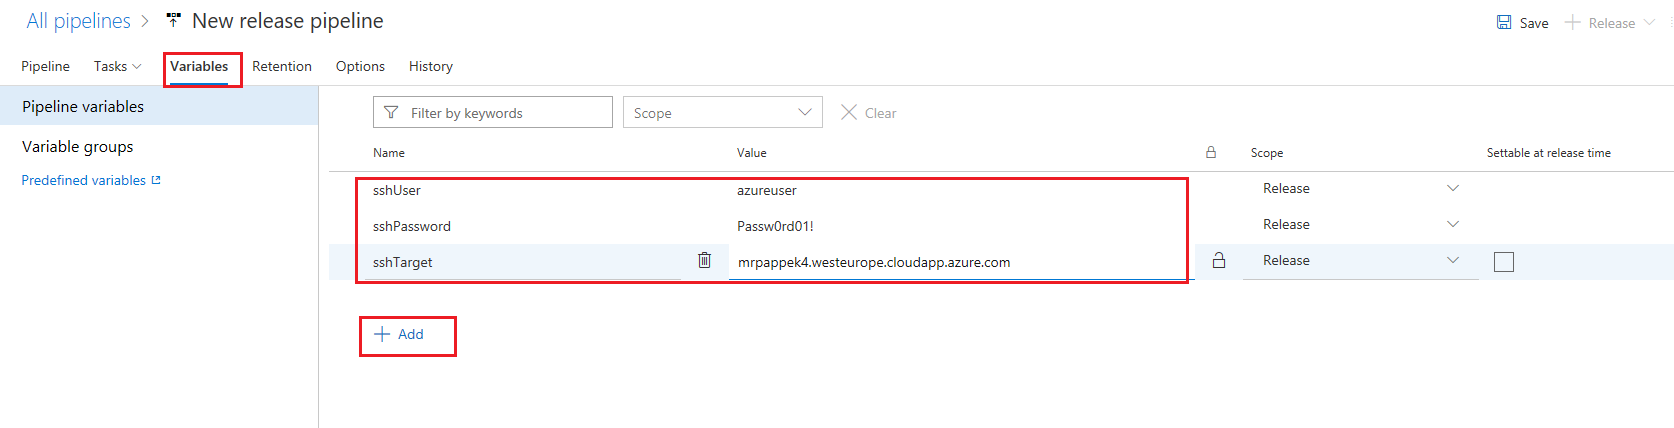
Click on the Variables option and add three variables as below. Fill in the values of the virtual machine that you created previously for these variables.
sshTargetshould be the public DNS name of the virtual machine, such as “mylinuxvm.westus.cloudapp.azure.com.”sshUsersshPasswordsshTarget
-
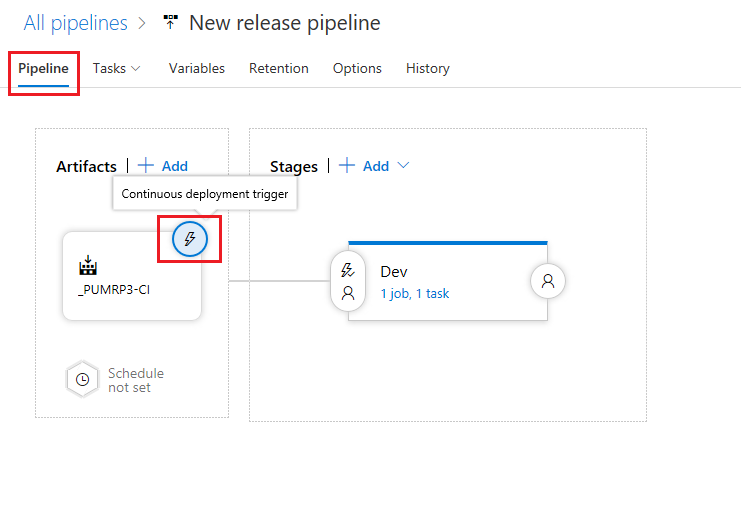
Click on the Pipeline option and then click on the lightning icon on the artifacts box
-
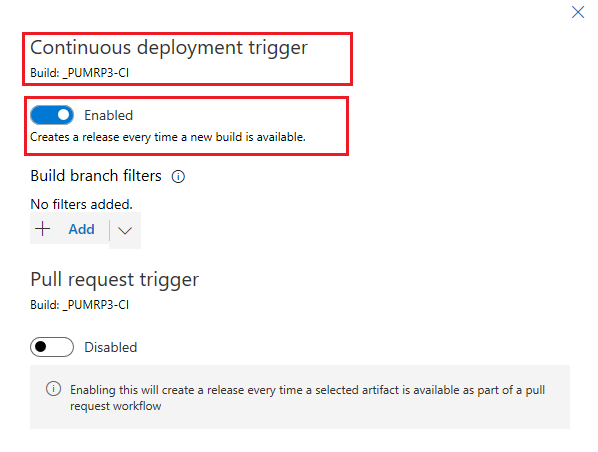
In the resultant Continuous deployment trigger pane enable continuous deployment, leave the default remaining values and click the X in the top right hand corner to close the pane.
-
Save the release definition by clicking Save and then OK.
Task 3: Trigger a build for continuous deployment
Now that our release definition is set up, let’s test using Continuous Integration and Continuous Deployment. We will trigger a build for continuous deployment by making changes to code and automatically deploying the MRP app to the hosted agent.
-
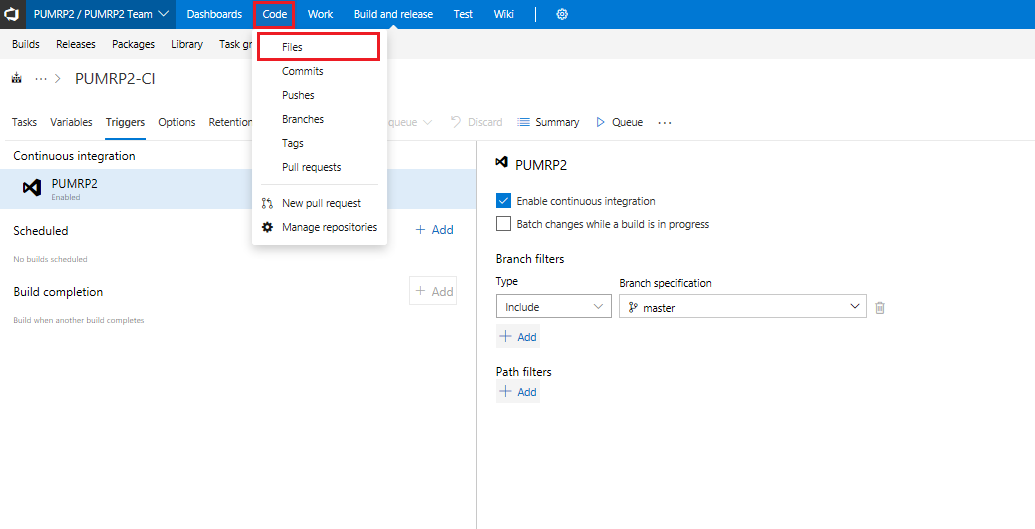
Go to the Code and then select Files tab, to go to your repo source
-
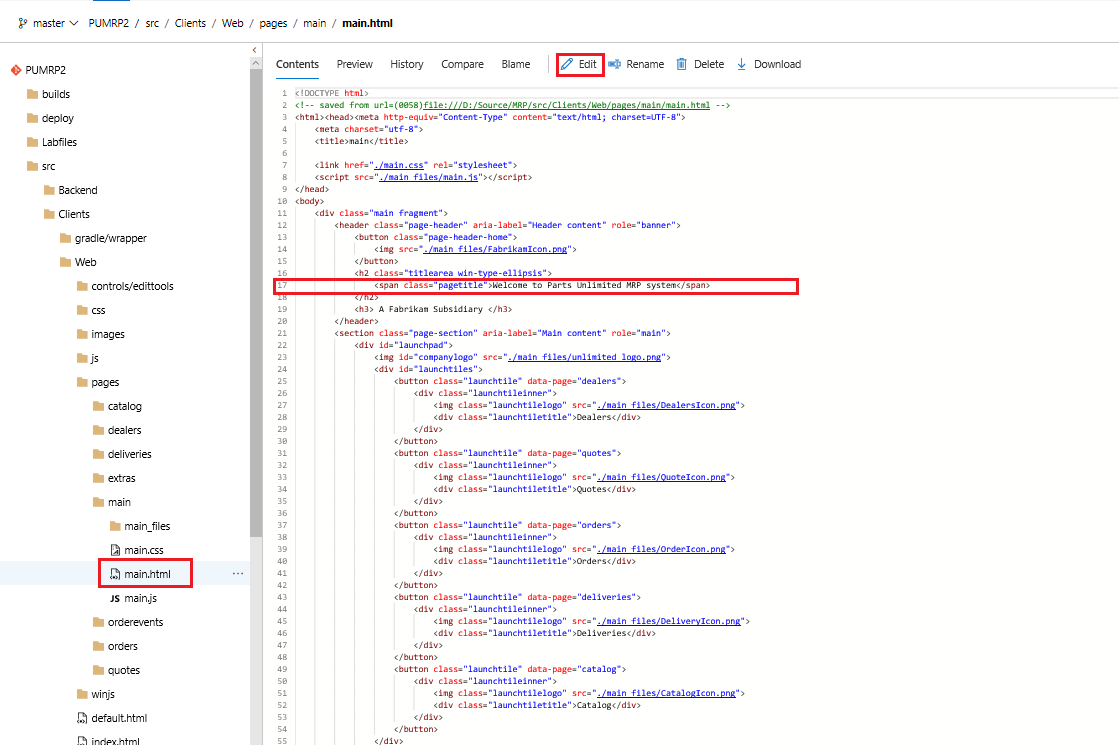
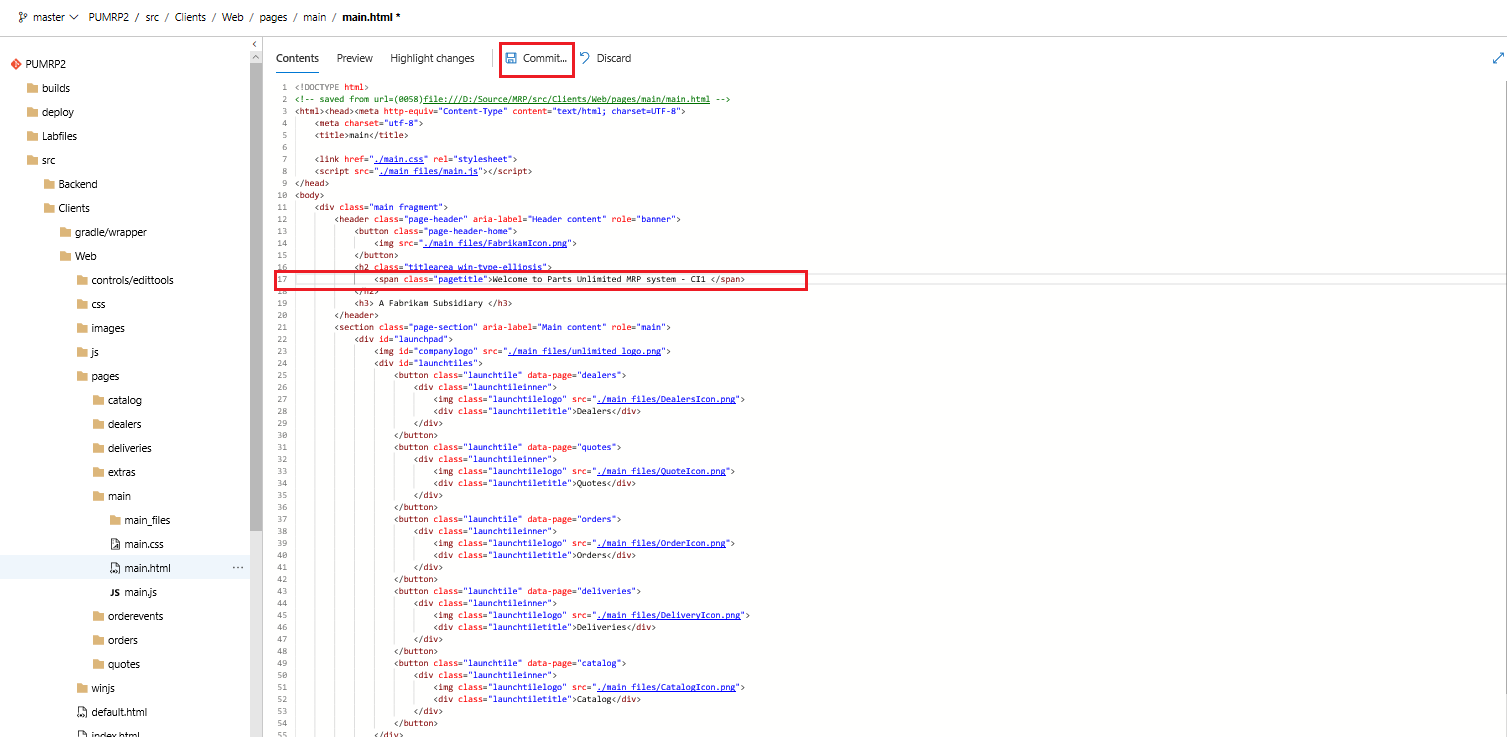
In the repo go to the location /src/Clients/Web/pages/main/main.html select Edit and modify line 17 from
Welcome to Parts Unlimited MRP system
to
Welcome to Parts Unlimited MRP system - CI1
or something similar.
-
Then click Commit to trigger a continuous Integration build
-
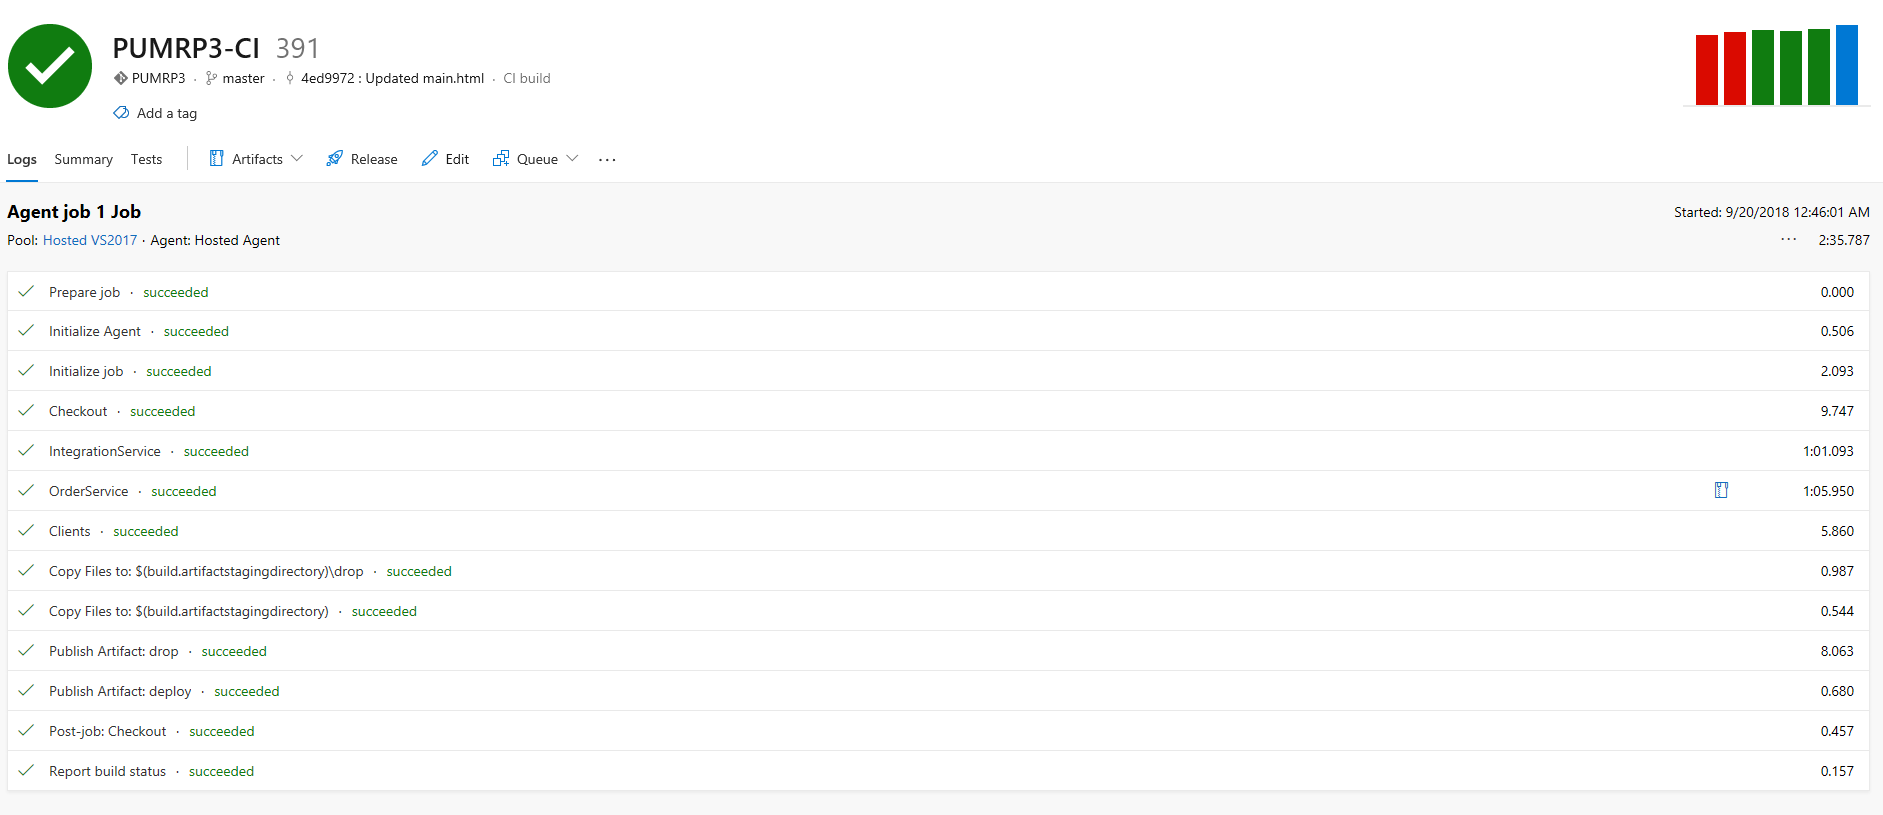
Go to the Build tab and note the running build that was queued by the Continuous Integration trigger.
-
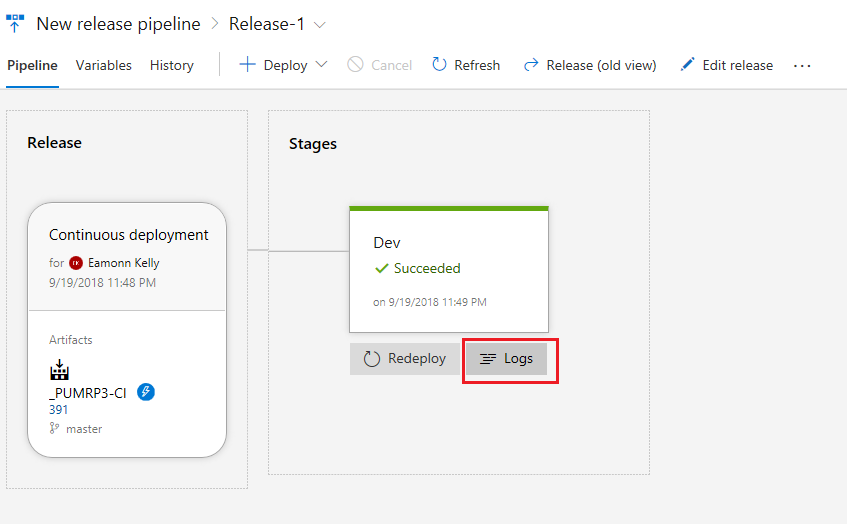
Return to the Release tab and note the running deployment that was queued by the Continuous Deployment trigger.

-
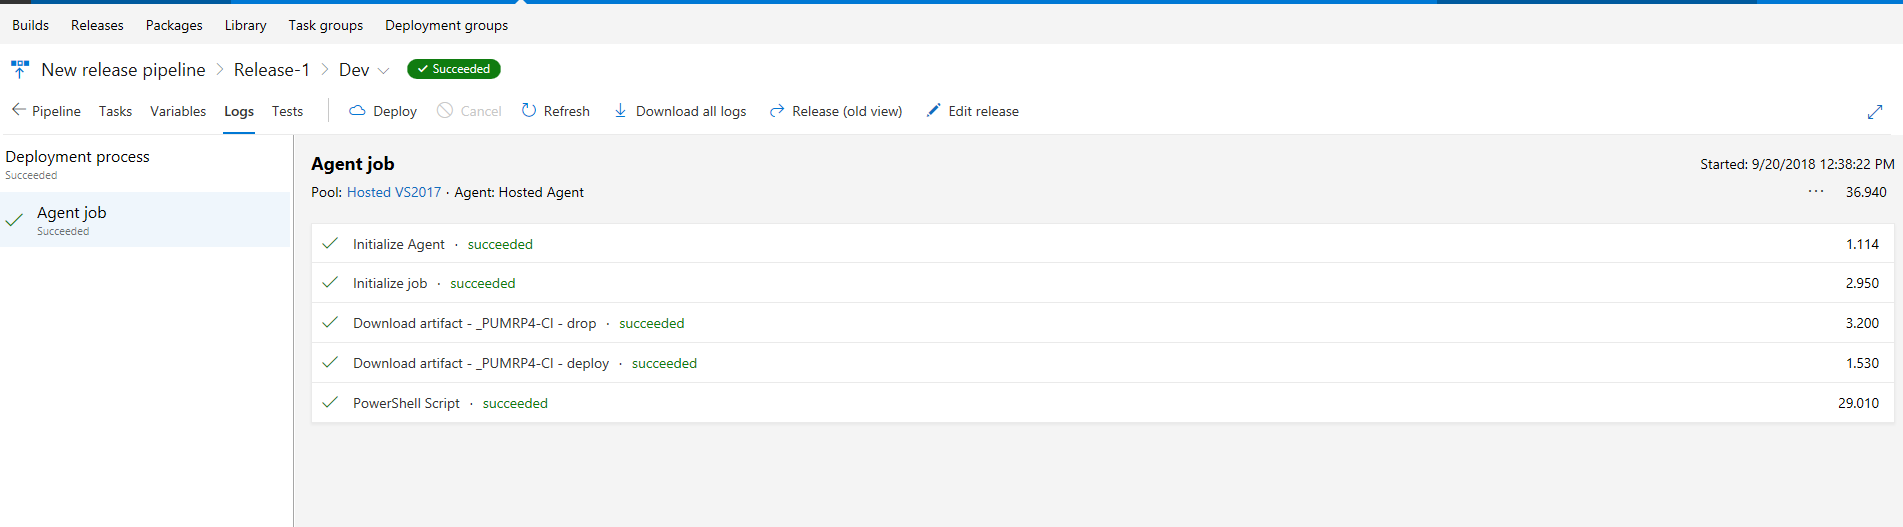
Click on the release and then on the logs to view the log output, and also what should be a successful deployment. You can click on each individual task section for the detailed logs and view what was completed, this would be the first place to go when troubleshooting a failed deployment.
-
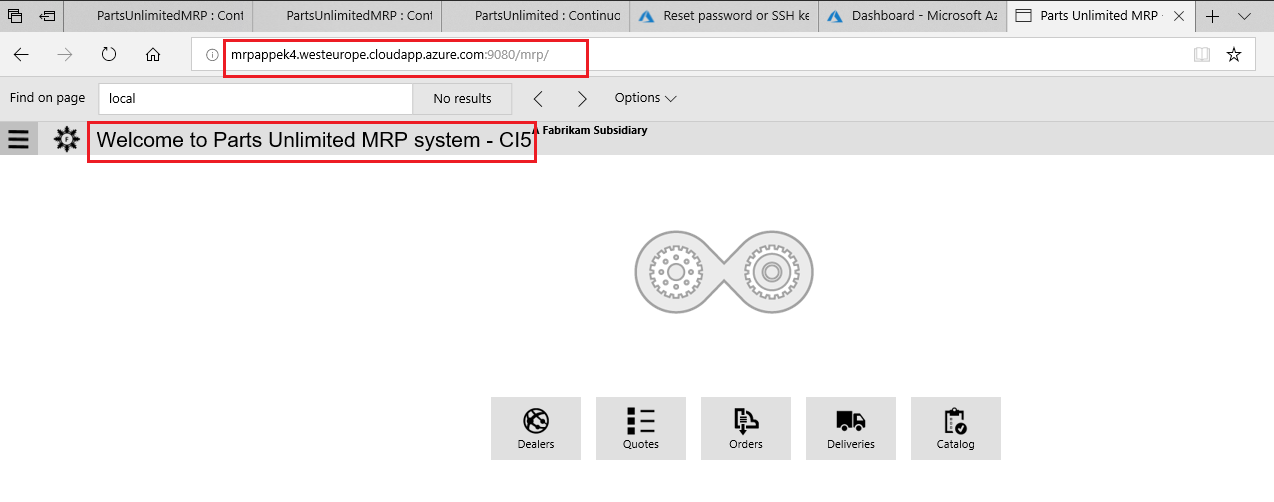
Verify your code change by navigating to the VM’s public IP DNS name, such as
http://mylinuxvm.westus.cloudapp.azure.com:9080/mrp.The changes you made to the home page text should be visible on the web page, as in the screenshot below.
If you encounter any issues, or failed deployment. Start by looking at the release pipeline logs, to try identify where the pipeline is breaking down. Some common errors could be
- access denied to the Linux VM > could be an incorrect password, username or target name specified in the pipeline variables. You could connect using ssh or putty to verify the credentials are workign as expected.
- artifact errors, or scripts breaking down > could be that artifacts are not in the format that the deployment scripts are expecting them. a message such as “no such file or directory…” would be an indicator that this was the case.
- To dig deep down, you could set up the pipeline to use a local agent, you can then access the staging ans artifact diretcories and dig further into the actual files being generated and used.
Summary
In this lab, you learned how to create deployments automatically after committing changes to code and build automatically. You completed the following tasks:
- Provisioned an MRP machine (Ubuntu VM) in Azure using an ARM template.
- Created and Configured the release pipeline
- Triggered a build for continuous deployment
- Verified the MRP app deployed successfully with artifacts generated by the build pipeline, which were then utilised in the release pipeline and verified that code changes we made to the home page were present in the live deployed app.
Continuous Feedback - Issues / Questions about this Lab ?
Thanks