Deploy app with Chef on Azure
In this lab, we will deploy the PartsUnlimted MRP Application (PU MRP App) via Chef Server to Azure. The lab is designed to point out some of the key features and capabilities of using Chef with Azure, and to discuss and describe them. Completing this lab will enable you to understand and explain these features and capabilities to customers, as part of the DevOps Lifecycle.
DevOps MPP Course Source:
This lab is used in the following courses.
- DevOps200.2x: Infrastructure as Code - Module 4 Azure IaaS and PaaS, Environment Configuration and Deployment, and Optimization.
- AZ-400T05: Implementing Application Infrastructure - Module 4 Third Party and Open Source Tool integration with Azure. The lab compliments the AZ-400 series of courses to help you prepare for the AZ-400 Microsoft Azure DevOps Solutions certification exam.
Lab Video:
Pre-requisites:
- An active Azure subscription.
Lab Tasks:
- Set up a Chef Automate machine and client with an Azure Resource Manager (ARM) template.
- Configure the Chef Workstation.
- Create a Cookbook and Recipe, and upload them to the Chef Automate server.
- Create a Role.
- Bootstrap the PU MRP App Server and Deploy the PU MRP App.
Estimated Lab Time:
- Approx. 80 minutes.
Chef deployment options in Azure
The following deployment options are available for using Chef in Azure.
- Install a clean Linux VM. We can install an Ubuntu image SKU in a VM on Azure, and then install and configure Chef Server in that VM.
- Install Chef Automate. This image SKU is available on Azure. The Chef Automate image includes a number of Chef services, such as Chef Server.
- Hosted Chef Server. You can sign up for a hosted Chef Server account at https://manage.chef.io, and use the server to host your Chef configurations.
In this lab, we will install Chef Automate on Azure. Chef Automate contains Chef Server. It also replaces Chef Analytics, so deploying Chef Automate to Azure will provide us with the components we need.
Note: If you have time, look through the Chef Automate documentation to familiarize yourself with how it operates and how it is structured.
Also, note that there is a free 30-day trial license for use with Chef Automate in Azure. In this lab, we will leave the license fields blank to avail of this free 30-day trial license.
Lab environment
This lab uses two Virtual Machines (VMs) on Azure, and your local environment, set up as follows:
- Chef Automate houses the Chef Server, and will be installed on a Linux VM in Azure.
- PU MRP App client will also be a Linux VM in Azure. This is the Chef node machine which we will configure. We will deploy the PU MRP application to this node machine using Chef.
- Chef Workstation will connect to and manage your Chef Server. It can be Linux, Windows, or Mac.
For this lab, your local machine will act as the Chef Workstation. We will use ARM templates to create the two Linux VMs in Azure for Chef Automate and for the PU MRP App, instead of creating the VMs manually.
Note: If you prefer, you can create a VM in Azure of any Operating System (OS) platform, and use it as your Chef Workstation instead of using your local environment. The steps set out in this lab assume you are using a Windows OS.
Task 1: Set up a Chef Automate machine and client with an ARM template
-
Select the Deploy to Azure button below, and follow the wizard to deploy Chef Automate to a new VM in Azure. When prompted, log in to the Azure Portal.


The VM will be deployed to a Resource Group along with a Virtual Network (VNET), and some other required resources.
Note: You can create a new Resource Group during the deployment process, to demarcate the resources that you set up in this lab. By assigning this lab’s resources to a separate Resource Group, you can delete the Resource Group any time you want to remove the resources created at this point in the lab.
-
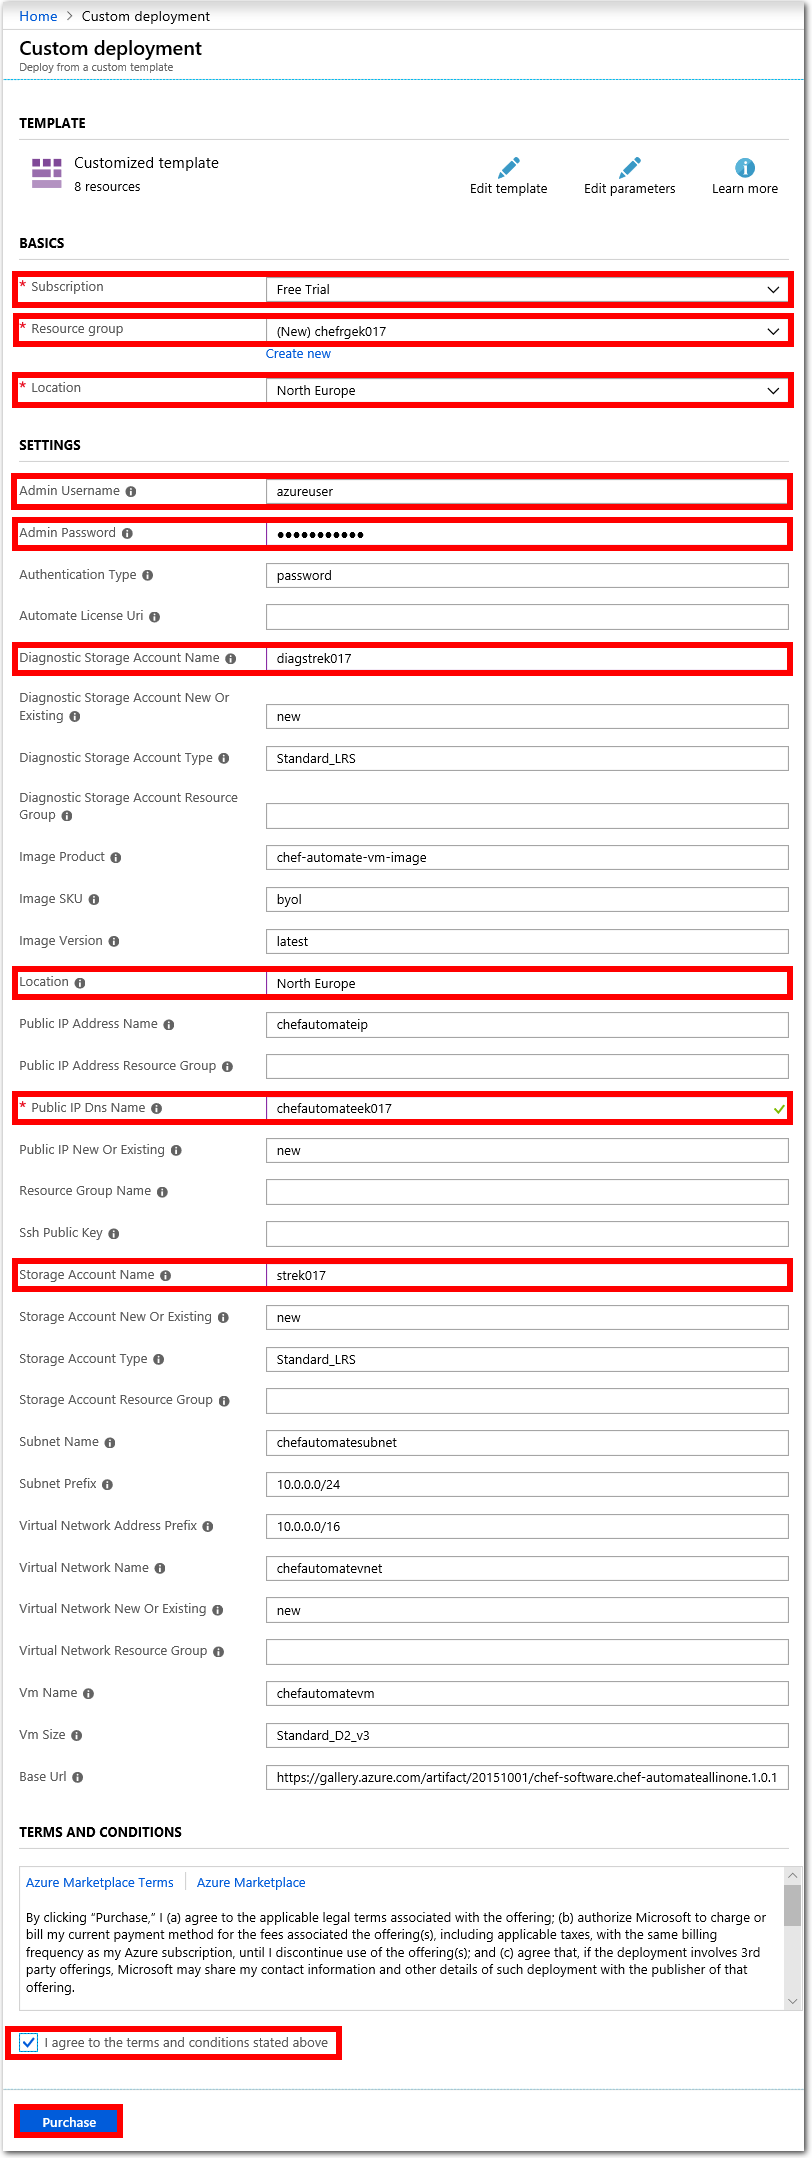
Fill out the required fields with the following details. Add your initials or other unique identifier as a suffix to create a unique name, where required.
- Subscription.
< your Azure subscription >. - Resource group. Choose Create new and enter a
< a unique resource group name >. For examplechefrgek017. - Location: Select a region to deploy the Resource Group to. For example
West EuropeorEast US. - Admin Username.
azureuser. - Admin Password.
Passw0rd0134. - Diagnostic Storage Account Name.
< a unique diagnostic storage account name >. For example,diagstrek017. - Location. Select a region to deploy the VM to. Use the same region that you used previously. For example
West EuropeorEast US. - Public IP Dns Name:
< a unique dns name >. For examplechefautomateek017. - Storage Account Name:
< a unique storage account name >. For examplestrek017.
Note: Only edit the configuration fields cited above. All other configuration fields are already populated correctly, and you do not need to change them. Make a note of the region, username and password that you set for the Chef Automate machine, as you will be required to recall these details later in this lab.
When you have entered the required details, check the tick box to agree to the Azure Marketplace terms and conditions. Select the Purchase button.
Allow about 10 minutes for the deployment to complete.
- Subscription.
-
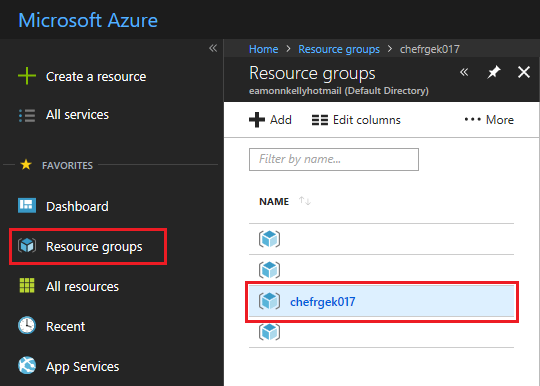
When the deployment completes, select the Resource Groups blade from the Azure Portal menu. Choose the name of Resource Group that you created, chefrgek017 for example.
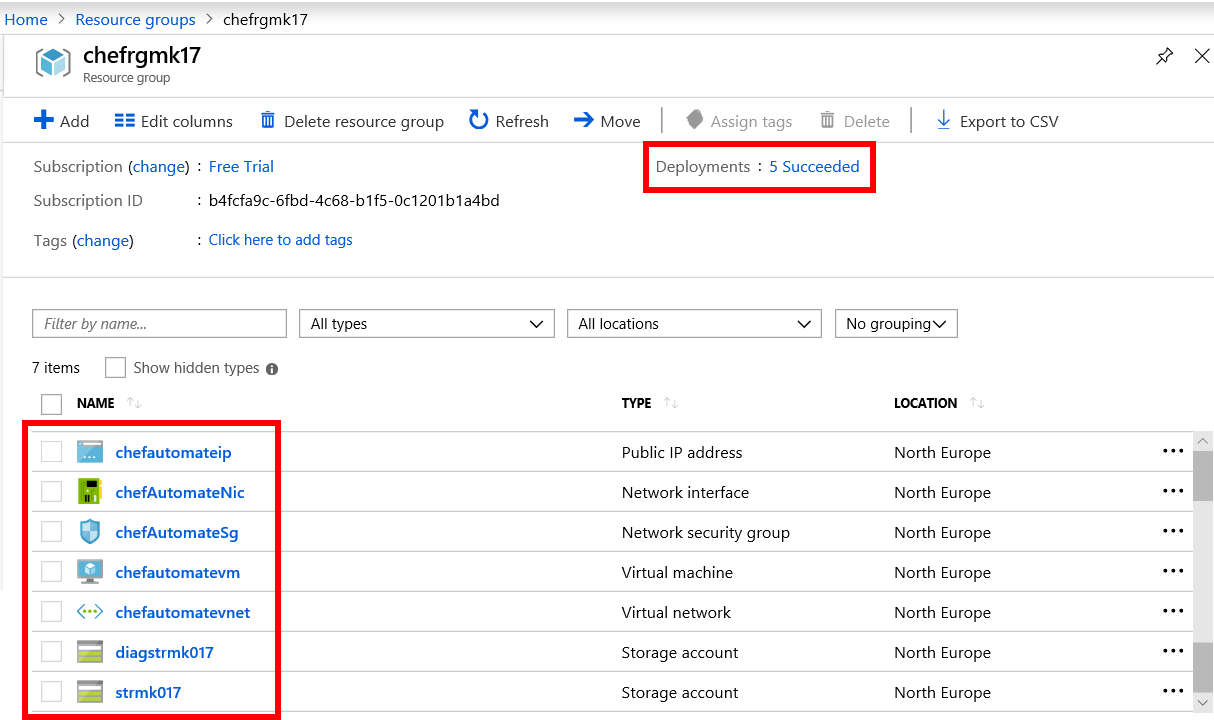
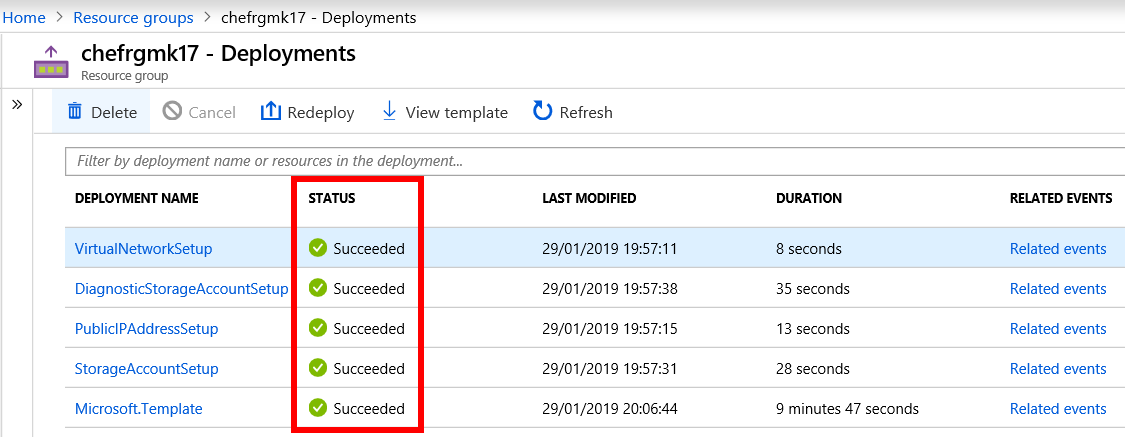
You should see a list of resources similar to the following. Beside Deployments, select the 5 succeeded message.
-
Verify that the Status for each deployment operation is Succeeded.
-
You need to obtain the public DNS name for your Chef Automate instance. Select the Resource Groups blade in Azure Portal. Choose the Resource Group you created previously (for example, chefrgek017). Select the chefautomateip resource (or whatever you called it) from the resources list.

Copy the DNS name value from the Public IP address pane. The DNS name value will be a URL, in the following format
machinename.region.cloudapp.azure.com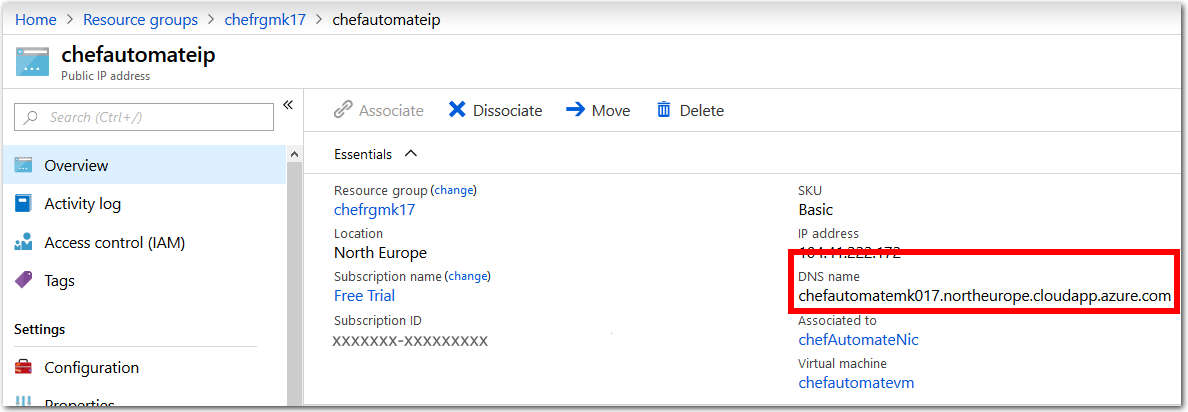
-
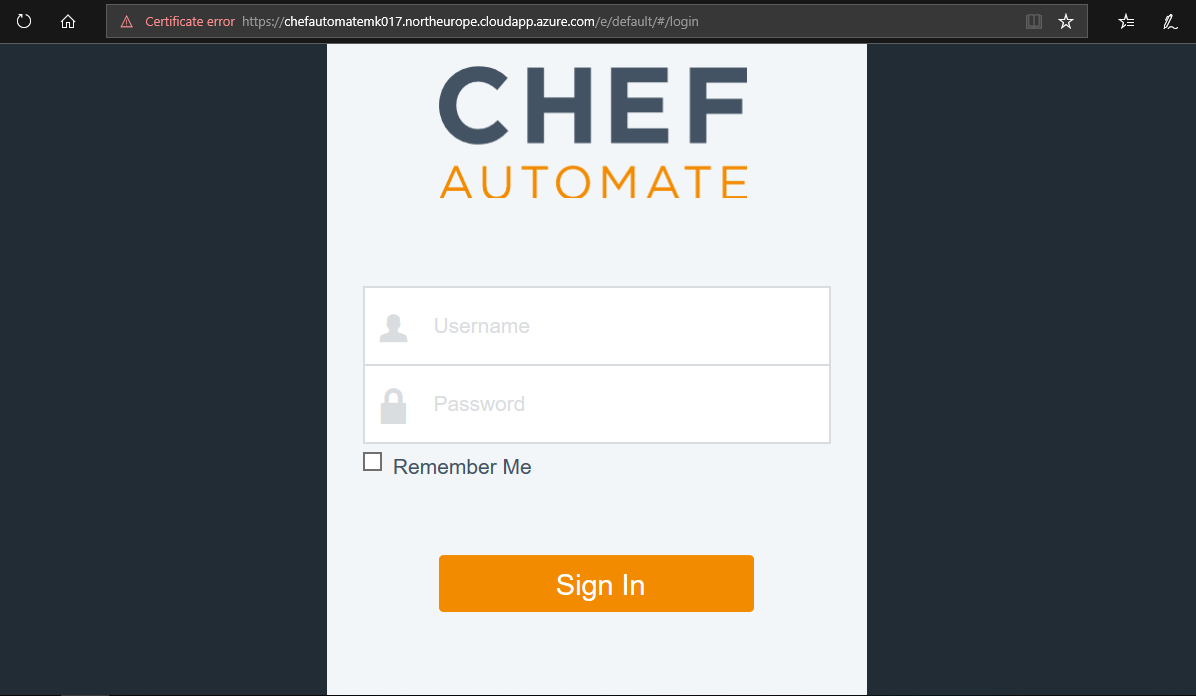
Open a web browser, paste the DNS name value into the address bar field, and go to the URL. Use the prefix
https(nothttp).If you are prompted about a certificate error, it is safe to override this warning for the purposes of this lab and visit the page. The prompts that you see, and steps required to access the URL, may be different depending on your web browser.
The following screenshot is from inside the Microsoft Edge web browser. To go to the page, choose Details, then select Go on to the webpage.

-
If the deployment of the Chef Automate image has succeeded, you should see the Chef Automate login prompt.
Note: You cannot sign into Chef Automate at this stage. You will need to complete Task 2 before you can sign into Chef Automate successfully.
Task 2: Configure the Chef Workstation
In this task, you will configure your Chef Workstation by setting up the Chef Starter Kit on your local workstation. You will connect to, and manage, your Chef Server from the Chef Workstation.
-
Download and install the Chef Development Kit (Chef DK) from https://downloads.chef.io/chefdk. Choose the version of the Chef Development Kit appropriate to your particular environment, i.e. Mac OSX/macOS, Debian, Red Hat Enterprise Linux, SUSE Linux Enterprise Server, Ubuntu, Windows, etc.
Note: As of September 2019 the latest version of the Chef Development Kit is 4.3.13. Chef Development Kit
chefdk-4.3.13-1-x64for Windows 10 is the version used in this lab. -
Once installed, you should have a shortcut for Chef Development Kit on your desktop. Use the shortcut to launch the Chef Development Kit, and run the following command in the Chef Development Kit PowerShell window.
chef verifyIf prompted, type yes to accept the Chef License terms. Keep the PowerShell window open, you will use it again later in this lab.
Running
Chef VerifyThe results of running the
Chef verifycommand may depend on your configuration.- If
Chef verifyruns successfully, and lists succeeded at each component, proceed to Step 4. -
If
Chef verifyfails or gives a warning at one or more components, as per the following screenshot, but continues to the end without further errors, proceed to Step 4.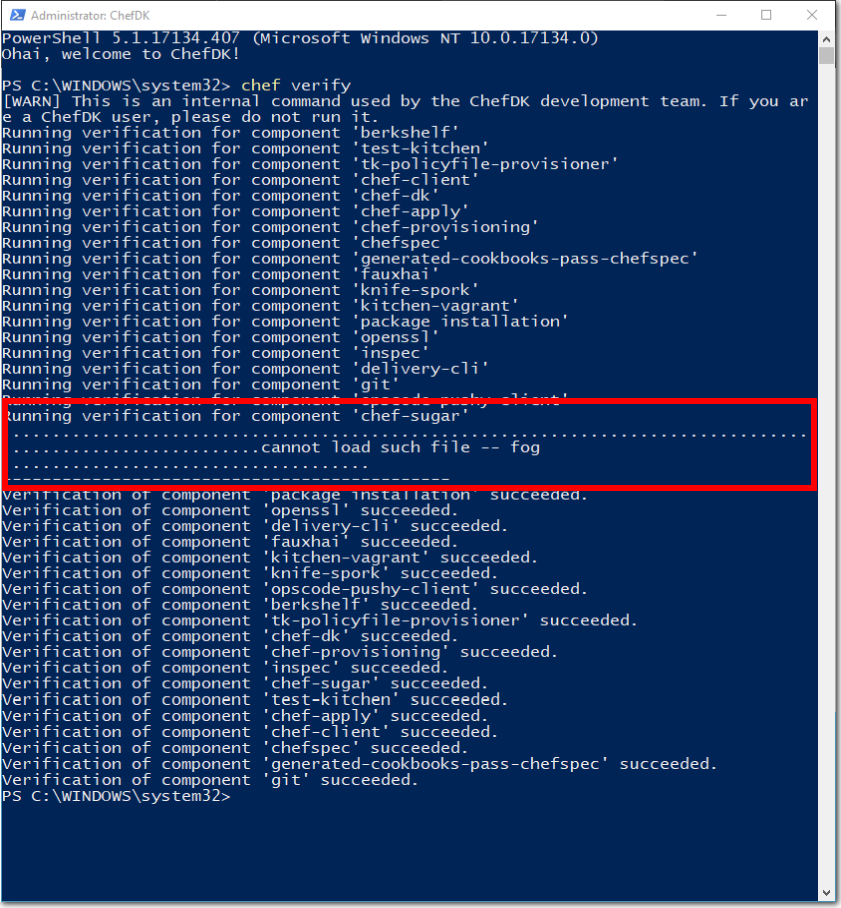
-
If
Chef verifyreturns errors because Git is not configured with your identity information, proceed to Step 3 to configure your Git identity information.
- If
-
In the Chef DK PowerShell window, configure your global Git variables with your name and email address if you have not already done so. We will use Git to store our Chef configuration details.
Enter the following commands and values into the Chef DK PowerShell window.
 git config --global user.name “azureuser”
 git config --global user.email “azureuser@partsunlimitedmrp.local”
Run
chef verifyagain to ensure no further Git-related errors exist. -
You need the Chef Starter Kit for accessing your Chef Automate VM instance on Azure. To get the Chef Starter Kit, append
/biscotti/setupto the public DNS name value for the Chef Automate VM that you installed in Task 1.The result will be a URL in the following format
https://DNS label.region.cloudapp.azure.com/biscotti/setupFor example,
https://chefautomateek017.westeurope.cloudapp.azure.com/biscotti/setupVisit the URL in a web browser, and override the certificate error if required.

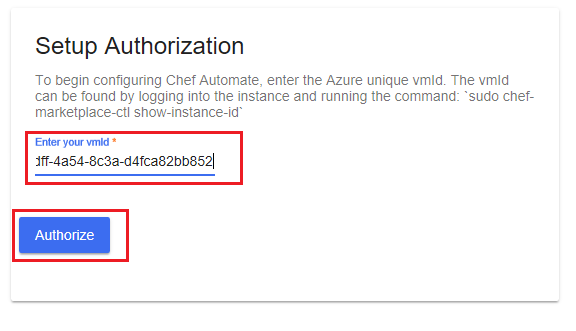
In your web browser window, on the Chef Automate Setup Authorization page you will be prompted to enter a Virtual Machine ID (VMID). This is the VMID for the Chef Automate VM that we deployed in Task 1.
-
The VMID is a unique value that is assigned to each VM in Azure. You can obtain the VMID in a number of ways, such as using PowerShell, or with Azure CLI. This lab uses the Windows OS, so we will obtain the VMID by connecting to the Chef Automate VM via SSH using PuTTy.
In a Linux environment, you can obtain the VMID in a similar way by connecting to the Chef Automate VM via SSH.
Obtain VMID using PuTTy
- Download PuTTy from https://putty.org/ and install it.
-
In PuTTy, open a new SSH connection to your Chef Automate VM. Enter the public DNS name for your Chef Automate VM as the destination Host Name (or IP address). Select Open to connect to your Chef Automate VM.
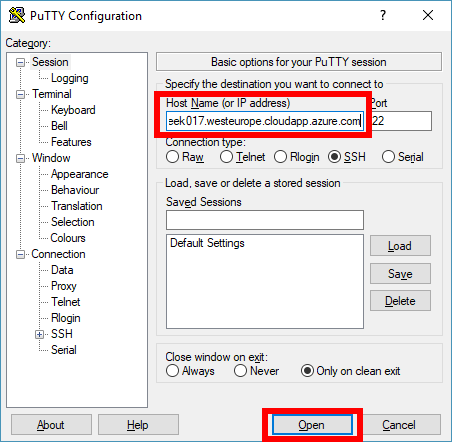
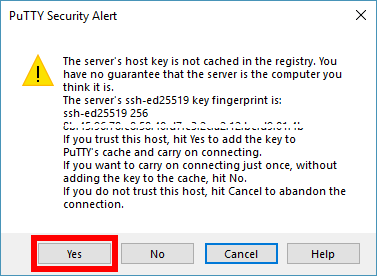
Note: If prompted, choose Yes to add the new SSH key to your local registry cache.
- A new bash terminal window will open. When prompted, inside the bash terminal, login into the Chef Automate VM using the username and password credentials you specified in Task 1, i.e.
- username.
azureuser - password.
Passw0rd0134
- username.
-
Once the PuTTy terminal has logged into the Chef Automate VM, run the following bash command and note the VMID that is returned.
sudo chef-marketplace-ctl show-instance-id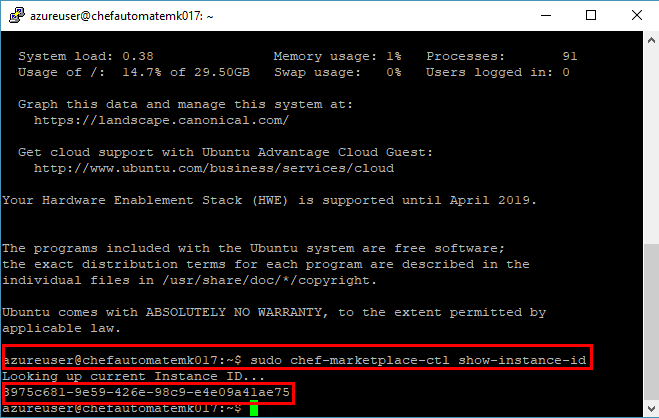
Exit the PuTTy terminal with the following command.
exit - Go back to your web browser and enter the VMID into the Chef Automate Authorization Setup page. Select the Authorize button, as in the following screenshot.
-
You will be asked to provide details of your Chef Automate Setup. Enter the same details on the Chef Automate Setup web page that you provided for the Chef Automate VM deployment. You should note the details that you specify, as you will need to reuse them later in this lab.
We recommend using the following details, which are consistent with the details used throughout this lab for the Chef Automate VM, Git, second Linux VM deployment, etc.
- First Name.
Azure - Last Name.
User - Username.
azureuser - Email address.
azureuser@partsunlimitedmrp.local - Password.
Passw0rd0134

- First Name.
-
Agree to the EULA terms and select the Set Up Chef Automate button.
If you get a warning message about a certificate error, override the error and continue to the web page.
Note: An organization name of default will be applied. We do not specify an organization name as part of the Chef Automate configuration setup. You can specify an organization name within the Chef Automate server, but we will use the default value. This organization value will be used in the
knife.rbfile in Task 3. -
Your web browser should be redirected to the download Chef Starter Kit web page. The Chef Starter Kit is a file named
starter-kit.zip, which contains pre-configured files to set up Chef quickly. Select the Download Starter Kit button and download the zip file to your local environment.Note: The Chef Start Kit contains user credentials and certificate details. Different credentials and details are generated each time you register, which are specific to the user and organizational details that you provide each time. Do not re-use the Chef Start Kit files across multiple users or registrations, as you may encounter errors.
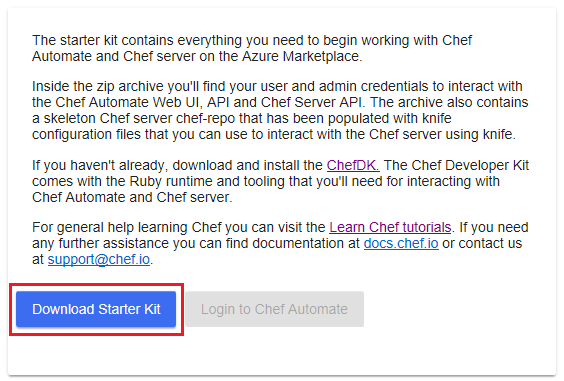
-
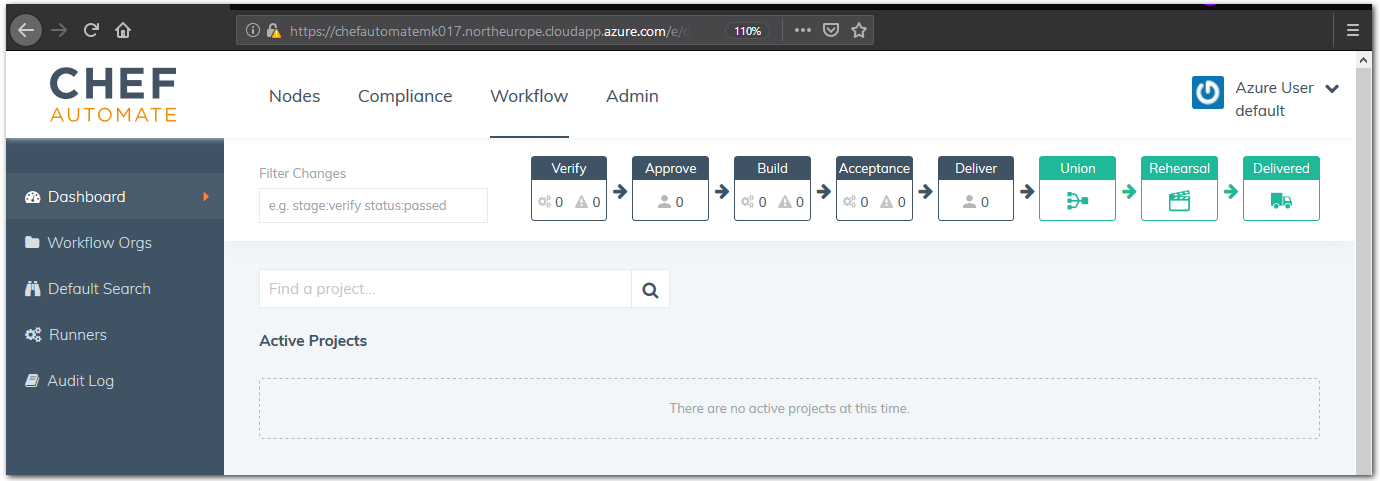
After you have downloaded the Chef Starter Kit, the Login to Chef Automate button will be enabled. Select the button, and sign into Chef Automate by entering the username and password you provided on the Chef Automate Setup web page. The Chef Automate dashboard should now be visible in your web browser.
-
Extract the contents of the Chef Starter Kit zip archive to a directory, such as
C:\Users\<username>\chef\. -
Go to the location where you extracted the Chef Starter Kit files. Open the file
~\chef-repo\.chef\knife.rbin an editor. Check that the value assigned tochef_server_url, for the external FQDN (Fully Qualified Domain Name), corresponds to the following.https://<chef-server-dns-name>.<region>.cloudapp.azure.com/organizations/defaultThen, save and close the file.
Note: If you have a different organization name present in the
knife.rbfile, change the name to thedefaultorganization.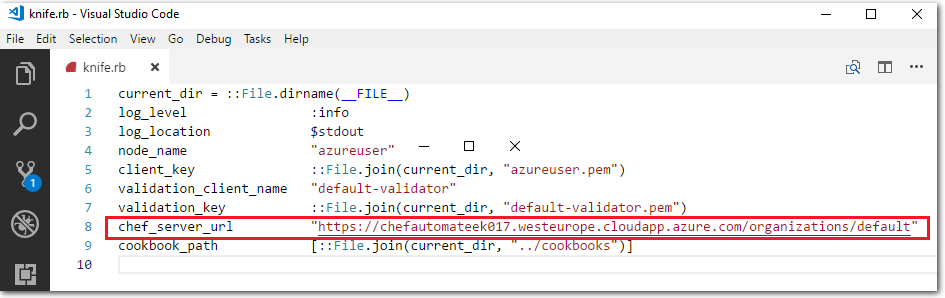
-
Return to the Chef DK PowerShell window that you used earlier to run the
chef verify. Change directories into thechef-repodirectory (e.g.cd C:\Users\<username>\chef\chef-repo).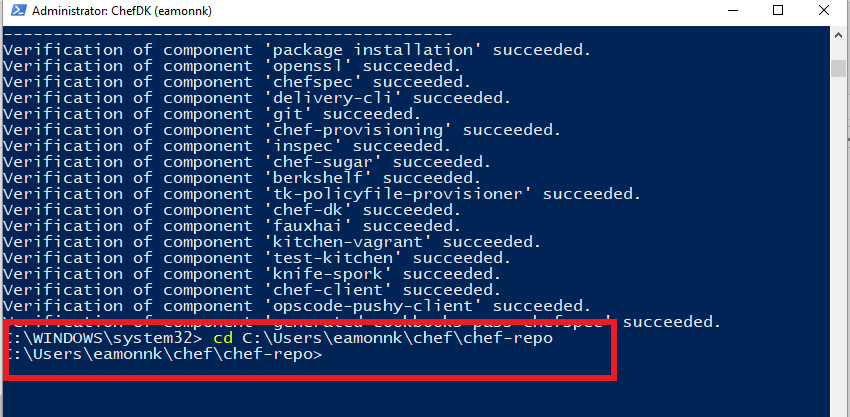
Run the following Git commands inside the Chef repo directory.
git init
git add -A
git commit -m "starter kit commit"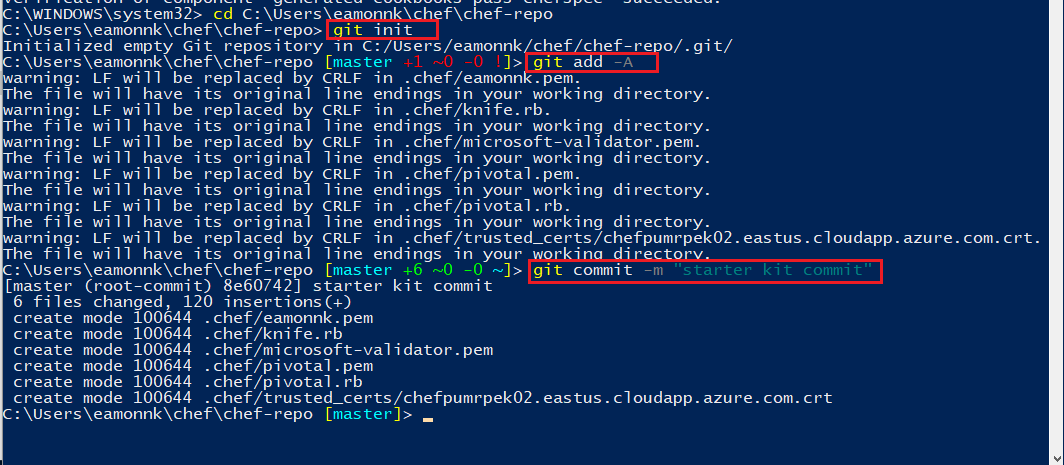
-
Our Chef Server has an SSL certificate that is not trusted. As a result, we have to manually trust the SSL certificate for our Chef Workstation to communicate with the Chef Server. To change this, we can import a valid SSL certificate for Chef to use with the following command:
knife ssl fetch
-
List the current contents of the chef-repo, by running the
lsor thedircommand. Inspect the current files in the chef-repo, so that you can compare the existing files to the new files that you will add to the chef-repo soon.dir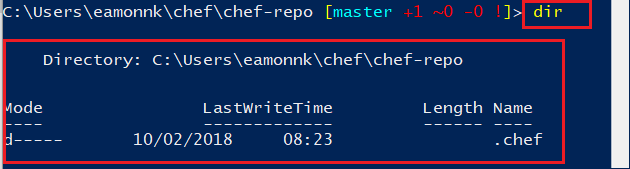
-
Synchronize the contents of the Chef Workstation repo, with the contents of your Chef Automate VM server’s repo, by running the following command. The command downloads the entire Chef repo from your Chef Automate server.
knife download /Note: For more information see the Chef Documentation page Knife Download.
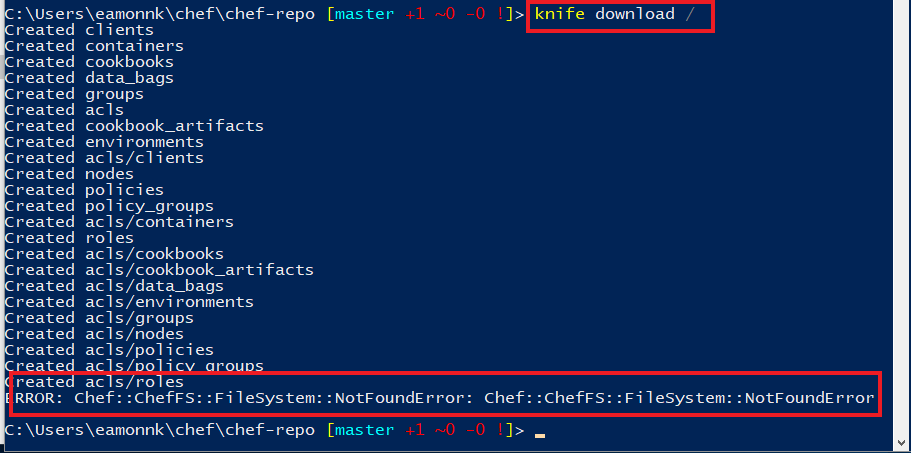
You may see errors in relation to
acls, depending on your user account details, but you can ignore these errors for the purposes of this lab. -
Run the
dircommand again. Observe the additional files and folders that have been created in thechef-repodirectory.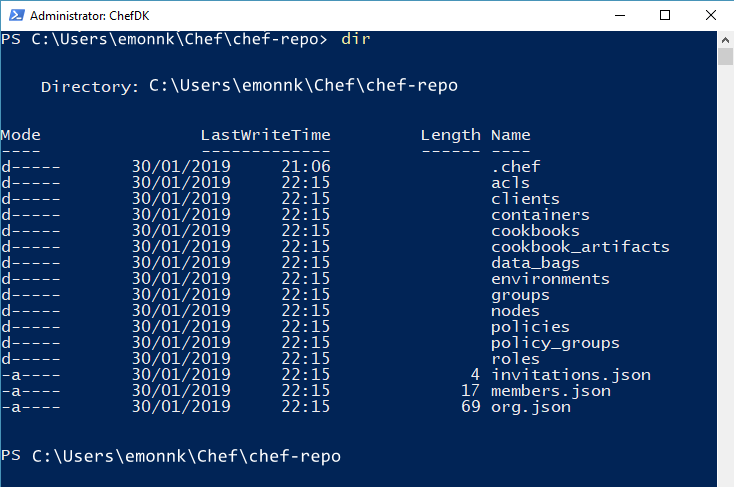
-
Commit the newly added files into the Git repository with the following commands.
git add -A
git commit -m "knife download commit"
Task 3: Create a Cookbook and Recipe, and upload them to the Chef Automate server
In this exercise, you will create a cookbook and recipe for the PU MRP app’s dependencies to automate the installation of the PU MRP application, and upload those cookbooks and recipes to the Chef server.
-
Open the Chef Development Kit PowerShell window. Change into the directory cookbooks, within the chef-repo. For example,
cd C:\Users\eamonnk\chef\chef-repo\cookbooksor wherever you placed your Chef Git repo in Task 2. Use the Chef knife tool to generate a cookbook template by running the following commandchef generate cookbook mrpapp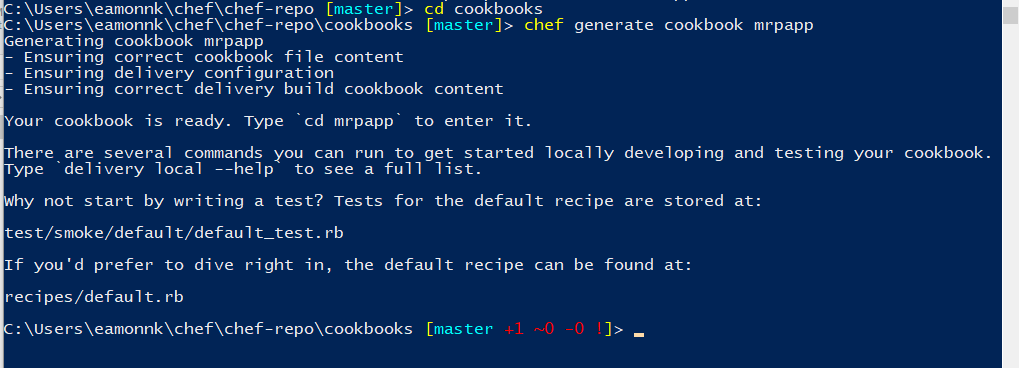
A cookbook is a set of tasks for configuring an application or feature. It defines a scenario and everything required to support that scenario. Within a cookbook, there are a series of recipes that define a set of actions for the cookbook to perform. Cookbooks and recipes are written in the Ruby language.
The
chef generate cookbookcommand we ran here creates anmrpappdirectory in the~/chef-repo/cookbooks/directory. Themrpappdirectory contains all of the boilerplate code that defines a cookbook and a default recipe.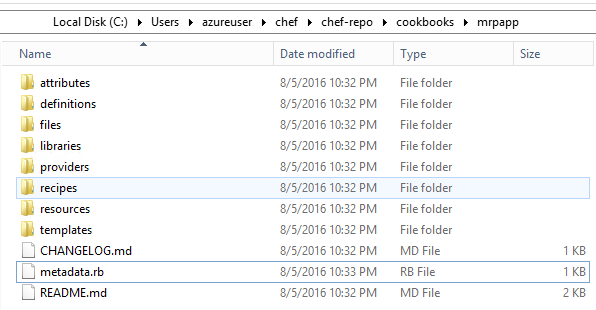
-
With a text editor, open the file
metadata.rb, within your~/cookbook/mrpappdirectory, for editing. For example, use the Visual Studio Code editor to open the file~/chef-repo/cookbooks/mrpapp/metadata.rbfor editing. You may need to open the file with administrator privileges.Cookbooks and recipes can leverage other cookbooks and recipes. Our cookbook will use a pre-existing recipe for managing APT repositories. Add the following line at the end of the
metadata.rbfile, then save and close the file.depends 'apt'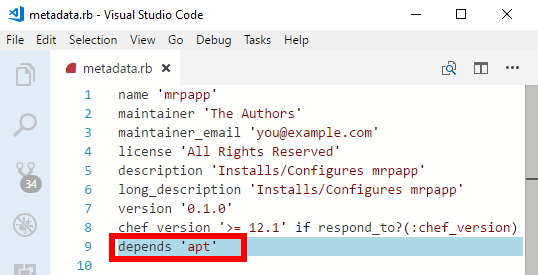
-
We need to install three dependencies for our recipe: the
aptcookbook, thewindowscookbook, and thechef-clientcookbook. We can download the three cookbooks from the official Chef cookbook repository, https://supermarket.chef.io/cookbooks, using theknife cookbook sitecommand.In the Chef Development Kit (Chef DK) PowerShell window, from inside the directory
~\chef\chef-repo\cookbooks, download the cookbooks using theknife cookbook sitecommand as follows.Install the apt cookbook:
knife cookbook site install aptInstall the windows cookbook:
knife cookbook site install windowsInstall the chef-client cookbook
knife cookbook site install chef-client -
After each
knife cookbook site installcommand, the focus of the Chef DK window should return to themasterbranch of your Chef repo automatically. However, the last command may change the focus to thechef-vendor-windowsbranch. Switch focus back to themasterbranch, by issuing the following command in the Chef DK window.git checkout master
-
Copy the full contents of the
default.rbrecipe from the Microsoft Parts Unlimited MRP GitHub repository.Open the URL in a web browser to access the
default.rbrecipe file in RAW format. The recipe file is hosted on Microsoft’s Parts Unlimited GitHub repo. Providing the recipe file in RAW format allows you to copy the file content easily. Copy the contents of the online recipe file.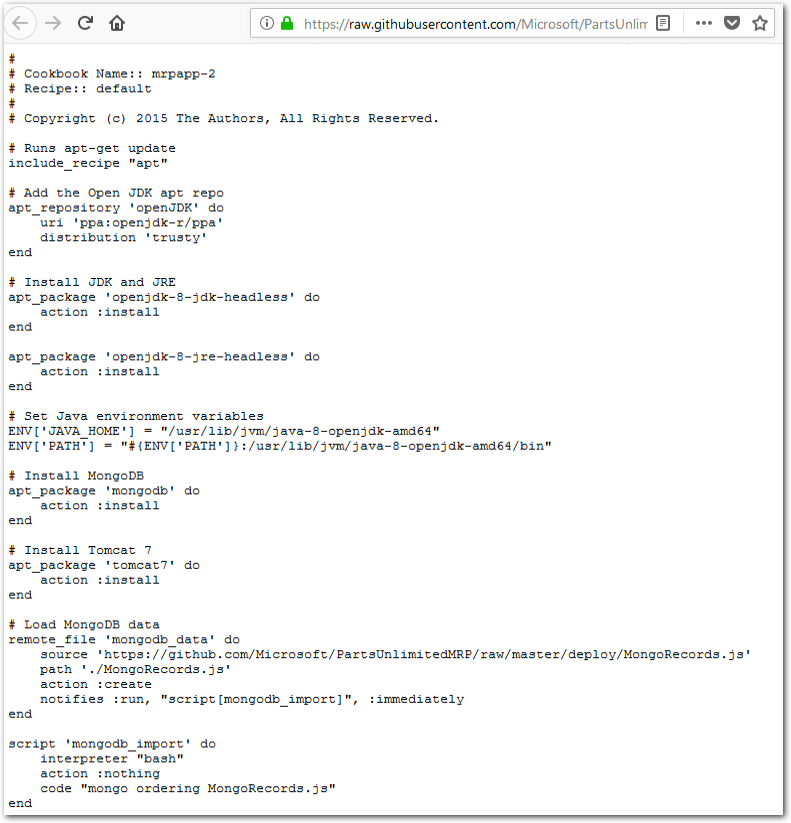
-
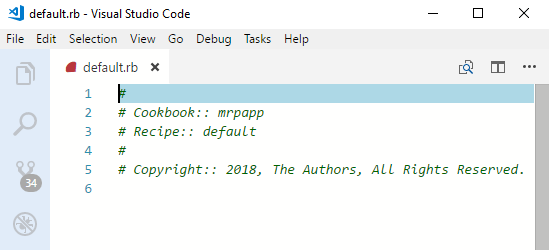
Open local file
~/chef-repo/cookbooks/mrpapp/recipes/default.rbfor editing.The file should look similar to the following, to start:
-
Paste the contents copied from the online recipe into the default recipe file
default.rb.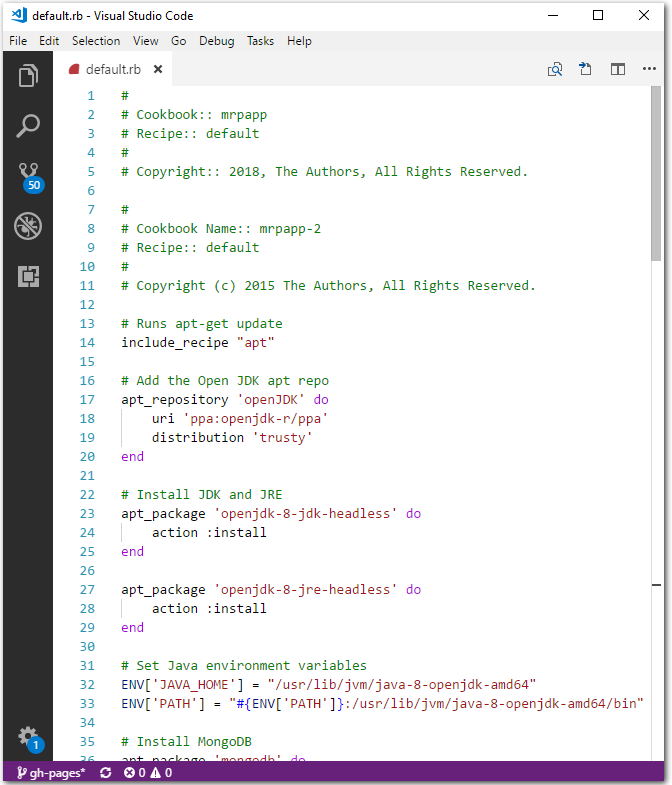
Save and close the file.
-
The following explains how the recipe we copied will provision our application, by going through
default.rbline-by-line.The recipe will run the
aptresource – this will cause our recipe to executeapt-get updatecommand prior to running. This command makes sure the package sources on the machine are up-to-date.↪ # Runs apt-get update ↪ include_recipe "apt"Now we add an
apt_repositoryresource to make sure that the OpenJDK repository is part of our apt repository list and up-to-date.↪ # Add the Open JDK apt repo ↪ apt_repository 'openJDK' do ↪ uri 'ppa:openjdk-r/ppa' ↪ distribution 'trusty' ↪ endNext, we will use the
apt-packagerecipe to ensure that OpenJDK and OpenJRE are installed. We use the headless versions as the full versions depend on a legacy package that we do not want to use.↪ # Install JDK and JRE ↪ apt_package 'openjdk-8-jdk-headless' do ↪ action :install ↪ end ↪ ↪ apt_package 'openjdk-8-jre-headless' do ↪ action :install ↪ endNext, we set the
JAVA_HOMEandPATHenvironment variables to reference OpenJDK.↪ # Set Java environment variables ↪ ENV['JAVA_HOME'] = "/usr/lib/jvm/java-8-openjdk-amd64" ↪ ENV['PATH'] = "#{ENV['PATH']}:/usr/lib/jvm/java-8-openjdk-amd64/bin"Then, we will install the MongoDB database engine and Tomcat web server.
 	↪	# Install MongoDB
 	↪	apt_package 'mongodb' do
 	↪		action :install
 	↪	end
 	↪
 	↪	# Install Tomcat 7
 	↪	apt_package 'tomcat7' do
 	↪		action :install
     ↪	end
At this point, all of our dependencies will be installed. We can then can start configuring our applications. First, we need to ensure that our MongoDB database has some baseline data in it. The
remote_fileresource will download a file to a specified location.It is idempotent which means, in this context, if the file on the server has the same checksum as the local file, no action will be taken.
We also use the
notifiescommand. For example, if a new version of the file is present when the resource runs, a notification is sent to the specified resource, telling it to run the new file.↪ # Load MongoDB data ↪ remote_file 'mongodb_data' do ↪ source 'https://github.com/Microsoft/PartsUnlimitedMRP/tree/master/deploy/MongoRecords.js' ↪ path './MongoRecords.js' ↪ action :create ↪ notifies :run, "script[mongodb_import]", :immediately ↪ endNext we use a
scriptresource to set the command line script that runs to load the MongoDB data we downloaded in the previous step.The
scriptresource has itsactionparameter set tonothing, which means the script will only run when it receives a notification to run. The only time this resource will run is when it is notified by theremote_file resourcewe specified in the previous step. So every time a new version of theMongoRecord.jsfile is uploaded, the recipe will download and import it. If theMongoRecords.jsfile does not change, nothing is downloaded or imported!↪ script 'mongodb_import' do ↪ interpreter "bash" ↪ action :nothing ↪ code "mongo ordering MongoRecords.js" ↪ endNext, we need to set the port that Tomcat will run our PU MRP application on. This uses a script resource to invoke a regular expression to update the
/etc/tomcat7/server.xmlfile.The
not_ifaction is a guard statement – if the code in thenot_ifaction returnstrue, the resource will not execute. This ensures that the script will only run if it needs to run.Another thing to note: We are referencing an attribute called
#{node['tomcat']['mrp_port']}. We have not defined this value yet, but we will in the next task. With attributes, you can set variables, so the PU MRP application can run on one port, on one server, or on a different port on a different server. If the port changes, you see that it usesnotifiesto invoke a service restart.↪ # Set tomcat port ↪ script 'tomcat_port' do ↪ interpreter "bash" ↪ code "sed -i 's/Connector port=\".*\" protocol=\"HTTP\\/1.1\"$/Connector port=\"#{node['tomcat']['mrp_port']}\" protocol=\"HTTP\\/1.1\"/g' /etc/tomcat7/server.xml" ↪ not_if "grep 'Connector port=\"#{node['tomcat']['mrp_port']}\" protocol=\"HTTP/1.1\"$' /etc/tomcat7/server.xml" ↪ notifies :restart, "service[tomcat7]", :immediately ↪ endNow we can download the PU MRP application and start running it in Tomcat. If we get a new version, it signals the Tomcat service to restart.
 	↪	# Install the PU MRP app, restart the Tomcat service if necessary
 	↪	remote_file 'mrp_app' do
 	↪		source 'https://github.com/Microsoft/PartsUnlimitedMRP/tree/master/builds/mrp.war'
 	↪		action :create
 	↪		notifies :restart, "service[tomcat7]", :immediately
     ↪	end
We can define the Tomcat service’s desired state, which is
running. This will cause the script to check the state of the Tomcat service, and start it, if it is not running. We can also signal this resource torestartwithnotifies(see above).↪ # Ensure Tomcat is running ↪ service 'tomcat7' do ↪ action :start ↪ endFinally, we can make sure the
ordering_serviceis running. This uses a combination ofremote_fileandscriptresources to check if theordering_serviceneeds to be killed and restarted. These checks ensure that theordering_servicewill always be up and running.↪ remote_file 'ordering_service' do ↪ source 'https://github.com/Microsoft/PartsUnlimitedMRP/tree/master/builds/ordering-service-0.1.0.jar' ↪ path './ordering-service-0.1.0.jar' ↪ action :create ↪ notifies :run, "script[stop_ordering_service]", :immediately ↪ end ↪ ↪ # Kill the ordering service ↪ script 'stop_ordering_service' do ↪ interpreter "bash" ↪ # Only run when notified ↪ action :nothing ↪ code "pkill -f ordering-service" ↪ only_if "pgrep -f ordering-service" ↪ end ↪ ↪ # Start the ordering service. ↪ script 'start_ordering_service' do ↪ interpreter "bash" ↪ code "/usr/lib/jvm/java-8-openjdk-amd64/bin/java -jar ordering-service-0.1.0.jar &" ↪ not_if "pgrep -f ordering-service" ↪ end -
In the Chef DK PowerShell window, commit the files we added to the Git repository with the following commands.
 git add .
 git commit -m "mrp cookbook commit"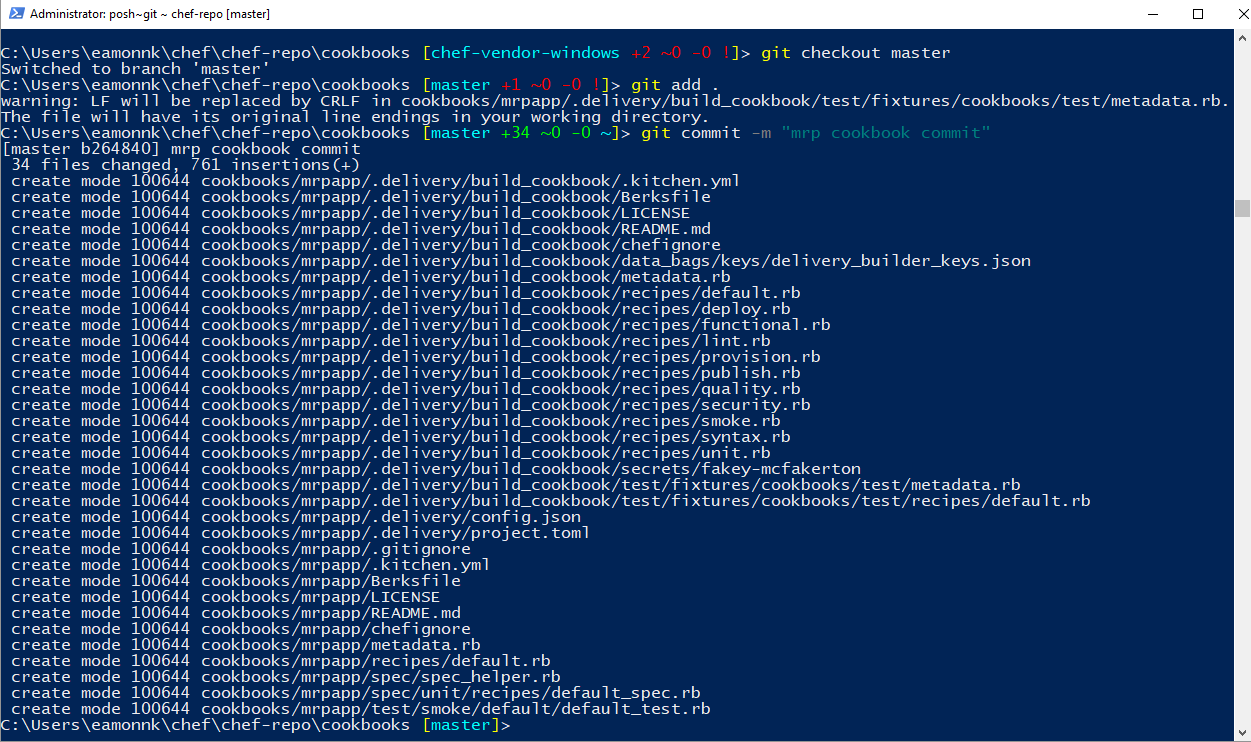
-
Now that we have created a recipe, and installed the dependencies, we can upload our cookbooks and recipes to the Chef Automate server. Use the
knife cookbook uploadcommand in the Chef DK PowerShell window, as follows.knife cookbook upload mrpapp --include-dependencies knife cookbook upload chef-client --include-dependencies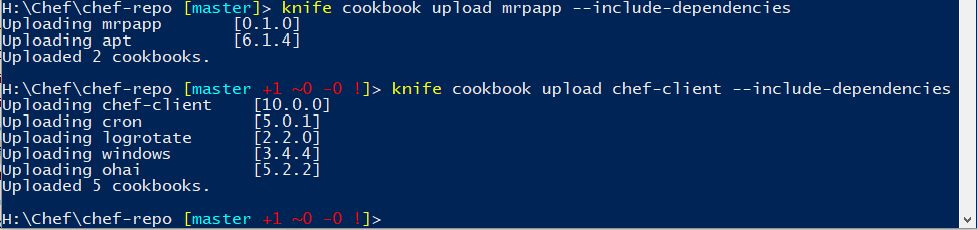
Task 4: Create a Role
In this exercise, you will use the knife command to create a Role. The role will define a baseline set of cookbooks and attributes that can be applied to multiple servers.
Note: For more information see the Chef Documentation page Knife Role.
-
In a text editor, open the file
C:\Users\<username>\chef\chef-repo\.chef\knife.rbor wherever you placed yourknife.rbfile. -
Add the following line to the end of the
knife.rbfile. Save and close the file.knife[:editor] = "notepad"![Screenshot of the local knife.rb, open inside the Visual Studio Code editor, with the added line knife[:editor] = "notepad" highlighted. The image illustrates how to edit the local knife.rb and how the file appears after editing.](../assets/pumrpdeploywithchef-feb2019/chef_notepadedit2-1.png)
Adding this line specifies Windows Notepad as the editor to open the
knife.rbwhen we create a role, in the next step. If you do not specify an editor in theknife.rb, when you run the command in step 3 you will receive an error. The error message will state something such as “Runtime ERROR: please set editor environment variable…” -
In the Chef DK PowerShell window run the following command to create the role, which we will name
partsrole.knife role create partsrole -
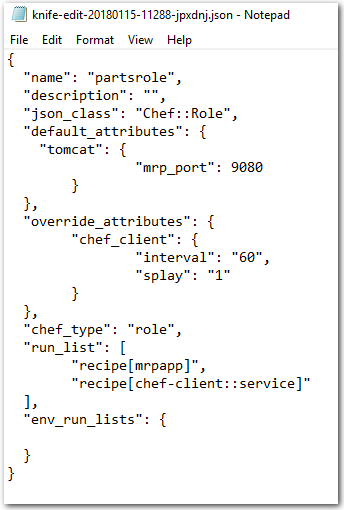
Running the command will open the Windows Notepad editor. Edit the JSON content by making the following changes. Change the
default_attributesto:"default_attributes": { "tomcat": { "mrp_port": 9080 } }, -
Update the
override_attributesto:"override_attributes": { "chef_client": { "interval": "60", "splay": "1" } }, -
Update the
run_listto:"run_list": [ "recipe[mrpapp]", "recipe[chef-client::service]" ],The completed file should be similar to the file in the following screenshot.
-
When you finish editing the JSON file, save the file and exit Notepad.
-
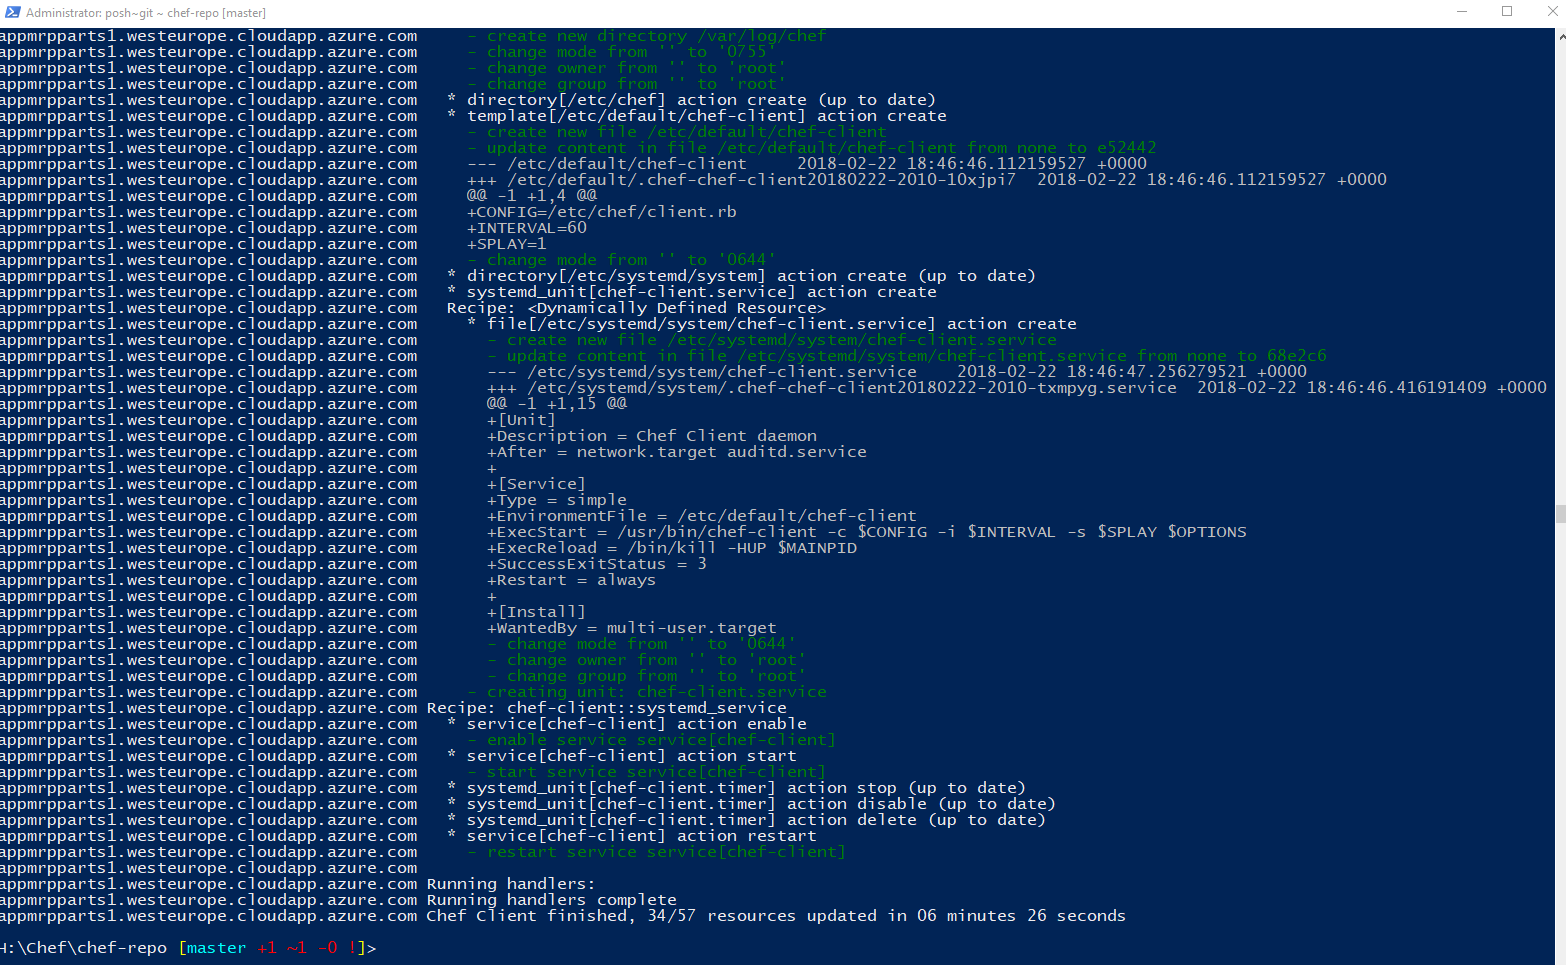
In the Chef DK PowerShell window, the
knife role create partsrolecommand that you ran in step 3 should be completed. The messageCreated role[partsrole]shown in the Chef DK PowerShell window indicates that the command ran successfully.![Screenshot of a PowerShell window. The knife role create partsrole command has been run successfully. The message Created role[partsrole] is shown which indicates that the command ran successfully. The knife commands and their outputs are shown to illustrate how to run the commands in PowerShell.](../assets/pumrpdeploywithchef-feb2019/chef_createroleparts1.png)
Task 5: Bootstrap the PU MRP App Server and Deploy the PU MRP Application
In this exercise, you will use knife to bootstrap the PU MRP Application Server and assign the PU MRP application role.
-
The PU MRP application will run on Azure in a Linux VM. Create the Linux VM by selecting the Deploy to Azure button. This will add a VM image template directly into Azure. You will need to sign in to Azure Portal to deploy the image.
The template will take approximately 5 minutes to deploy.
-
When prompted, enter the following details for the PU MRP app VM into the Deploy from a custom template pane in Azure Portal.
- Resource group:
< specify a new resource group >. Choose Create new and enter a new Resource Group name. For example,chefmrplinuxvmrg. - Location:
< whatever region location you selected for the Chef Automate >. For example,West Europe. - Admin Username:
< your admin username >. For example,azureuser. - Admin Password:
< your admin password >. For example,Passw0rd0134. - Dns Label Prefix:
appmrppartsek017 - Ubuntu OS Version:
< Leave the default value >
Check the box to Agree to the terms, and select the Purchase button.
- Resource group:
-
Once the template has deployed, return to the Chef DK PowerShell window. From inside your Chef repo directory, e.g.
C:/Users/<username>/chef/chef-repo, use knife to bootstrap the PU MRP app VM by running the following command.Note: You need to obtain the Public DNS name for your MRP App VM. To obtain the DNS name, select the Resource Groups blade in Azure Portal. Choose the Resource Group that you created in the previous step (for example,
chefmrplinuxvmrg). Select themmrpPublicIPresource (or whatever you called it) from the resources list. Copy theDNS namevalue. For example,ppmrppartsek017.westeurope.cloudapp.azure.com.In the following
knife bootstrapcommand, enter the DNS name you obtained as the value for<FQDN-for-MRP-App-VM>. You should also substitute the username and password that you set in the previous step for<mrp-app-admin-username>and<mrp-app-admin-password>. For example,azureuserandPassw0rd0134.knife bootstrap <FQDN-for-MRP-App-VM> --ssh-user <mrp-app-admin-username> --ssh-password <mrp-app-admin-password> --node-name mrp-app --run-list role[partsrole] --sudo --verboseIf prompted to continue connecting, type “Y” and press Return.

The script should take between 5 to 10 minutes to run. You will see the script perform the following operations:
- Install Chef on the VM.
- Assign the
mrpChef role to the VM. - Run the
mrpapprecipe.
Potential Errors and Issues
- The installation may not do anything for the first minute, while it connects and prepares to run. However, if it hangs for more than 5 to 10 minutes, cancel the run and note any error messages that are returned.
- If error messages relate to disconnecting from the remote host, it may be a username or password issue. You should recheck the user account details on the Chef Automate server, and on the Linux VM. Use PuTTy to sign in to the VMs.
- You can also set up the connection to use certificates instead of a username and password.
-
If there is an error related to resolving the run list, you will need to run the following command in the Chef DK PowerShell window and try again. This command will make sure the missing role is in the node.
knife node run_list add mrp-app 'role[partsrole]'
-
Open a web browser and, in the address bar, enter the Public DNS name of your MRP App VM with the suffix
:9080/mrp/. The URL should be in the following formathttp://<mrp-dns-name>.<region>.cloudapp.azure.com:9080/mrp/. For example,http://ppmrppartsek017.westeurope.cloudapp.azure.com:9080/mrp/. If the installation was successful, you should see the PU MRP application landing web page.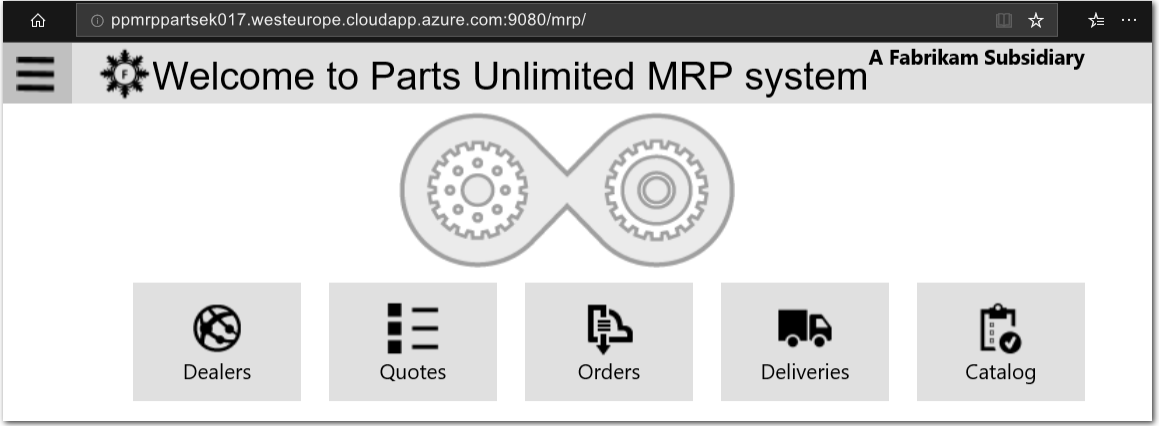
-
Explore the web site and check that it functions normally.
-
Visit the URL for your Chef Automate server in your web browser, for example
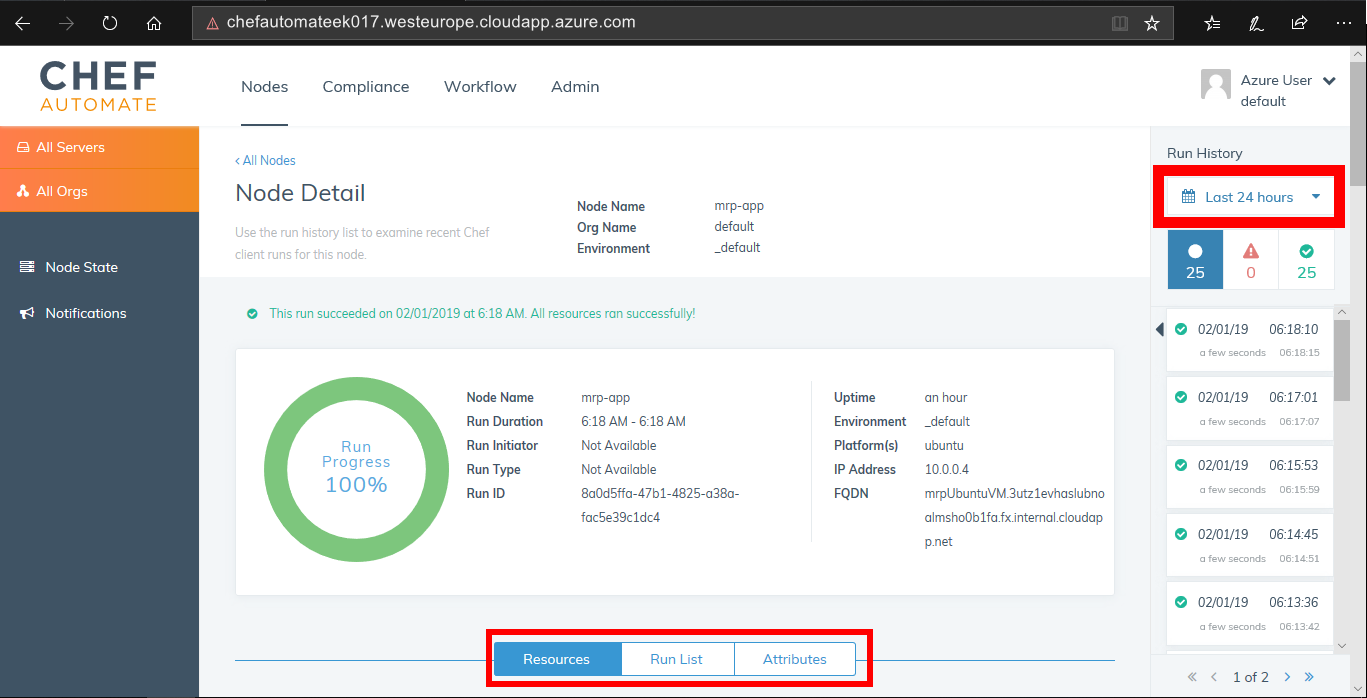
https://chefautomateek017.westeurope.cloudapp.azure.com. Log in to your Chef Automate server. From the Chef Automate Dashboard, go to the Nodes area. Verify the PU MRP Application VM is listed as nodemrp-app. Select themrp-appfrom the bottom of the dashboard.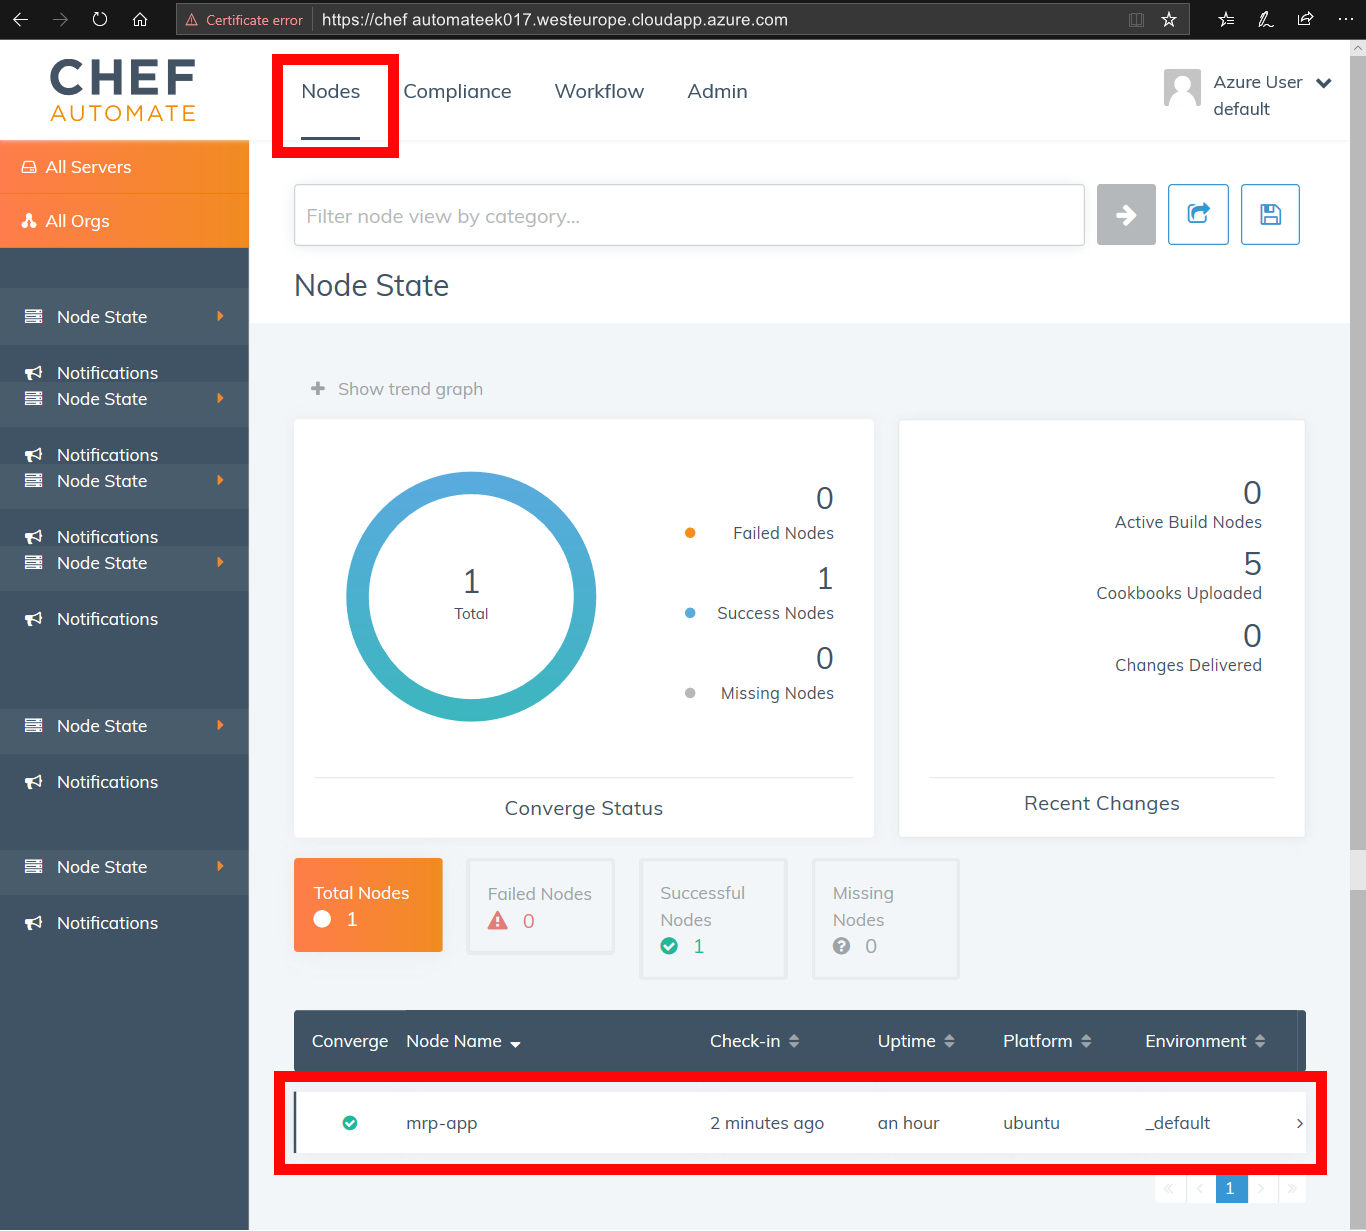
From the Run History panel, choose Last 24 hours from the dropdown list and select the Apply button. Examine the details listed under the Resources, Run List and Attributes tabs, and verify that the details are as expected.
Note: You can manage your Chef server configuration and node deployments via a web browser by installing the Chef Management Console. Go to your Chef Automate server deployment organization page by appending
/organizations/defaultto the URL you use to access your Chef Automate server. The resulting URL should be similar tohttps://< your chef automate server dns name >.< region >.cloudapp.azure.com/organizations/default. Visit the URL, and follow the instructions on the web page to install the Chef Management Console.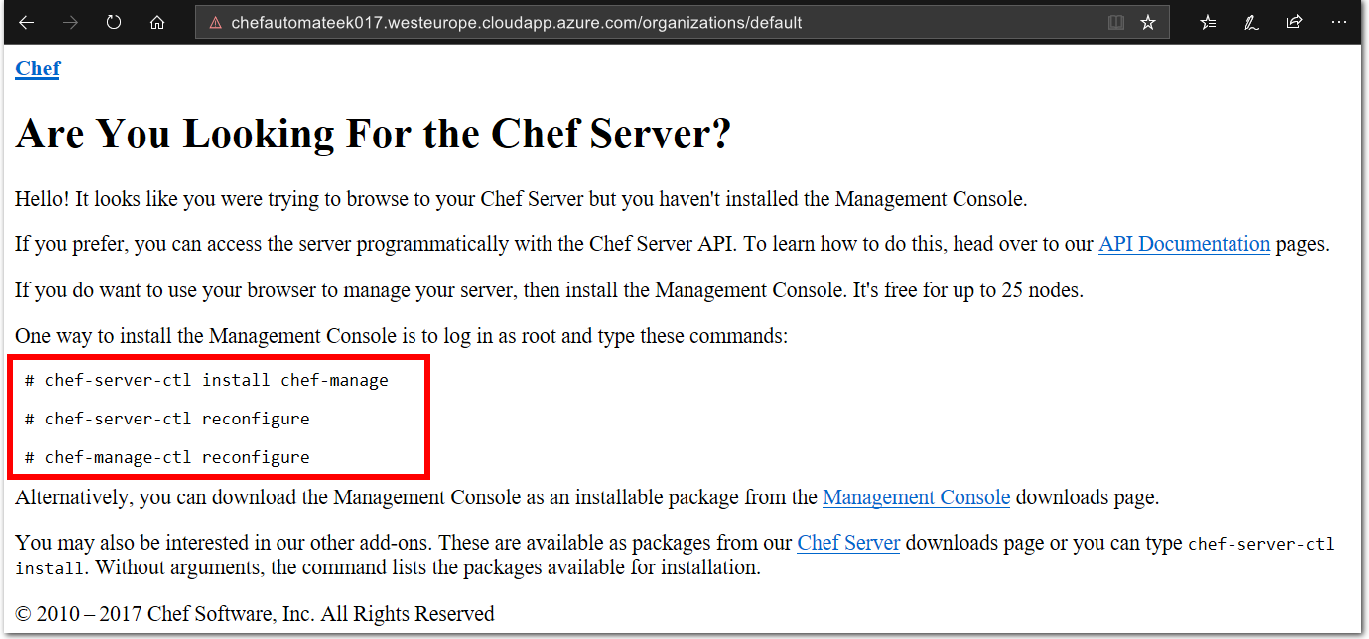
Summary:
In this lab you deployed the PU MRP app, via a Chef Automate server in Azure, to an application server. You completed the following tasks:
- Deployed a Chef Automate server in Azure.
- Configured a workstation to connect and interact with the Chef Automate server.
- Created a cookbook and recipe for the PU MRP application and its dependencies, to automate the installation of the PU MRP application.
- Uploaded a cookbook to the Chef Automate server.
- Created a Role to define a baseline set of cookbooks and attributes that can be applied to multiple servers.
- Created a Node to deploy the configuration to, i.e. a Linux VM.
- Bootstrapped the Linux VM to add the Role to the Node, i.e. deployed the PU MRP application to it using Chef.
This hands-on lab was designed to show you one option for integrating Chef with Azure. This lab also demonstrates how run lists, nodes, cookbooks, roles and recipes can be created and deployed on Azure.