Continuous Deployment with Jenkins
In this lab, you will learn how to deploy the Parts Unlimited MRP App in an automated fashion onto a Linux VM with no agent. After this lab, you will have a working pipeline in Jenkins that will build, test, and deploy the Parts Unlimited MRP app to a Virtual Machine in Azure Stack.
Pre-Requisites:
- Completion of the lab Set up Parts Unlimited MRP with Jenkins
- Completion of the Continuous Integration with Jenkins lab
Overview:
During this lab, we will implement the continuous delivery of the artifacts that we have built in the previous lab.
Install the SSH Agent plugin
In this task, we are going to install the ssh-agent plugin on Jenkins. This plugin will allow Jenkins to connect via ssh to the target machine during the deployment or the artifacts.
1. Switch to the SSH session to your Jenkins server (or open a new one if you have closed the one from the previous lab) and type the following command
sudo java -jar /var/cache/jenkins/war/WEB-INF/jenkins-cli.jar -s http://Jenkins:Passw0rd@127.0.0.1:8080/ install-plugin ssh-agent
The result should be
Installing ssh-agent from update center
2. Restart the Jenkins server so that the newly installed plugin becomes active.
From the Jenkins Master, type the following command:
sudo java -jar /var/cache/jenkins/war/WEB-INF/jenkins-cli.jar -s http://Jenkins:Passw0rd@localhost:8080/ safe-restart
Keep your ssh session open.
Create a pair of SSH keys
In this taks, we will create a pair of ssh keys to be able to automatically connect to the deployment server.
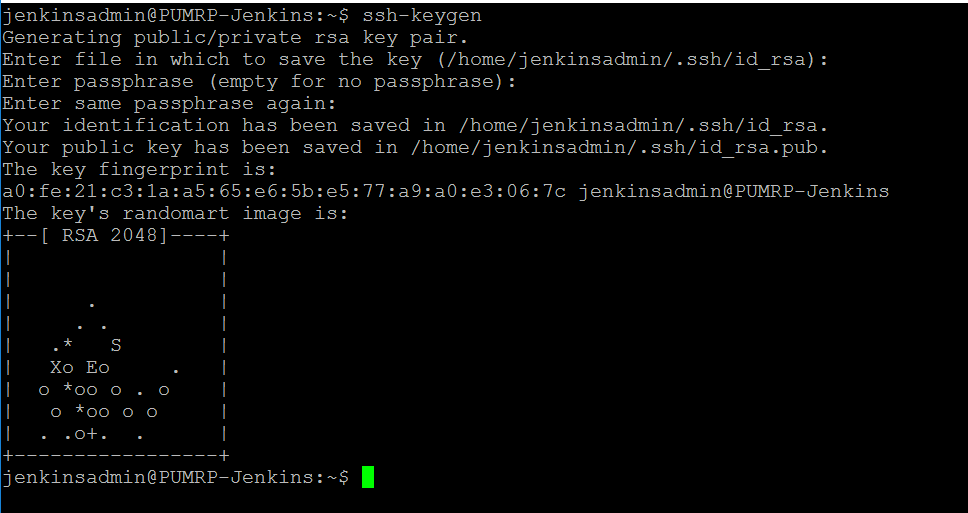
1. Type the following command:
ssh-keygen
2. Press Enter to leave the default values for the filename and the passphrase.
3. Copy the private key file to /var/lib/jenkins/.ssh by typing the following commands:
sudo mkdir /var/lib/jenkins/.ssh/
sudo chown jenkins:jenkins /var/lib/jenkins/.ssh
sudo cp .ssh/id_rsa /var/lib/jenkins/.ssh/id_rsa
sudo chown jenkins:jenkins /var/lib/jenkins/.ssh/id_rsa
4. Create a Jenkins credentials
Navigate to
http://ip_address_of_your_jenkinsmaster:8080/credentials/store/system/domain/_/newCredentials
Because of the restart, you will have to authenticate again with the following credentials:
- Username = Jenkins
- Password = Passw0rd
5. Enter the values for the credentials as follows
- Select SSH Username with private key for the Kind
- Leave the scope as “Global”
- Type mrpadmin for the Username
- Select From the Jenkins master ~/.ssh
- Leave the Passphrase empty
- Type mrpadmin for the ID
Click OK

Create the VM to run the Parts Unlimited MRP application
Now, you have 2 options for deployment.
- ARM Template & Custom Deployment -> for this option, you will perform a new custom template deployment from Azure Stack, using a JSON file that will be provided for you. You will enter a number of key values for the parameters, and then deploy. This is the quicker option.
- Create a Custom Marketplace Item for Deployment -> for this option, in the same way you (optionally) added an Ubuntu 16.04.3-LTS item to the Azure Stack Marketplace, you will add a new .azpkg to your Azure Stack, and configure the deployment from this, providing the same parameters as per option 1.
The end result of both of these options is the same, however if you’d like to populate your gallery with more items, use option 2.
*Option 1 - ARM Template & Custom Deployment
If you’re not interested in creating a Marketplace item for ‘Parts Unlimited MRP with SSH’, then this quick and easy approach should make things, well, quick and easy for you!
Firstly, we need the SSH key to use with this new virtual machine. To obtain this, go back to your SSH session, and run:
cat ./.ssh/id_rsa.pub
Select the returned text, and copy it. We will use it later.

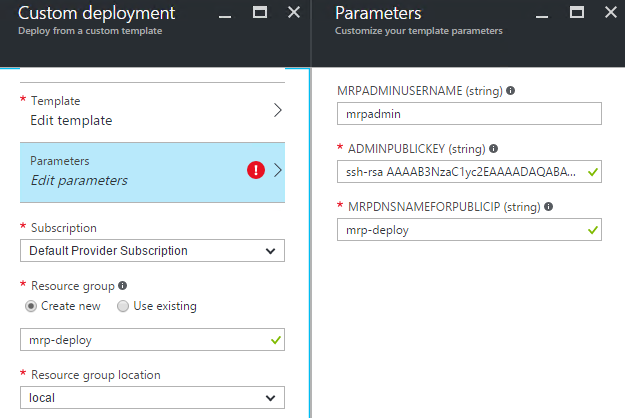
Then, from your Azure Stack Development Kit Host machine, you need to click on the button below to deploy the MRP virtual machine, and fill in the parameter fields. The link should open the Azure Stack portal, and if you’re not already logged in, it’ll prompt you for your Azure Stack credentials, then take you immediately to the custom template blade.

You’ll need to enter information for the following fields:
- ADMINPUBLICKEY - Paste the string that you have copied earlier.
- MRPDNSNAMEFORPUBLICIP - for testing purposes, use mrp-deploy.
- Resource Group - for testing purposes, use mrp-deploy.
- Location - seeing as this is the Azure Stack Development Kit, you’ll just be able to choose local for now.
If you’re interested in taking a deeper look at the ARM template that is used for deployment, you could either click Edit Template within the custom template deployment blade, and that will present the template that will be used for the deployment, or alternatively, you could grab the ARM template from here
Depending on your hardware, the deployment of the key artifacts, the virtual machine, and its respective automated configuration, may take a while. Expect around 20-30 mins for the deployment, unless you have new hardware, and a bank of SSDs for storage!
Once the deployment has completed, you’re ready to proceed with the lab.
*Option 2 - Create a Custom Marketplace Item for Deployment
If you are interested in adding a custom marketplace item to your Azure Stack marketplace, then these steps will help. I’ve already made the package for you, so you should just be able to follow these steps, and import it right into your Azure Stack.
As we saw earlier, when we added our Ubuntu base image to the Azure Stack marketplace, things are much easier when something is packaged for you, so to start things off, pull down the .azpkg file for our Parts Unlimited MRP with SSH machine, that I’ve stored on GitHub. From yor Azure Stack Development Kit Host machine, do the following:
- Navigate to your PartsUnlimited.MRPSSH.1.0.0.azpkg file, you downloaded earlier
- Move it to a newly created folder C:\MyMarketPlaceItems.
It’s important to note that if you are going to use the package I have provided, you need to have used the following info when you uploaded your Ubuntu base VHD image to the platform image repository earlier. Any differences, and the package I’m providing will not reference your uploaded image. If you used an exact copy of my PowerShell upload script, you’re all set.
- Publisher "Canonical"
- Offer "UbuntuServer"
- SKU "16.04.3-LTS"
Now that we have the package ready to upload, we need somewhere in Azure Stack to upload it to. Fortunately, we created a storage account for this very purpose earlier, so we’ll use the same storage account for this package.
- Connect to your Azure Stack via an administrative PowerShell console. If you’re not still connected from the earlier steps, run the following:
  cd\
  cd C:\AzureStack-Tools-master\connect
  Import-Module .\AzureStack.Connect.psm1
  Add-AzureStackAzureRmEnvironment -Name "AzureStackAdmin" -ArmEndpoint "https://adminmanagement.local.azurestack.external"
  $TenantID = Get-DirectoryTenantID -AADTenantName "<myaadtenant>.onmicrosoft.com or customdomain.com" -EnvironmentName AzureStackAdmin
  $UserName='<username@myaadtenant.onmicrosoft.com or username@customdomain.com>'
  $Password='<administrator or user password>'| `
  ConvertTo-SecureString -Force -AsPlainText
  $Credential= New-Object PSCredential($UserName,$Password)
  Login-AzureRmAccount -EnvironmentName "AzureStackAdmin" -TenantId $TenantID -Credential $Credential
- Now, let’s access the storage account to hold this package. If you recall, we named the storage account tenantartifacts and this is located in a dedicated resource group of the same name:
  $StorageAccount = Get-AzureRmStorageAccount -ResourceGroupName tenantartifacts -Name tenantartifacts
  $GalleryContainer = Get-AzureStorageContainer -Name gallery -Context $StorageAccount.Context
- With the resource group, storage account and gallery container now accessible, we can push our new Jenkins marketplace package into Azure Stack.
$GalleryContainer | Set-AzureStorageBlobContent -File "C:\MyMarketPlaceItems\PartsUnlimited.MRPSSH.1.0.0.azpkg"
$GalleryItemURI = (Get-AzureStorageBlob -Context $StorageAccount.Context -Blob 'PartsUnlimited.MRPSSH.1.0.0.azpkg' -Container 'gallery').ICloudBlob.uri.AbsoluteUri
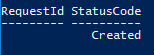
Add-AzureRMGalleryItem -GalleryItemUri $GalleryItemURI -Verbose
When successful, you should see a StatusCode of Created
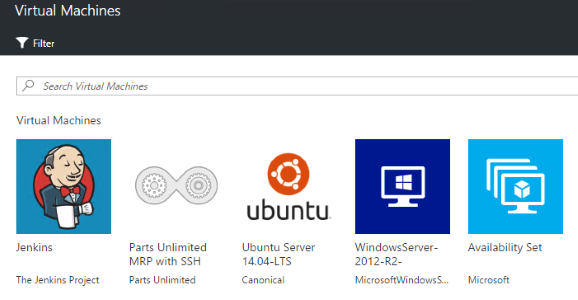
Go back and refresh the portal, and under New -> Virtual Machines -> See All, you should see your newly added Parts Unlimited MRP with SSH marketplace item
With your newly created marketplace item created and pushed to the Azure Stack Marketplace, we’re ready to deploy an instance of the environment.
- On the Azure Stack Development Kit Host machine, in your Azure Stack portal, click on New, then Virtual Machines, then See all.
- Select the Parts Unlimited MRP with SSH item in the marketplace, and click Create.
- You’ll need to enter information for the following fields:
- ADMINPUBLICKEY - Paste the string that you have copied earlier.
- MRPDNSNAMEFORPUBLICIP - for testing purposes, use mrp-deploy.
- Resource Group - for testing purposes, use mrp-deploy.
- Location - seeing as this is the Azure Stack Development Kit, you’ll just be able to choose local for now.
Once you’ve filled in the fields, it should look like this:
- Click OK to confirm the parameters, and then Create to start the deployment.
Depending on your hardware, the deployment of the key artifacts, the virtual machine, and its respective automated configuration, may take a while. Expect around 20-30 mins for the deployment, unless you have new hardware, and a bank of SSDs for storage!
Once the deployment has completed, you’re ready to proceed with the lab.
Update the Jenkins pipeline
In this task we will update the Jenkins pipeline to automatically deploy the artifacts after they have been built.
Navigate to the configuration of your pipeline:
http://ip_address_of_your_jenkinsmaster:8080/job/PartsUnlimitedMRP/configure
In the pipeline, go to the end of the script (line 31) and before the last line (the trailing “}” you need to paste in the following code.
    stage ('Save MongoRecords.js') {
        dir('deploy') {
            archiveArtifacts artifacts: 'MongoRecords.js', excludes: '**/docker'
        }
    }

    def mrpipaddress

    stage ('Get MRP IP Address') {
        mrpipaddress = input(
            id: 'mrpipaddress', message: 'Please enter the MRP VM IP Address', parameters: [
                [$class: 'TextParameterDefinition', defaultValue: '192.168.102.1', description: 'This is the IP Address by which the VM can be remotely accessed', name: 'mrpipaddress']
                ])
        echo ("MRP IP Address: ${mrpipaddress}")
    }

    stage ("ssh") {
        sshagent(['mrpadmin']) {
            sh "ssh -o StrictHostKeyChecking=no -l mrpadmin  ${mrpipaddress} 'curl -O ${env.JENKINS_URL}/job/PartsUnlimitedMRP/lastSuccessfulBuild/artifact/build/libs/mrp.war'"
            sh "ssh -o StrictHostKeyChecking=no -l mrpadmin  ${mrpipaddress} 'curl -O ${env.JENKINS_URL}/job/PartsUnlimitedMRP/lastSuccessfulBuild/artifact/build/libs/integration-service-0.1.0.jar'"
            sh "ssh -o StrictHostKeyChecking=no -l mrpadmin  ${mrpipaddress} 'curl -O ${env.JENKINS_URL}/job/PartsUnlimitedMRP/lastSuccessfulBuild/artifact/build/libs/ordering-service-0.1.0.jar'"
            sh "ssh -o StrictHostKeyChecking=no -l mrpadmin  ${mrpipaddress} 'curl -O ${env.JENKINS_URL}/job/PartsUnlimitedMRP/lastSuccessfulBuild/artifact/MongoRecords.js'"
            sh "ssh -o StrictHostKeyChecking=no -l mrpadmin  ${mrpipaddress} 'curl -sL https://raw.githubusercontent.com/Microsoft/PartsUnlimitedMRP/master/docs/assets/jenkins/env/deploy_mrp_app.sh | sudo bash -'"
        }
        sh "curl -sL -w \"%{http_code}\\n\" http://${mrpipaddress}:9080/mrp/ -o /dev/null"
    }
Click Save
NOTE: In the Azure Stack environment, because we have chosen not to automate the new build process on the changing of code in GitHub, you will still need to manually press Build Now in the Jenkins UI After we make a change to the code in GitHub.
The pipeline shall now be the following - Make sure you change the git url on line 4, to your GitHub repository.
node{

    stage ("Checkout") {
    git url: 'https://github.com/Microsoft/PartsUnlimitedMRP'
    }

    env.JAVA_HOME = "${tool 'JDK 8'}"
    env.PATH = "${env.JAVA_HOME}/bin:${env.PATH}"
    sh 'java -version'

    stage ('Build IntegrationService') {
        dir('src/Backend/IntegrationService') {
            sh 'chmod +x gradlew'
            sh './gradlew build'
            archiveArtifacts artifacts: '**/integration-service*.jar', excludes: null
        }
    }

    stage ('Build OrderService') {
        dir('src/Backend/OrderService') {
            sh 'chmod +x gradlew'
            sh './gradlew build'
            archiveArtifacts artifacts: '**/ordering-service*.jar', excludes: null
            junit '**/TEST-*.xml'
        }
    }

    stage ('Build Client') {
        dir('src/Clients') {
            sh 'chmod +x gradlew'
            sh './gradlew build'
            archiveArtifacts artifacts: '**/mrp.war', excludes: null
        }
    }

    stage ('Save MongoRecords.js') {
        dir('deploy') {
            archiveArtifacts artifacts: 'MongoRecords.js', excludes: '**/docker'
        }
    }

    def mrpipaddress

    stage ('Get MRP IP Address') {
        mrpipaddress = input(
            id: 'mrpipaddress', message: 'Please enter the MRP VM IP Address', parameters: [
                [$class: 'TextParameterDefinition', defaultValue: '192.168.102.1', description: 'This is the IP Address by which the VM can be remotely accessed', name: 'mrpipaddress']
                ])
        echo ("MRP IP Address: ${mrpipaddress}")
    }

    stage ("ssh") {
        sshagent(['mrpadmin']) {
            sh "ssh -o StrictHostKeyChecking=no -l mrpadmin  ${mrpipaddress} 'curl -O ${env.JENKINS_URL}/job/PartsUnlimitedMRP/lastSuccessfulBuild/artifact/build/libs/mrp.war'"
            sh "ssh -o StrictHostKeyChecking=no -l mrpadmin  ${mrpipaddress} 'curl -O ${env.JENKINS_URL}/job/PartsUnlimitedMRP/lastSuccessfulBuild/artifact/build/libs/integration-service-0.1.0.jar'"
            sh "ssh -o StrictHostKeyChecking=no -l mrpadmin  ${mrpipaddress} 'curl -O ${env.JENKINS_URL}/job/PartsUnlimitedMRP/lastSuccessfulBuild/artifact/build/libs/ordering-service-0.1.0.jar'"
            sh "ssh -o StrictHostKeyChecking=no -l mrpadmin  ${mrpipaddress} 'curl -O ${env.JENKINS_URL}/job/PartsUnlimitedMRP/lastSuccessfulBuild/artifact/MongoRecords.js'"
            sh "ssh -o StrictHostKeyChecking=no -l mrpadmin  ${mrpipaddress} 'curl -sL https://raw.githubusercontent.com/Microsoft/PartsUnlimitedMRP/master/docs/assets/jenkins/env/deploy_mrp_app.sh | sudo bash -'"
        }
        sh "curl -sL -w \"%{http_code}\\n\" http://${mrpipaddress}:9080/mrp/ -o /dev/null"
    }

}
Connecting the dots
1. Go to the source code on your GitHub repository
2. Edit the file src/Clients/Web/index.html
You can change the title of the page for example.
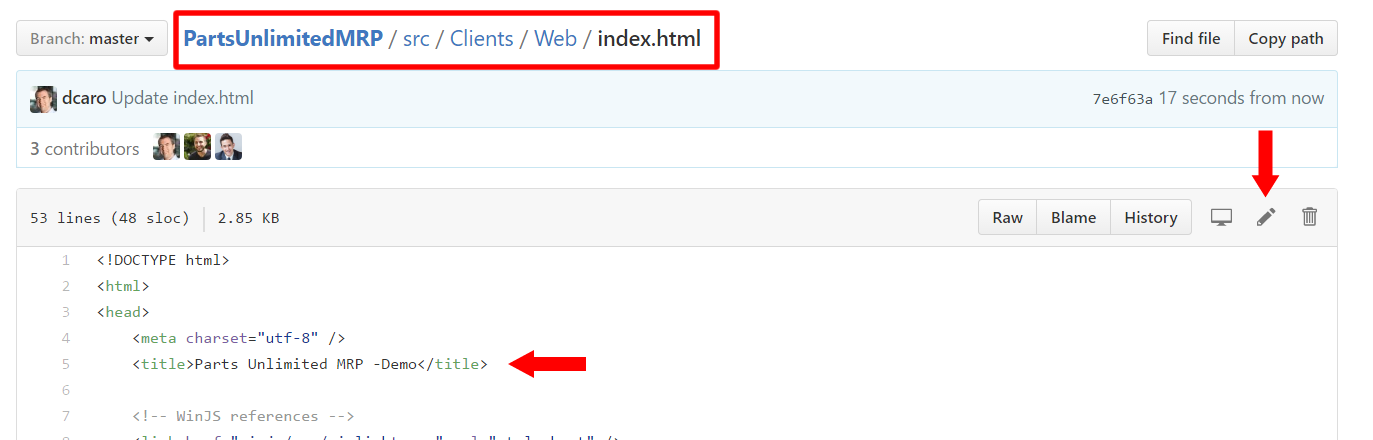
3. Click Commit changes
4. Navigate to your Jenkins master, and click Build Now
http://ip_address_of_your_jenkinsmaster:8080/job/PartsUnlimitedMRP/
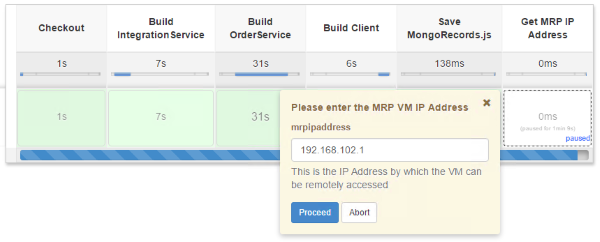
5. The build will begin, and the pipeline will stop at the stage Get MRP IP Address
Click on the step that is paused and enter the IP address of the MRP machine, this is the Parts Unlimited MRP with SSH VM you deployed earlier
Click Proceed
6. Wait until the completion of the pipeline
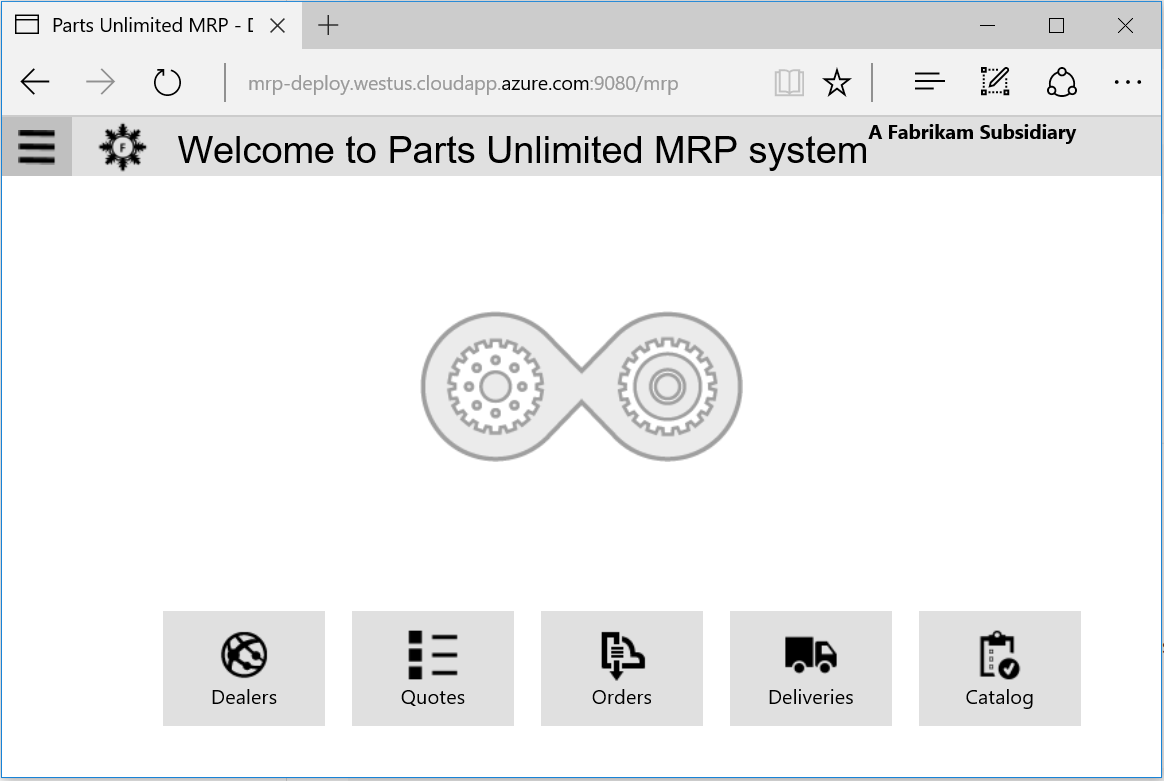
7. Navigate to the following address:
http://ip_address_of_the_mrp_deployment_machine:9080/mrp
The IP address of the MRP deployment machine is the IP address of the Parts Unlimited MRP with SSH VM you deployed earlier
Verify that the Title in the browser is the same than the one you have modified in the code.
Next steps
In this lab, you learned how to implement Continuous Deployment for the Parts Unlimited MRP Application. This allows you to reduce the time to go in production and get feedback if your changes are okay. Implemented with Continuous Integration, the changes performed by the developers are pushed, in a continuous manner into production without removing the ability to have human control.
If you’re interested in learning more about DevOps tooling on Azure Stack, check out these Hands-On-Labs: