Continuous Integration with Jenkins
In this lab, we have an application called Parts Unlimited MRP. We want to set up Jenkins to continuously integrate code into the master branch. This means that whenever code is committed and pushed to the master branch, we want to ensure that it integrates correctly to get fast feedback. To do so, we are going to be creating a pipeline that will allow us to compile and run unit tests on our code every time a commit is pushed to GitHub.
DevOps MPP Course Source
- This lab is used in course DevOps200.3x: Continuous Integration and Continuous Deployment - Module 1.
Pre-Requisites:
- Completion of the lab Set up Jenkins in Azure
- Have a Github account https://github.com and basic skills on how to work in GitHub.
Lab Tasks:
- Configure your GitHub repository
- Create a new pipeline
- Adding test coverage
Estimated Lab Time:
- approx. 60 minutes
Task 1: Configure your GitHub repository
During the following tasks you will fork the PartsUnlimitedMRP Github repository and create a Jenkins pipeline for the Continuous Integration of the Parts Unlimited MRP application.
You will learn how to configure Jenkins so that whenever a change is checked in on the code repository, a build will be triggered and the available tests will be performed.
1. Nagivate to https://github.com/Microsoft/PartsUnlimitedMRP/
2. Sign in with your github account
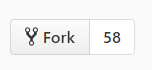
3. Click on Fork.
NOTE: if you have multiple account, select the account you want to fork to.
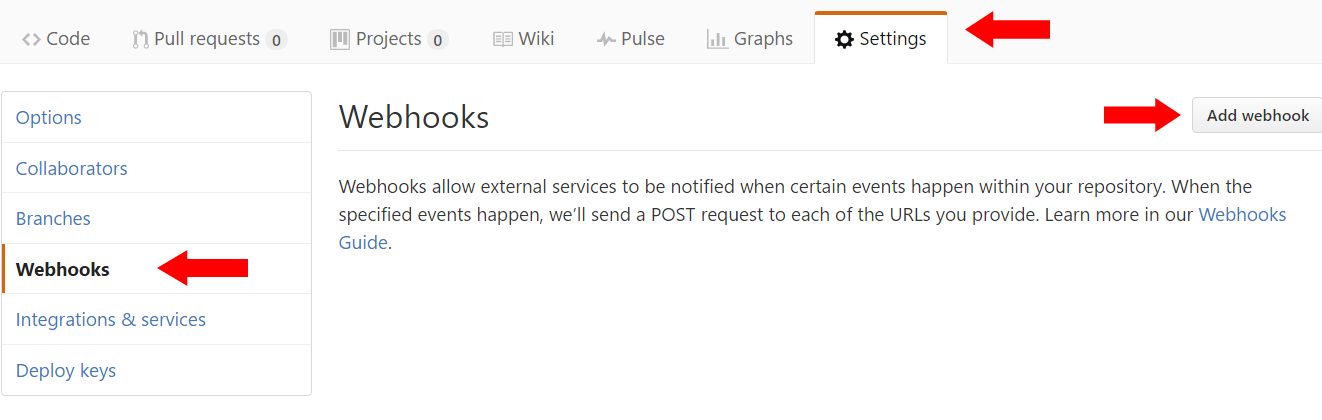
4. Go to the repository that you have just forked and click on the tab Settings
5. Click on Webhooks then Add webhook
6. Type the following in the Payload URL.
http://fqdn_of_your_jenkinsmaster/job/PartsUnlimitedMRP/build
- For our current example it would be
http://mspujenkins.australiasoutheast.cloudapp.azure.com/job/PartsUnlimitedMRP/build
Note:
- You can use the IP or the FQDN of your jenkins master server.
7. Click Add webhook
- Ignore the error flag on the webhook, we will be doing the necessary configuration on Jenkins to enable this endpoint over the next steps.
8. Navigate to
http://localhost:8080/configureSecurity/
Note: If you get an 404 error from localhost:8080 make sure if haven’t close the Putty session created on the previous lab. If the session was closed, you have to create a new session to complete this lab. It’s important to create the Tunnel to localhost:8080 (following the steps from the pre-requisite lab) when connecting using Putty, otherwise you will not be able to login to Jenkins.
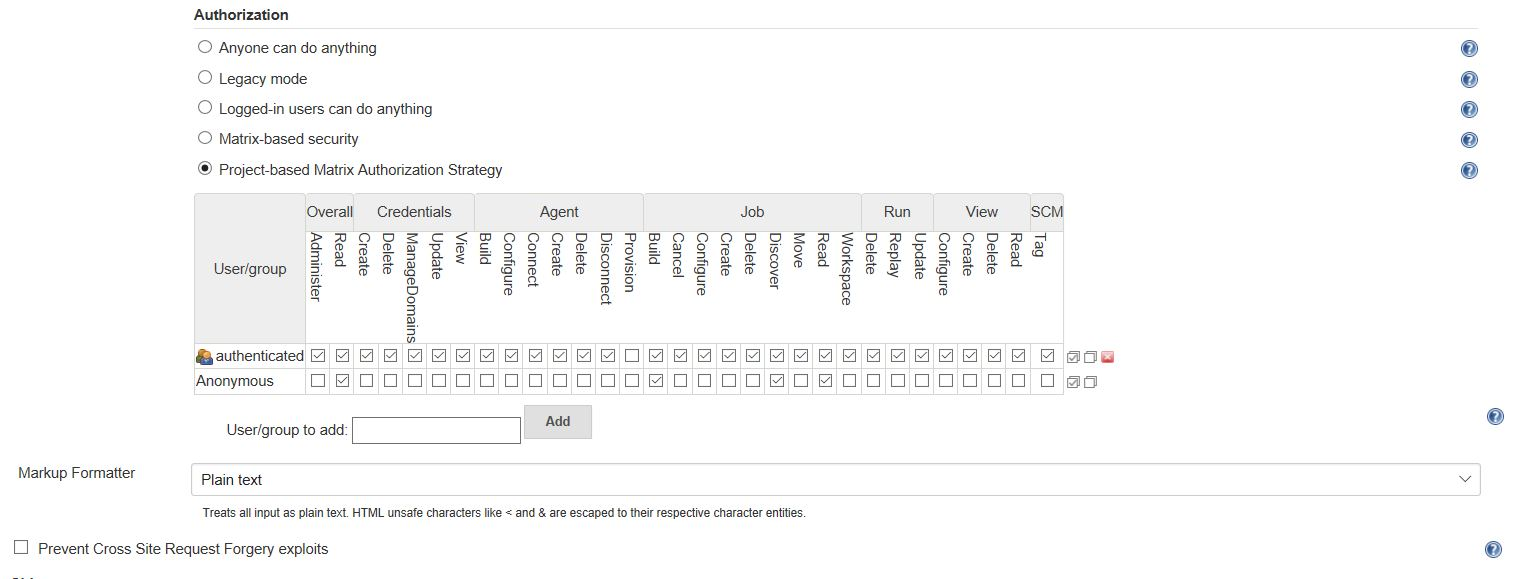
9. Allow anonymous users to start builds.
- On the
Authorizationsection edit theMatrix Authentication Strategyby allowingBuildon the groupJobsforAnonymoususers.
Note: In an official environment a secure certificate would have to be configured to enable Jenkins HTTPS and allow public IPs to authenticate on Jenkins server. On this lab we are allowing anonymous users to start build routines, saving configurations time. Please check Jenkins instructions for more details on how to configure Jenkins certificate.
10. Unselect the box Prevent Cross Site Request Forgery exploits and click Save.
This will Disable the CSRF protection on the Jenkins master but is an easy way to enable CI with Github.
Task 2: Create a new pipeline
In this task, we will create a new pipeline that will build the artifacts of the application.
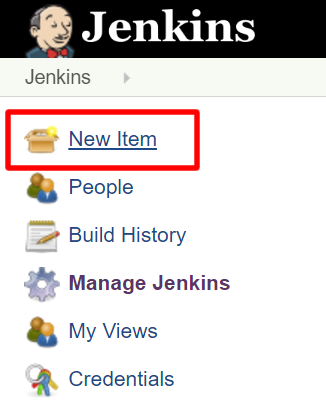
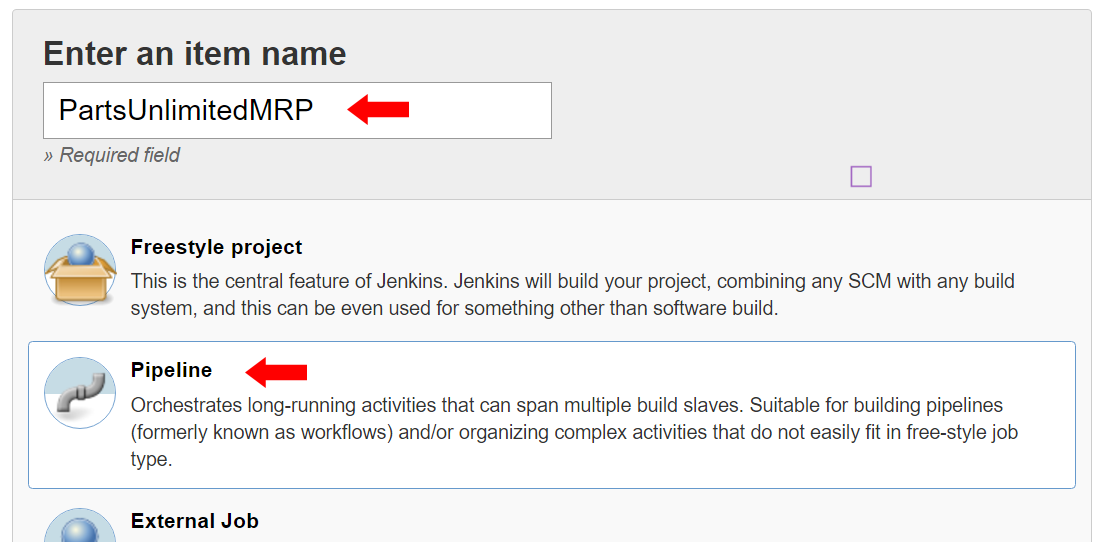
1. Create an empty pipeline
- From you Jenkins master, click on New Item. You can also go directly to
http://localhost:8080/view/All/newJob
- Type the following name for the pipeline: PartsUnlimitedMRP
- Select Pipeline
- Click OK
Note: The pipeline type in Jenkins will allow us to describe all the build step with Groovy code. This code can be easily ported on any Jenkins system and could also be embedded in a Jenkins file in the source code.
2. Create the Pipeline
-
Click on the tab name Pipeline and ensure that the definition is Pipeline script
-
The following code will clone the source code from PartsUnlimited, define the environment variables for the JDK and print the version of Java that we are using. Copy the script below in the Script box.
    node{
        stage ("Checkout") {
        git 'https://github.com/Microsoft/PartsUnlimitedMRP.git'
        }

        env.JAVA_HOME = "${tool 'JDK 8'}"
        env.PATH = "${env.JAVA_HOME}/bin:${env.PATH}"
        sh 'java -version'
    }
- Replace the git url with the url of your own github repository.
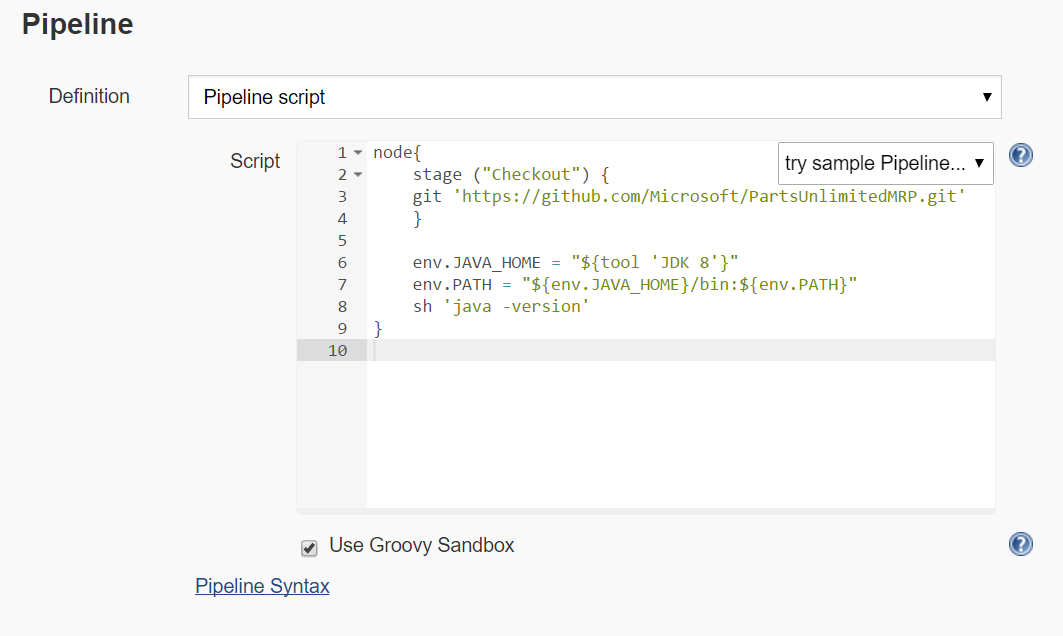
-
The stage syntax in the code above defines a boundary of code that will be executed together. In a pipeline you can have as many stages as you want, they can run sequentially or in parallel, depending on the constraints that you have to build the application.
-
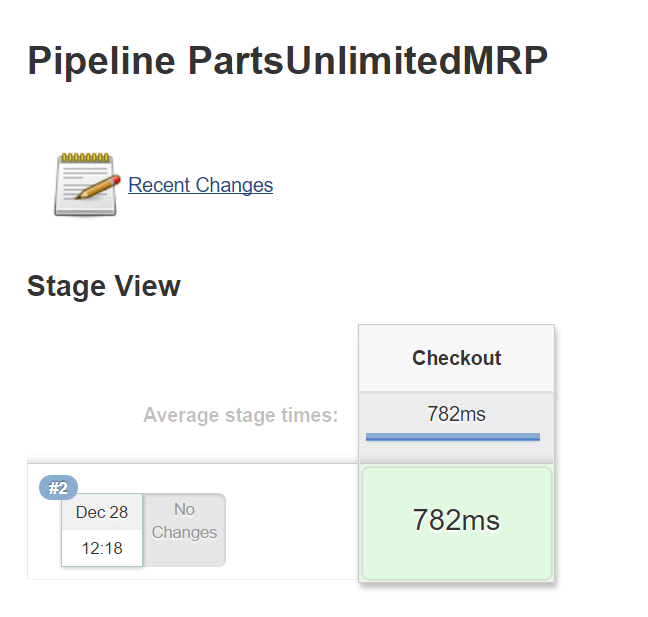
Click Save and then Build Now
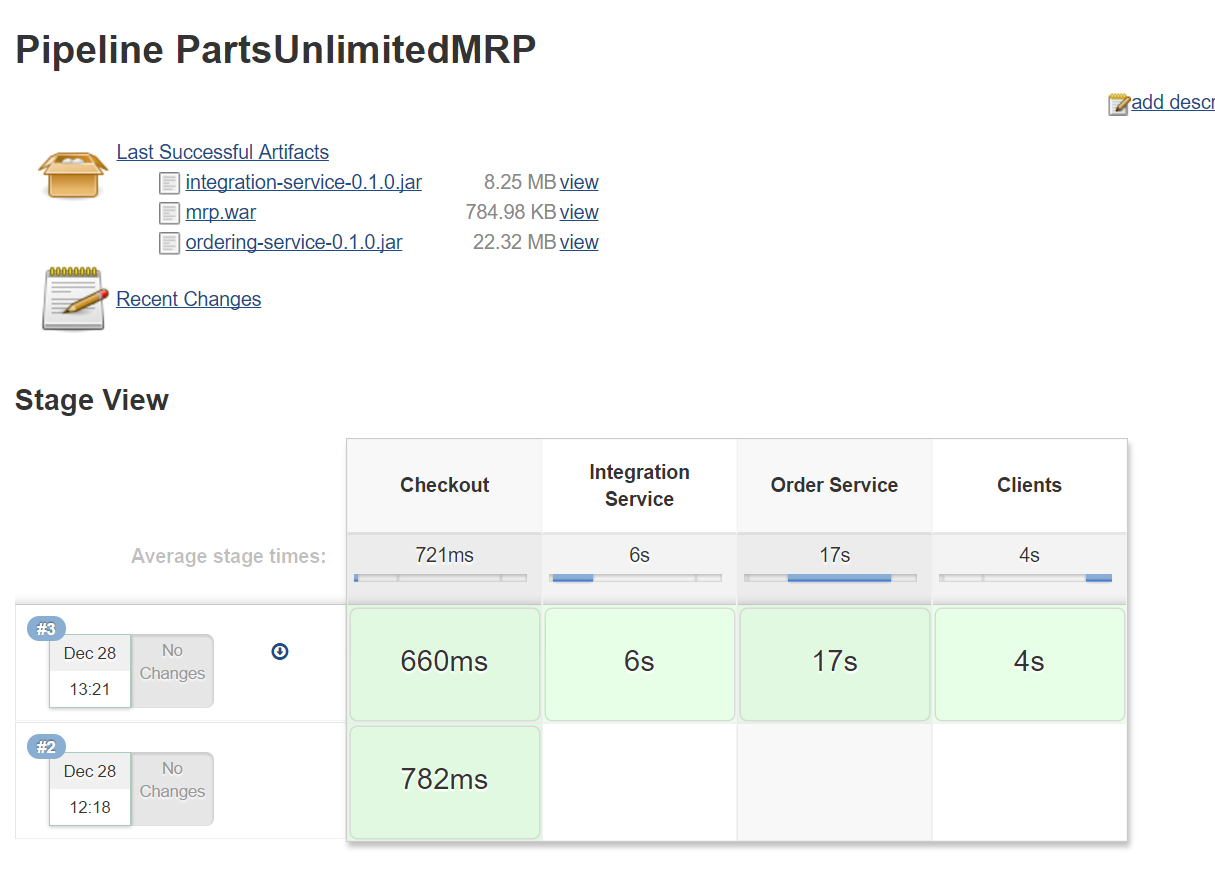
- After few seconds you should have a successful build with following result:
3. Building PartsUnlimitedMRP
Now that we have a basic pipeline, let’s add the code that will define the build of the Parts Unlimited application. The application is composed of three components:
- The Order Service
- The Integration Service
- The Client application
We will create a stage for each of those components.
-
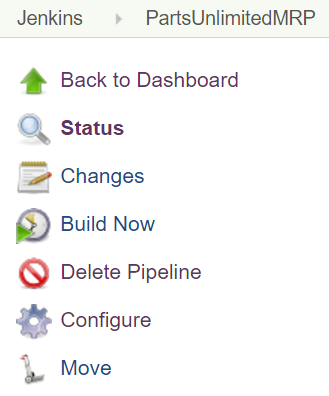
Click on Configure on the left section or access
http://localhost:8080/job/PartsUnlimitedMRP/configure -
Copy the following code in the pipeline script:
node{
    stage ("Checkout") {
        git 'https://github.com/Microsoft/PartsUnlimitedMRP.git'
        }

    env.JAVA_HOME = "${tool 'JDK 8'}"
    env.PATH = "${env.JAVA_HOME}/bin:${env.PATH}"
    sh 'java -version'

    stage ("Integration Service") {
            dir('src/Backend/IntegrationService') {
            sh 'chmod +x gradlew'
            sh './gradlew build'
            archiveArtifacts artifacts: '**/integration-service*.jar', excludes: null
        }
    }
    stage ("Order Service") {
            dir('src/Backend/OrderService') {
            sh 'chmod +x gradlew'
            sh './gradlew build'
            archiveArtifacts artifacts: '**/ordering-service*.jar', excludes: null
        }
    }
    stage ("Clients") {
        dir('src/Clients') {
            sh 'chmod +x gradlew'
            sh './gradlew build'
            archiveArtifacts artifacts: '**/mrp.war', excludes: null
        }
    }
}
-
Replace the git url
https://github.com/Microsoft/PartsUnlimitedMRP.gitwith the url of your own github repository. -
Click Save and then Build Now
Note: You may have to refresh the page once the build has completed to see the artifacts that have been produced.
Task 3: Adding test coverage
The Parts Unlimited MRP Application performs some test for the OrderService component. In this task, we will add some information about the results of those tests and display the trend of the results of those tests.
1. Cick on Configure to edit your pipeline script.
2. After line 21, insert the following code
junit '**/TEST-*.xml'
The new pipeline code is:
node{
    stage ("Checkout") {
    git 'https://github.com/Microsoft/PartsUnlimitedMRP.git'
    }
    env.JAVA_HOME = "${tool 'JDK 8'}"
    env.PATH = "${env.JAVA_HOME}/bin:${env.PATH}"
    sh 'java -version'
    stage ("Integration Service") {
            dir('src/Backend/IntegrationService') {
            sh 'chmod +x gradlew'
            sh './gradlew build'
            archiveArtifacts artifacts: '**/integration-service*.jar', excludes: null
        }
    }
    stage ("Order Service") {
            dir('src/Backend/OrderService') {
            sh 'chmod +x gradlew'
            sh './gradlew build'
            archiveArtifacts artifacts: '**/ordering-service*.jar', excludes: null
            junit '**/TEST-*.xml'
        }
    }
    stage ("Clients") {
        dir('src/Clients') {
            sh 'chmod +x gradlew'
            sh './gradlew build'
            archiveArtifacts artifacts: '**/mrp.war', excludes: null
        }
    }
}
3. Click on Save then Build Now.
The test results as displayed below will be displayed AFTER two build and refreshing the page.

Summary
In this lab, you learned how to create a Continuous Integration build that runs when new commits are pushed to the master branch. This allows you to get feedback as to whether your changes made breaking syntax changes, or if they broke one or more automated tests, or if your changes are okay.
Continuous Feedback - Issues / Questions about this Lab ?
Thanks