
TIP
🔥 Make sure you star the repo (opens new window) to keep up to date with new tips and tricks.
💡 Learn more : Azure Private Link overview (opens new window).
📺 Watch the video : How can I get started with Azure Private Link (opens new window).
# What's Azure Private Link and how can I get started?
# Connect to services securely
It is very important to secure all aspects of your application, including your data communications. This can be difficult as services in the cloud are often exposed to the public internet. Azure Private Link (opens new window) can help to secure traffic between Azure services and other applications. You can use Azure Private Link to secure Azure services and also your own services, that are behind an Azure Load Balancer (opens new window). Consumers of services that are protected with Private Link, can simply use the Private Link and communicate with the protected services directly, over the Azure backbone, instead of over the public internet.
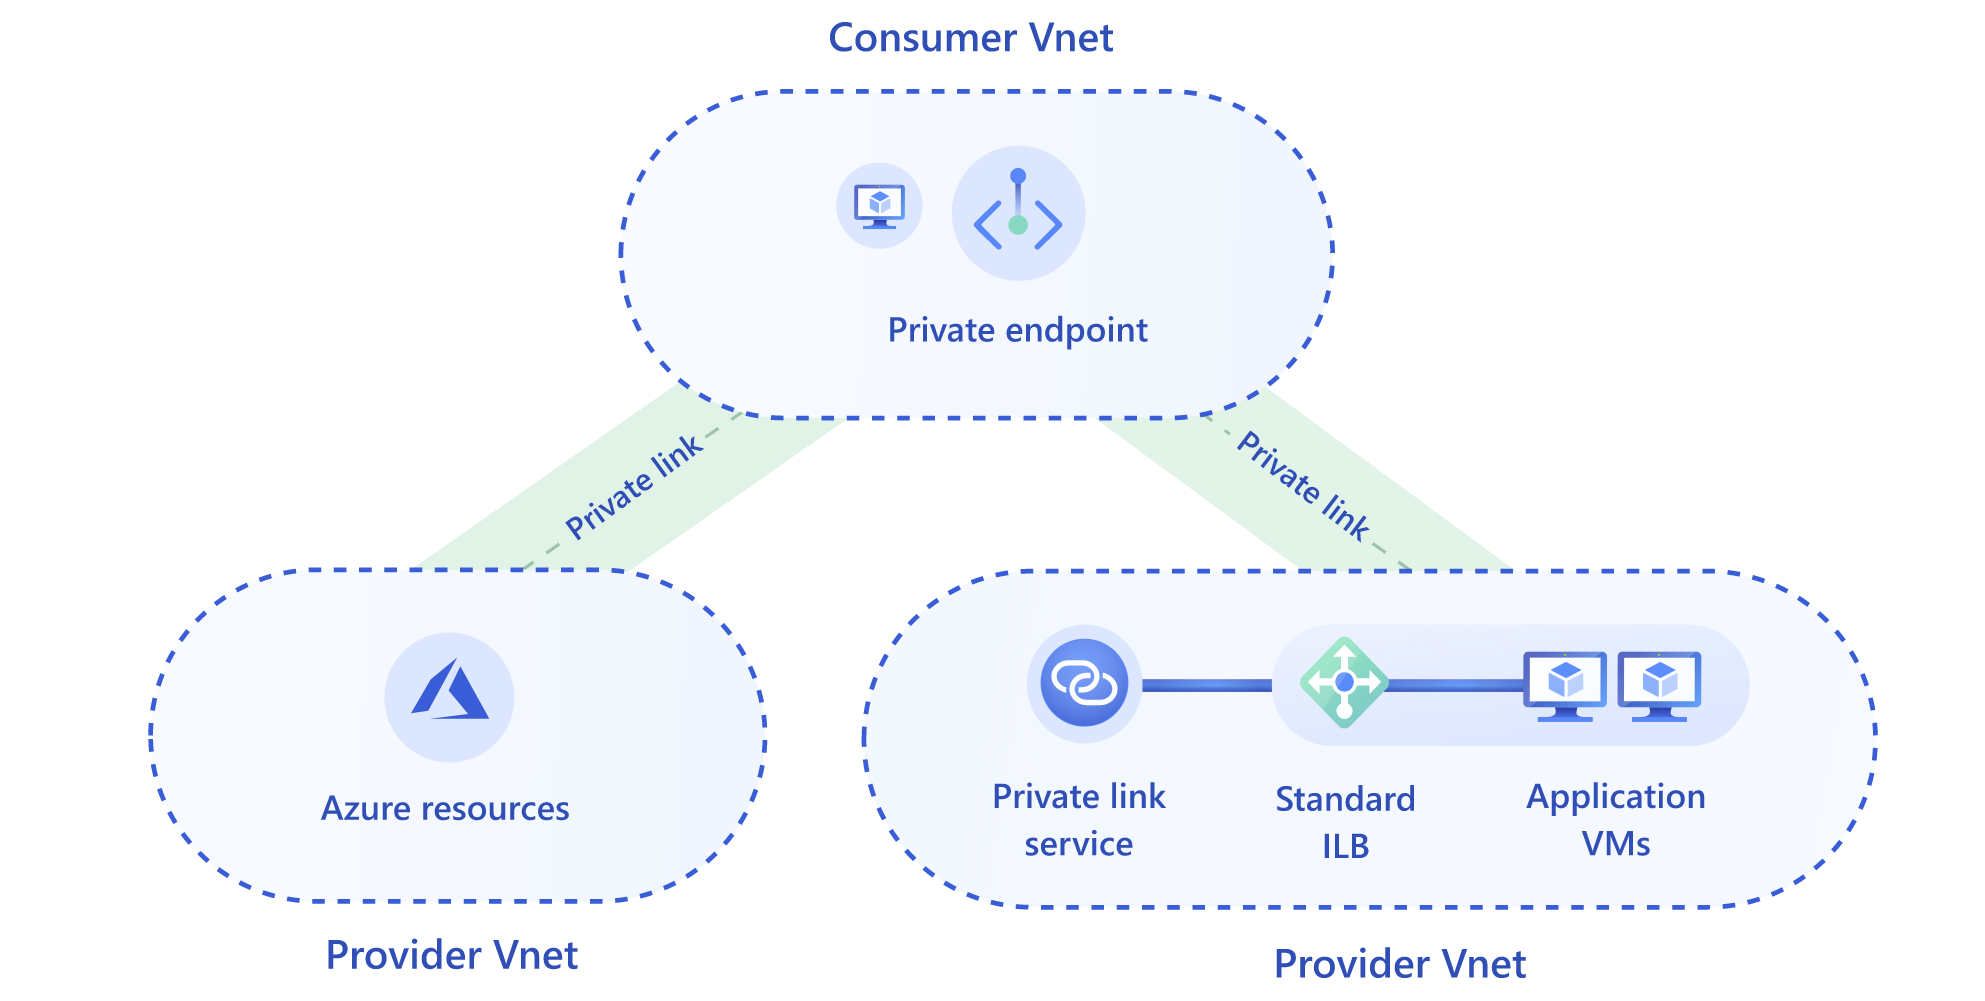
(Azure Private Link)
In this post, we'll secure an Azure SQL Database (opens new window) with Azure Private Link and use it securely from an Azure Virtual Machine (opens new window).
# Prerequisites
If you want to follow along, you'll need the following:
- An Azure subscription (If you don't have an Azure subscription, create a free account (opens new window) before you begin)
# Using Azure Private Link to connect to a SQL Database
We are going to create a Private Endpoint for an Azure SQL Database. The VM that we are going to create can use that Private Endpoint to securely access the SQL Database.
We'll start by creating a Virtual Network that the Virtual Machine is going to use.
1. Create a Virtual Network
- Go to the Azure portal (opens new window)
- Click the Create a resource button (the plus-sign in the top left corner)
- Search for Virtual Network and click on the result to start creating a VNET a. This brings you to the create virtual network blade b. Fill in a Name for the VNET c. In Address space fill in 10.1.0.0/16 d. Create a new Resource Group called PrivateLink. We'll put all of our resources in here e. Choose West Central US for Location f. Fill in a Name for the subnet g. For Address range for the subnet, fill in 10.1.0.0/24 h. Leave the rest and click Create to create the Virtual Network
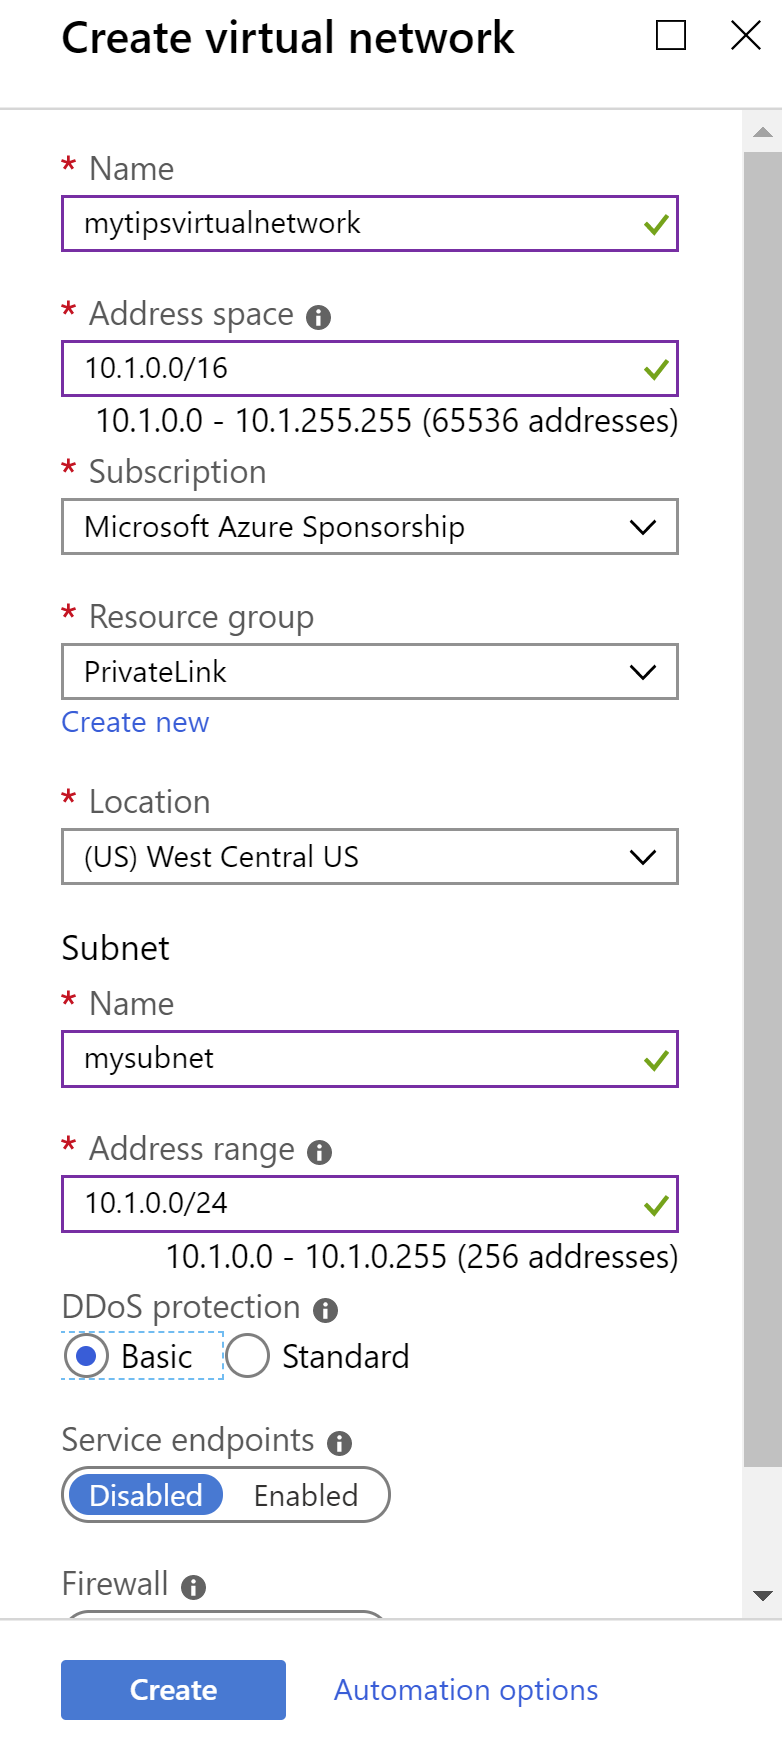
(Create Azure Virtual Network)
2. Create a Virtual Machine
Click the Create a resource button (the plus-sign in the top left corner)
Click Create a resource > Compute > Virtual Machine a. This brings you to first page of the Create a virtual machine wizard b. Select the PrivateLink Resource Group c. Fill in a Name for the VM d. Choose West Central US for Region e. Select Windows Server 2019 Datacenter for Image f. Fill in a Username that you'll use to log into the VM g. Fill in a Password and Confirm password h. For Public inbound ports, leave it to None i. Leave the rest and click Next: Disks
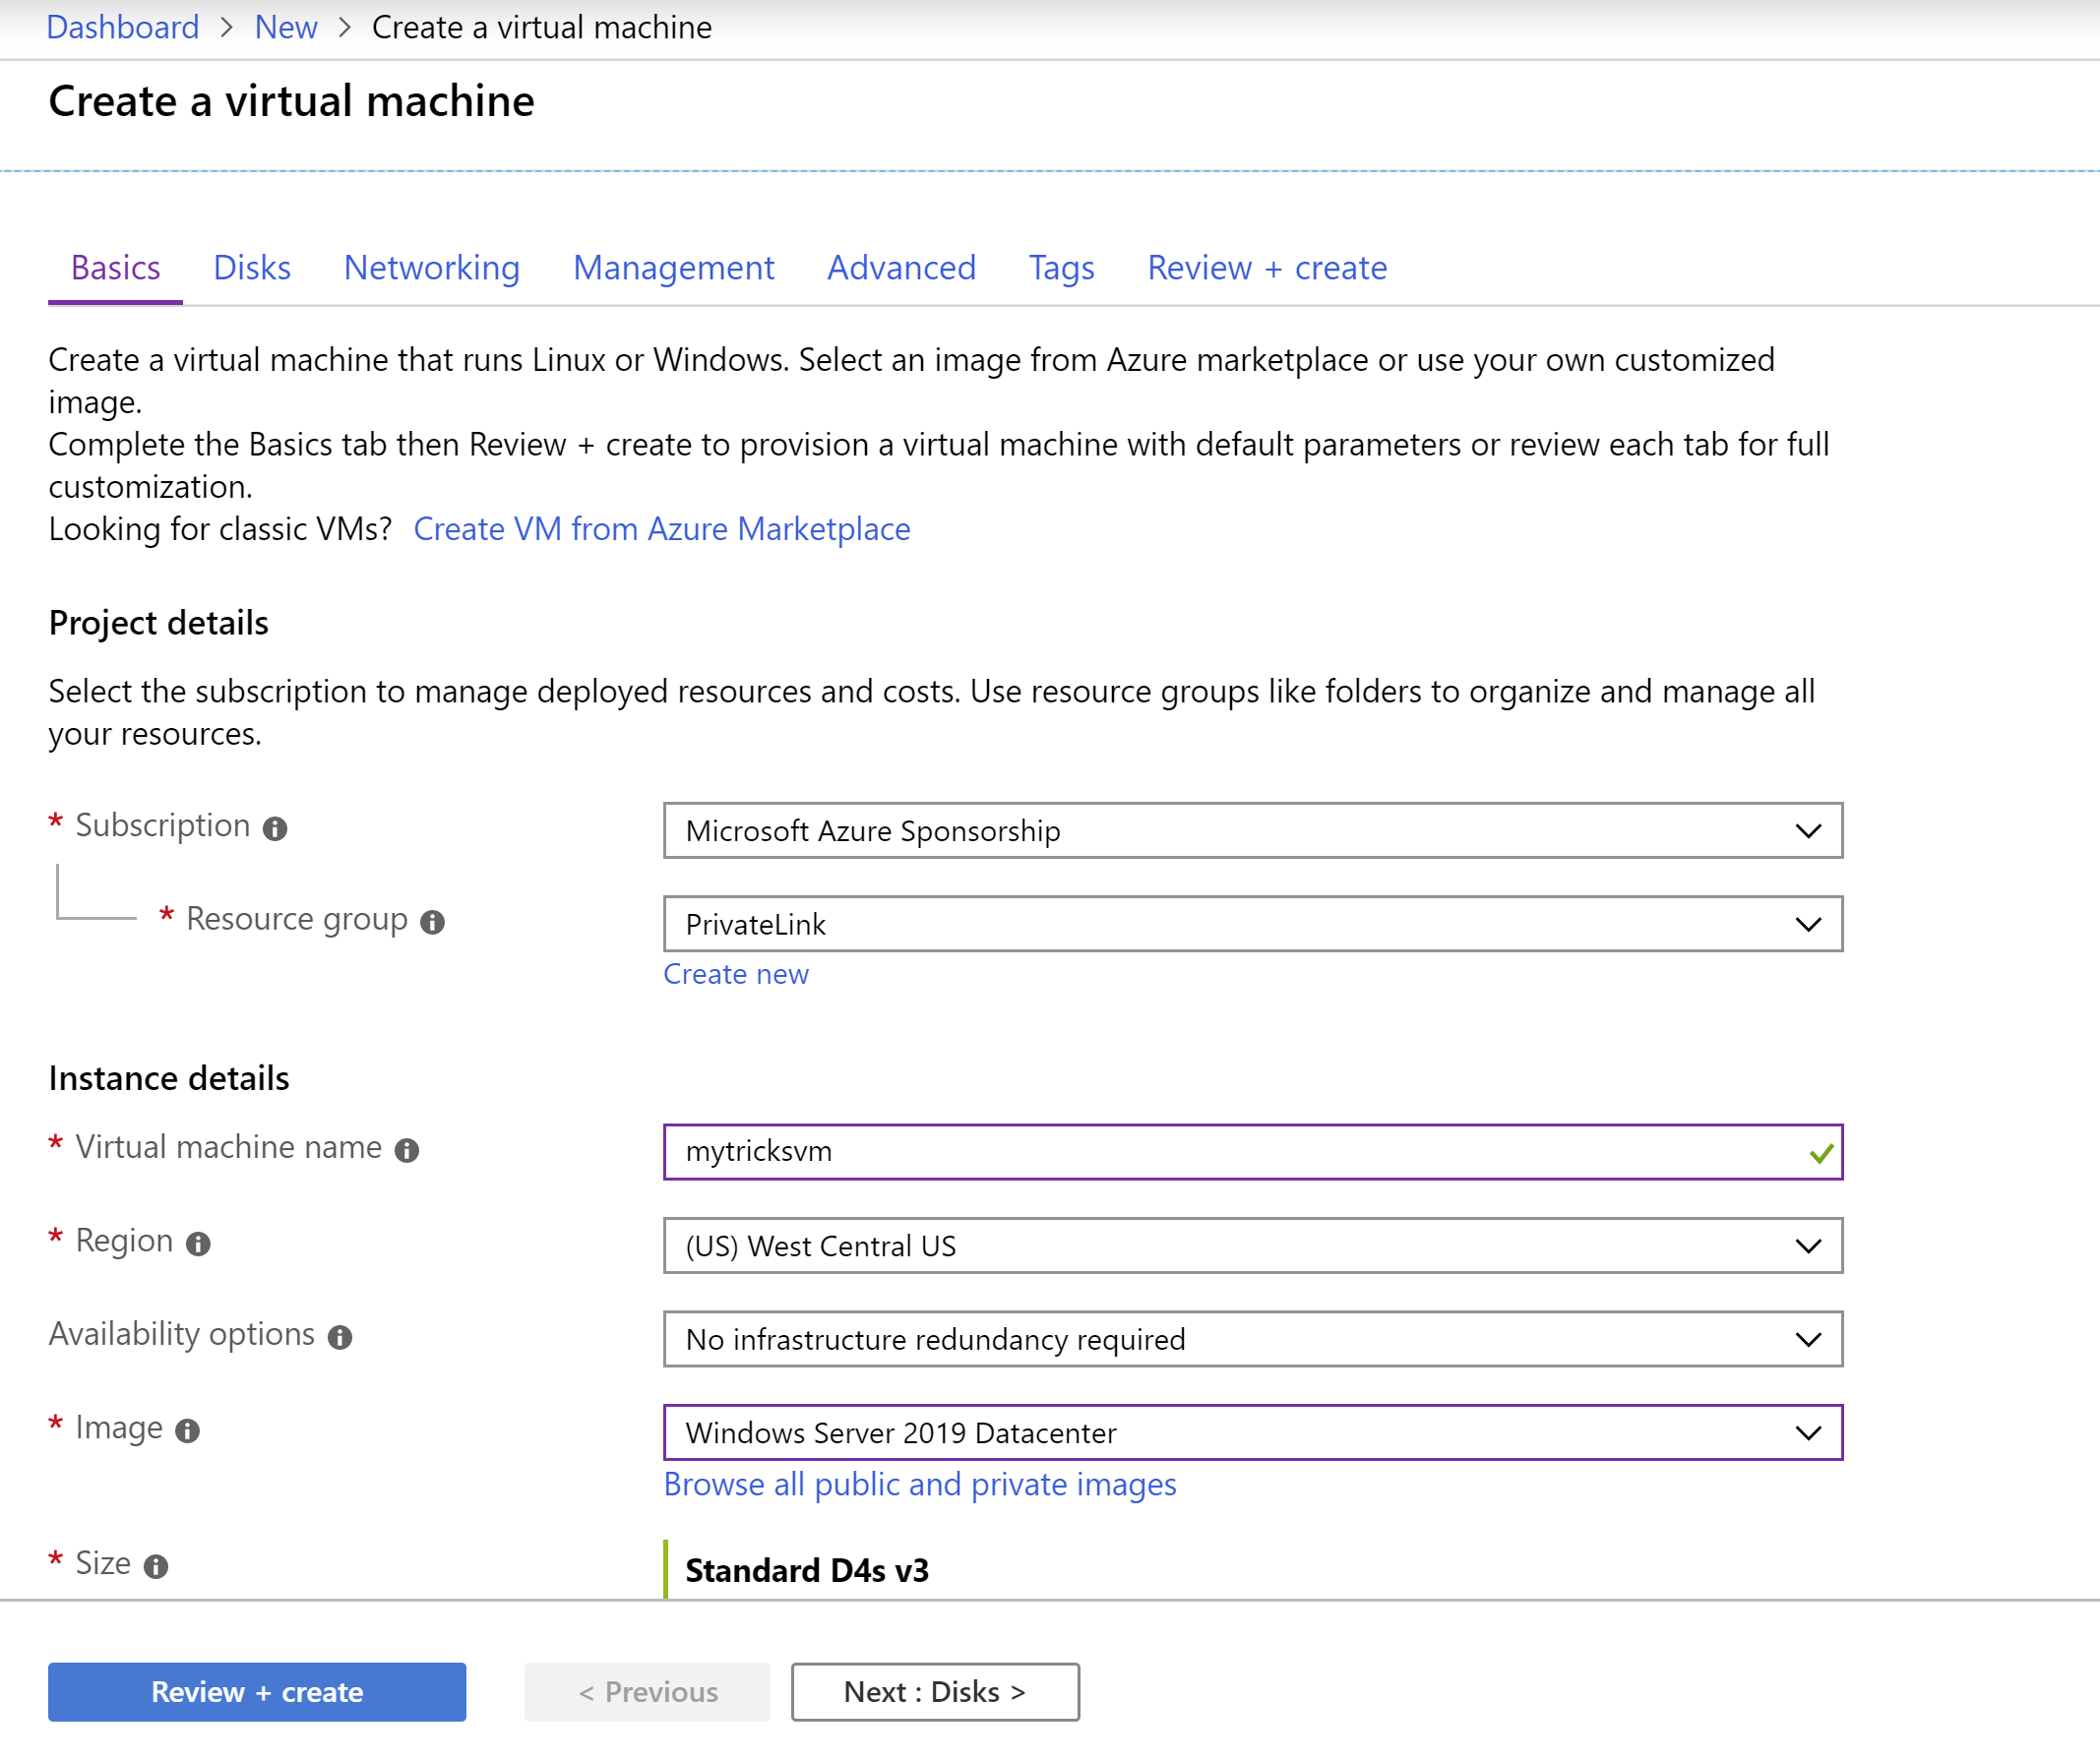
(Create a Virtual Machine: Basics)
j. Don't change anything and click Next: Networking k. Select the VNET that we've just created for Virtual network l. Select the Subnet (10.1.0.0/24) that we have created with the VNET m. Leave Public IP to (new) n. For Public Inbound ports, select Allow selected ports o. And select HTTP and RDP for Select inbound ports p. That's it! Click Review + create and Create after that to create the VM
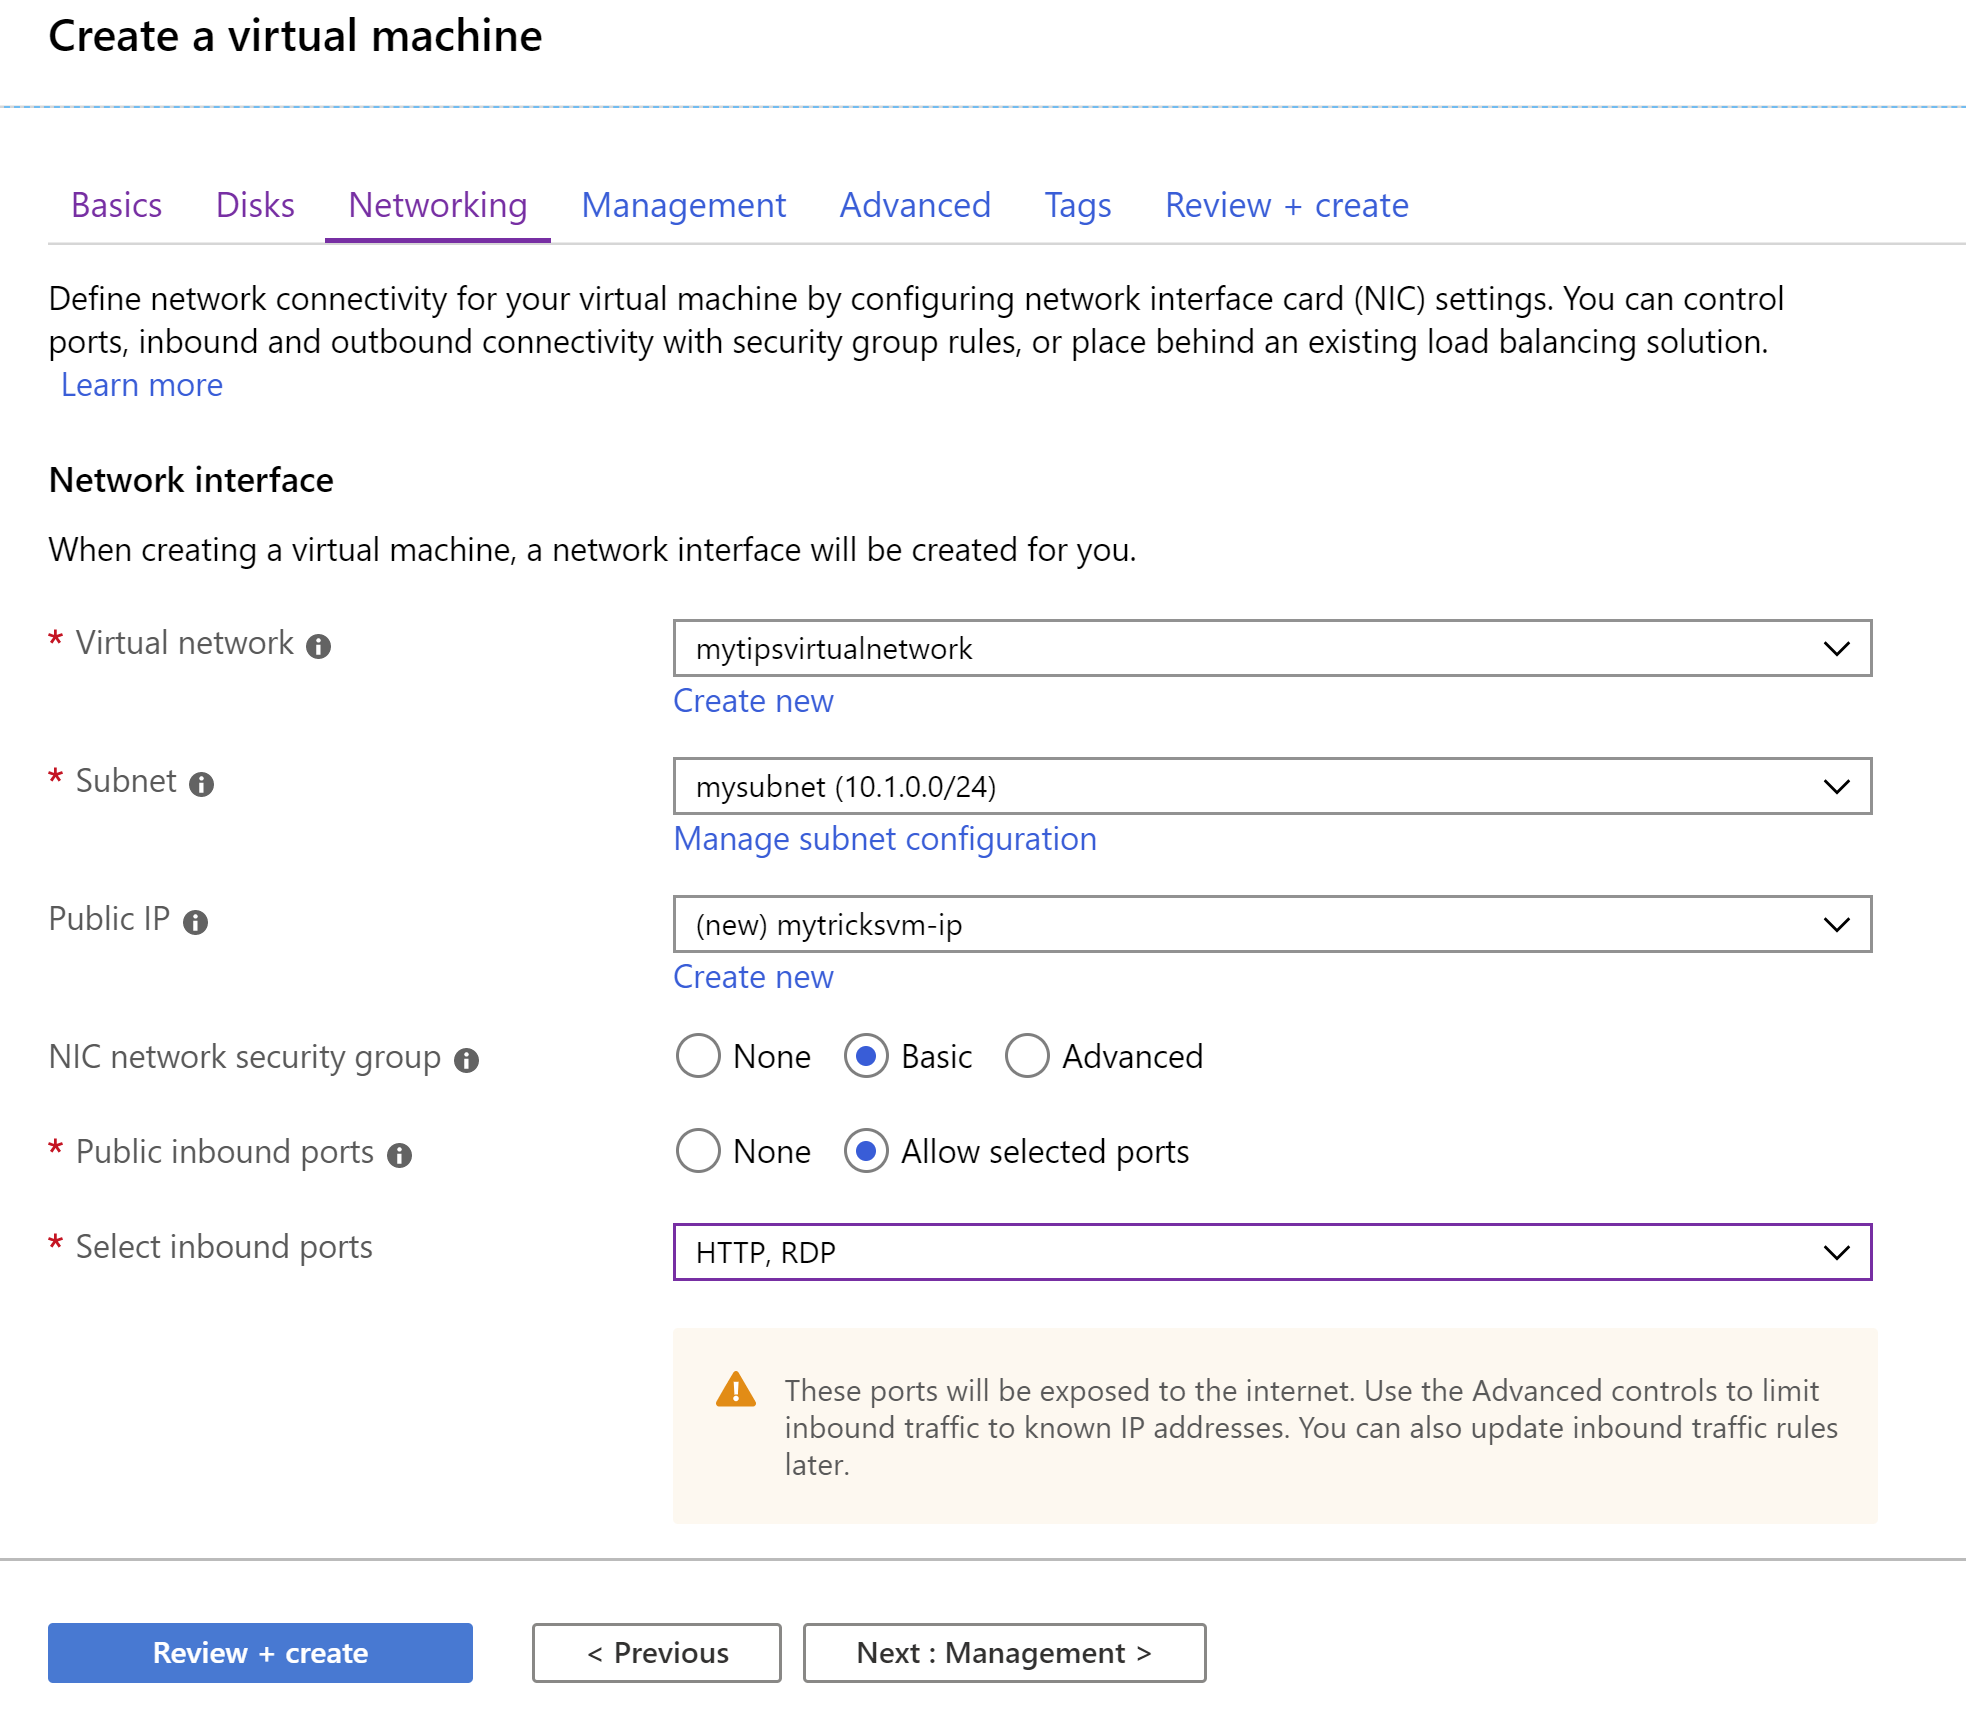
(Create a Virtual Machine: Networking)
3. Create a SQL Database Server
Click the Create a resource button (the plus-sign in the top left corner)
Search for SQL Database and click on the result to start creating an Azure SQL Database a. This brings you to the Create SQL Database blade b. Select PrivateLink for the Resource Group c. Fill in a Database name d. Click Create new to create a new Server e. In the New server blade:
- Fill in a Server name
- Enter a Server admin login. This is the username that you'll use to connect with the server
- Enter a Password and Confirm password
- Fill in West US Central for the Location
- Click OK to add the server e. Click Review + create and Create after that to create the SQL Database and server

(Create a SQL Database)
4. Create a Private Endpoint Now, we need to create a Private Endpoint to the SQL Server.
Click the Create a resource button (the plus-sign in the top left corner)
Search for Private Link and click on the Private Link Center result a. In the Private Link Center - Overview, click on Start on the option Build a private connection to a service. We choose this because we are creating a private connection to an Azure service and not to a custom service behind an Azure Load Balancer b. This brings you to the first page of the Create a private endpoint blade c. Select Private Link for the Resource Group d. Fill in a Name for the private endpoint e. Select West Central US for the Region f. Click Next: Resource g. For the Connection method, select Connect to an Azure resource in my directory h. Select Microsoft.Sql/servers for Resource type i. Select the SQL Server that we've just created j. And select sqlServer for the Target sub-resource k. Click Next: Configuration
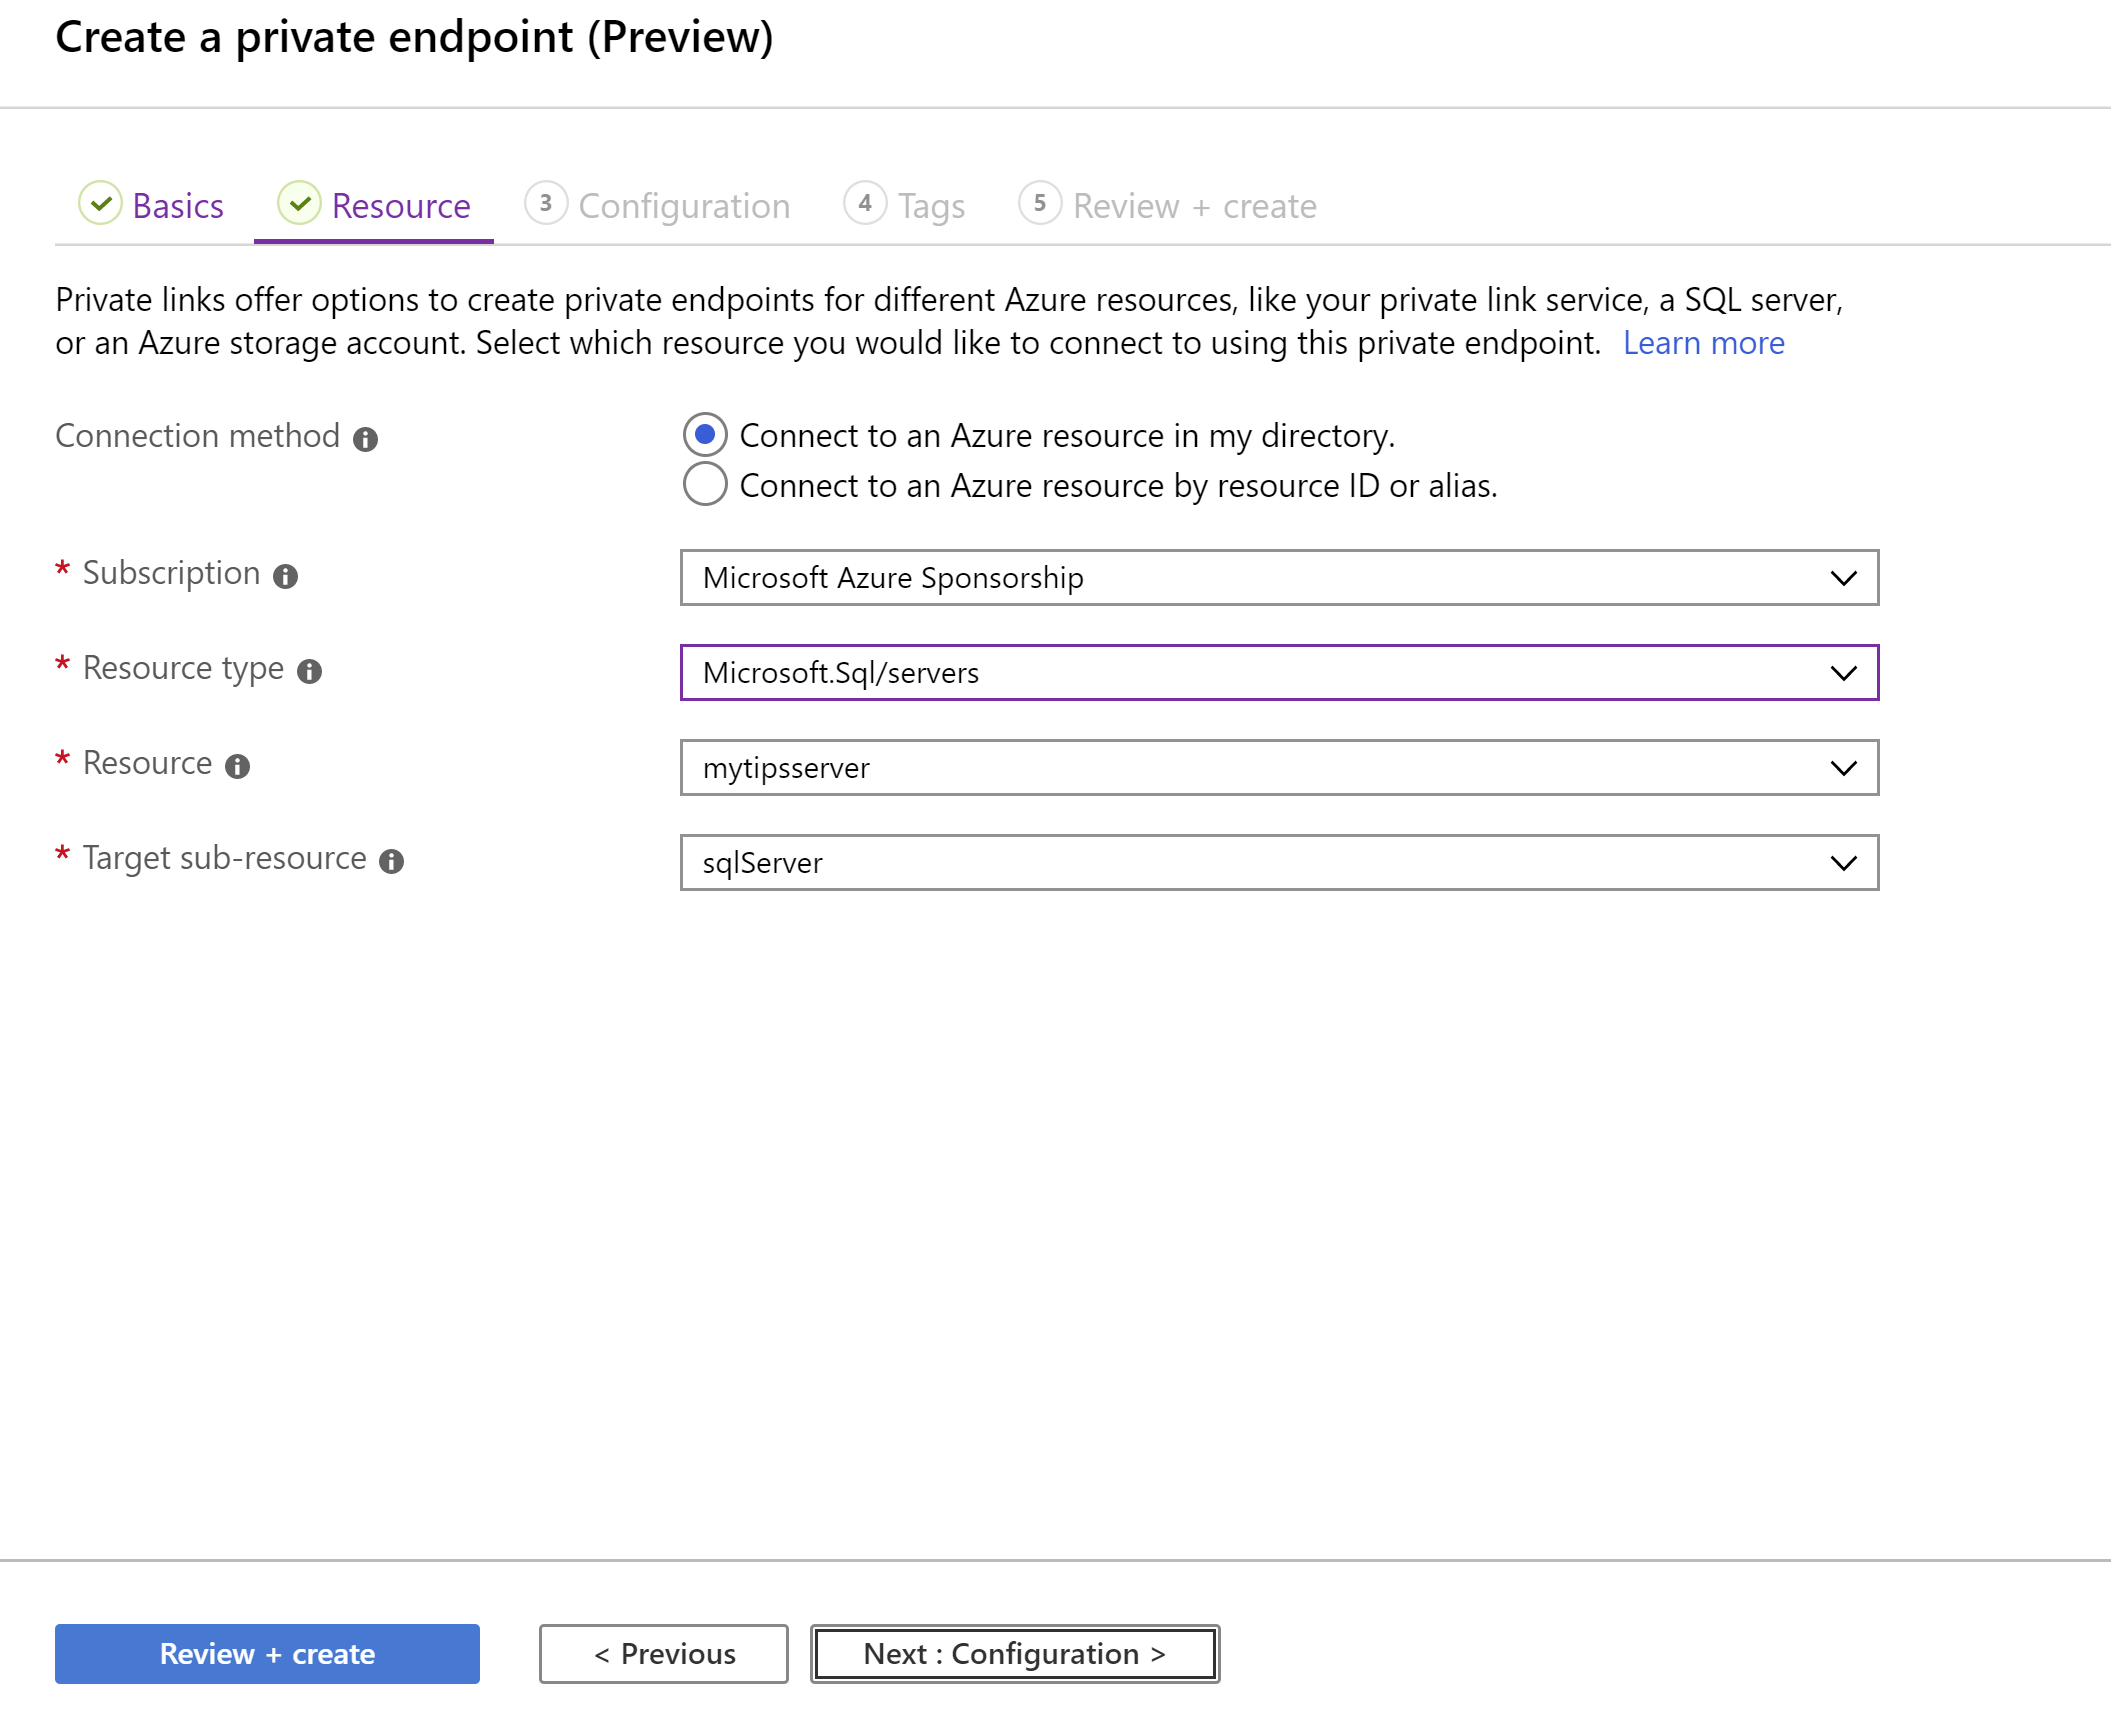
(Create a Private Endpoint: Resource)
l. Select the VNET that we've created for Virtual network m. And select the subnet (10.1.0.0/24) that we've created for Subnet n. Leave the Integrate with private DNS zone to Yes o. And leave Private DNS Zone to (New) p. That's it! Click Review + create and Create after that to create the private endpoint
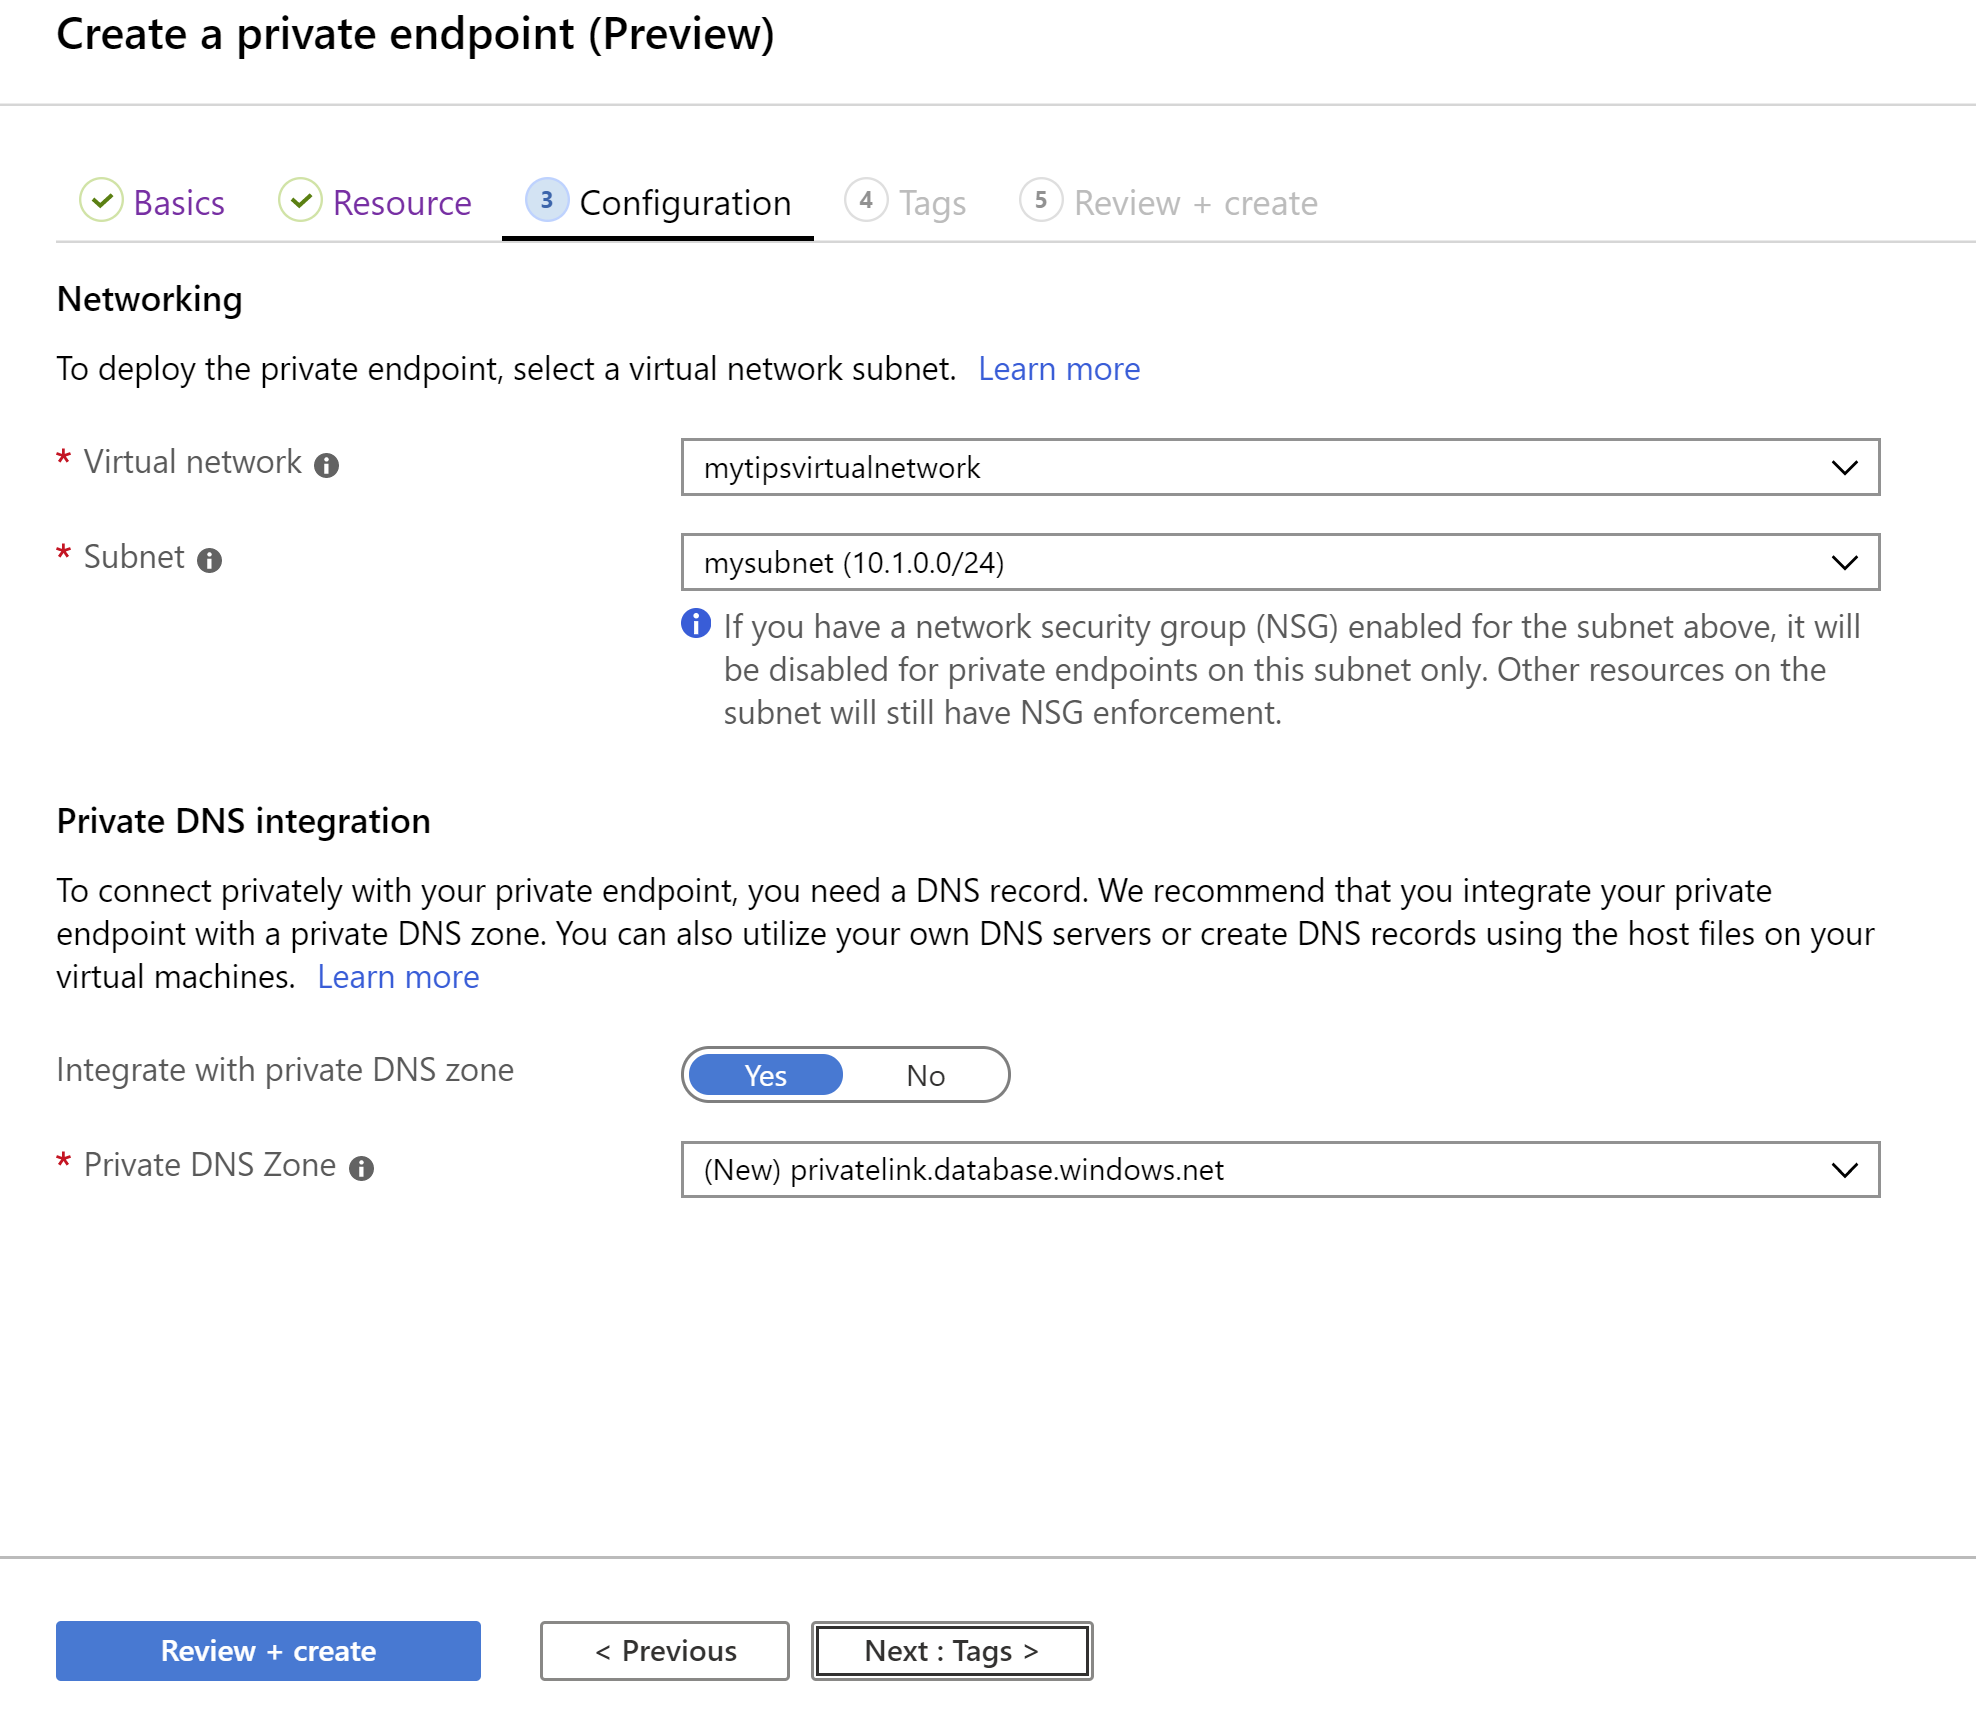
(Create a Private Endpoint: Configuration)
5. Connect to the SQL Database securely Everything is setup to create a secure connection. So let's try it out.
- Go to the Virtual Machine in the Azure portal
- Click on the Connect button to download the RDP file for the VM
- Open the RDP file and log into the VM
- In the Remote Desktop session, open a command prompt
- Enter nslookup yoursqlservername.database.windows.net to check if the private endpoint works. It should say something like in the image below:
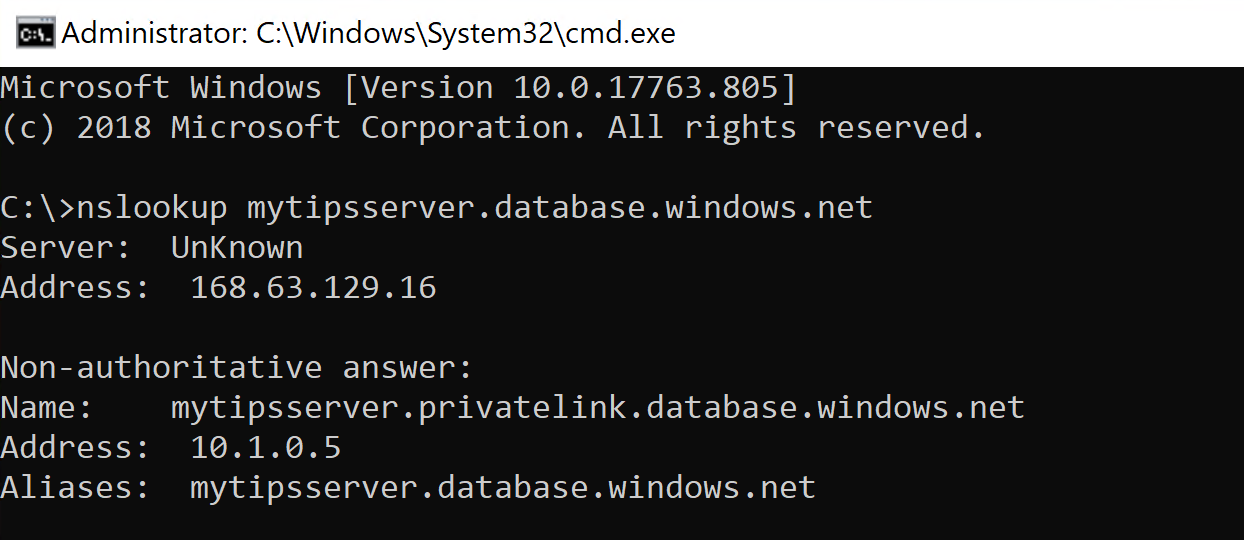
(Test the Private Endpoint)
- In the Remote Desktop session of the VM, download and install SQL Server Management Studio (opens new window). We'll use this to connect to the SQL Server
- Once you have it installed, connect to the SQL Server
You'll notice that you don't have to add your IP address to the SQL Server firewall. The connection that you now have with the SQL Server and database is secure and travels over the Azure backbone, not over the public internet.

(SQL Server connection in SQL Server Management Studio)
# Conclusion
You can use Azure Private Link (opens new window) to create secure connections to Azure services or your own services and applications that are behind an Azure Load Balancer (opens new window). Go and check it out!