Task 01 - Set up Visual Studio Code and run the flow locally
Introduction
Description
In this task you’ll test the chatbot locally before you publish the chatbot.
The key steps are as follows:
- Configure your development environment in Visual Studio Code.
- Create an environment file for the chatbot.
- Create a connection to Azure OpenAI.
- Run the chatbot locally to test the chatbot.
Success Criteria
- You’ve set up your development environment.
- You’ve tested the chatbot locally.
Learning Resources
Solution
Expand this section to view the solution
-
Open File Explorer and go to the Downloads\AssetsRepo\Assets folder.
-
Double-click lab-6-promptflow.zip. Select Extract all and then select Extract.
-
Launch Visual Studio Code as an administrator.
-
From the menu bar, select File and then select Open Folder.
-
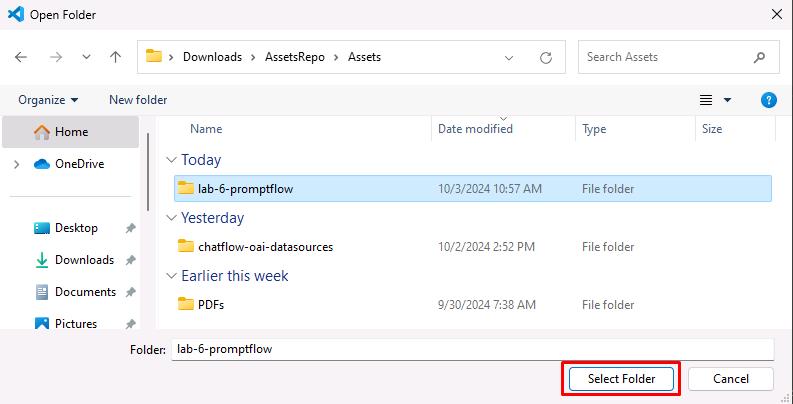
Navigate into AssetsRepo/Assets, select lab-6-promptflow, and then select Select folder.
-
Select the option to Trust the authors.
-
In the Explorer pane, expand lab-6-promptflow.
-
Right-click .env.sample and then select Rename. Rename the file to .env.
-
Select .env to open the file in an Editor window.
-
Update the variables to use the same values that you used in Exercise 05, Task 01, Step 05.
 AZURE_OPENAI_ENDPOINT="https://azureopenai62143490.openai.azure.com/"
 AZURE_OPENAI_API_KEY="08c96b97791e44ea83c4dff67a76eb32"
 AZURE_OPENAI_DEPLOYMENT_ID="gpt-4o"
 AZURE_AI_SEARCH_ENDPOINT="https://contososrch799498.search.windows.net"
 AZURE_AI_SEARCH_INDEX="brochures-vector"
 AZURE_AI_SEARCH_API_KEY="ctkSfXrdBMgyYEIFOkECVmrWrdcRioV7wyAfqRVSNGAzSeAsUWls"
 PGHOST="mg32xpzwcffkg.postgres.database.azure.com"
 PGPORT="5432"
 PGUSER="promptflow"
 PGDATABASE="pycontosohotel"
 PGPASSWORD="1234ABCD!"
To locate the values for AZURE_OPENAI_ENDPOINT and AZURE_OPENAI_API_KEY, in the Azure portal, select the Azure OpenAI resource you created. In the Resource Management section, select Keys and Endpoints. Use the Endpoint URL for AZURE_OPENAI_ENDPOINT and the key 1 value for AZURE_OPENAI_API_KEY.
To locate the values for AZURE_AI_SEARCH_ENDPOINT, AZURE_AI_SEARCH_INDEX, and AZURE_AI_SEARCH_API_KEY, in the Azure portal, select the Search Service instance you created. On the Overview page, use the URL for AZURE_AI_SEARCH_ENDPOINT. In the left hand navigation pane, in the Search Management section, select Indexes. Use the index name for AZURE_AI_SEARCH_INDEX. In the left navigation pane, in the Settings section, select Keys. Use Primary admin key for AZURE_AI_SEARCH_API_KEY.
For all parameters that start with “PG”, use the values from the PostgreSQL connection string that you recorded earlier in the lab.
-
Save your changes to the .env file.
-
Open a new Terminal prompt by selecting Terminal from the top menu and then New Terminal. Enter the following commands to create environment variables.
get-content .env | foreach { $name, $value = $_.split('=') set-content env:\$name $value } -
Enter the following commands in the Terminal to create a connection to Azure Open AI.
# open ai connection pf connection create --file azure_openai.yaml --name azure_openai --set "api_base=$env:AZURE_OPENAI_ENDPOINT" --set "api_key=$env:AZURE_OPENAI_API_KEY" # ai search connection pf connection create --file azure_ai_search.yaml --name azure_ai_search --set "api_base=$env:AZURE_AI_SEARCH_ENDPOINT" --set "api_key=$env:AZURE_AI_SEARCH_API_KEY" # postgresql connection pf connection create --file postgresql.yaml --name postgresql --set "configs.hostname=$env:PGHOST" --set "configs.port=$env:PGPORT" --set "configs.user=$env:PGUSER" --set "configs.database=$env:PGDATABASE" --set "secrets.passwd=$env:PGPASSWORD" -
Enter the following command at the Terminal window prompt. This command lists all connections.
pf connection list | ConvertFrom-Json | Select-Object name, type |Format-Table
-
Enter the following command at the Terminal window prompt. This command installs all dependencies listed in the requirements.txt file.
pip install -r requirements.txt -
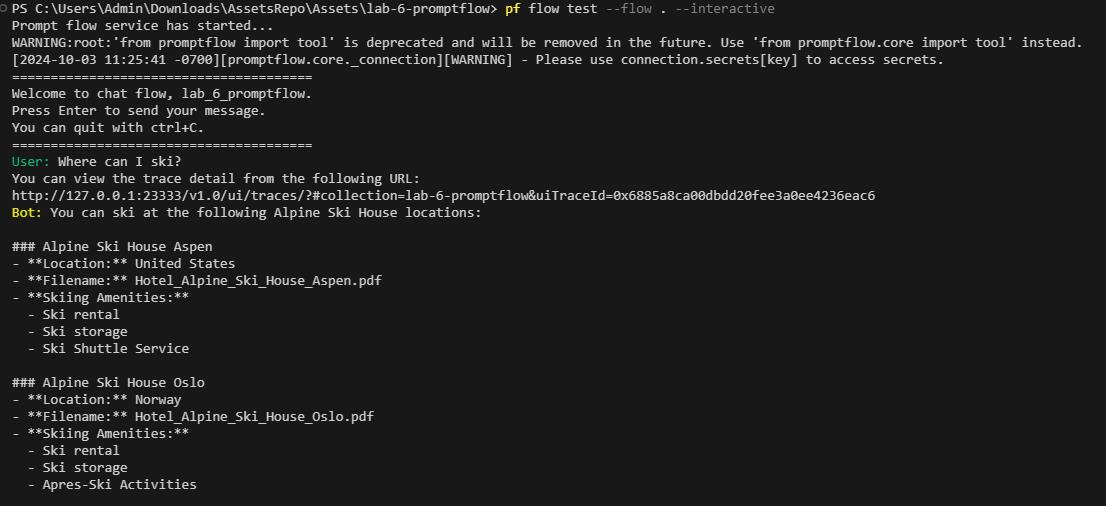
Enter the following commands at the Terminal window prompt. These commands run the flow interactively so that you can perform testing.
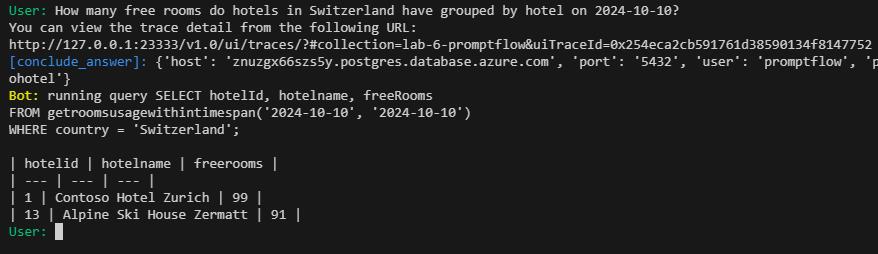
pf flow test --flow . --interactiveTry Where can I ski? and then How many free rooms do hotels in Switzerland have grouped by hotel on 2024-10-10?
Error: “pf.flow.test failed with UserErrorException: TypeError: Execution failure in ‘chat_with_data’”
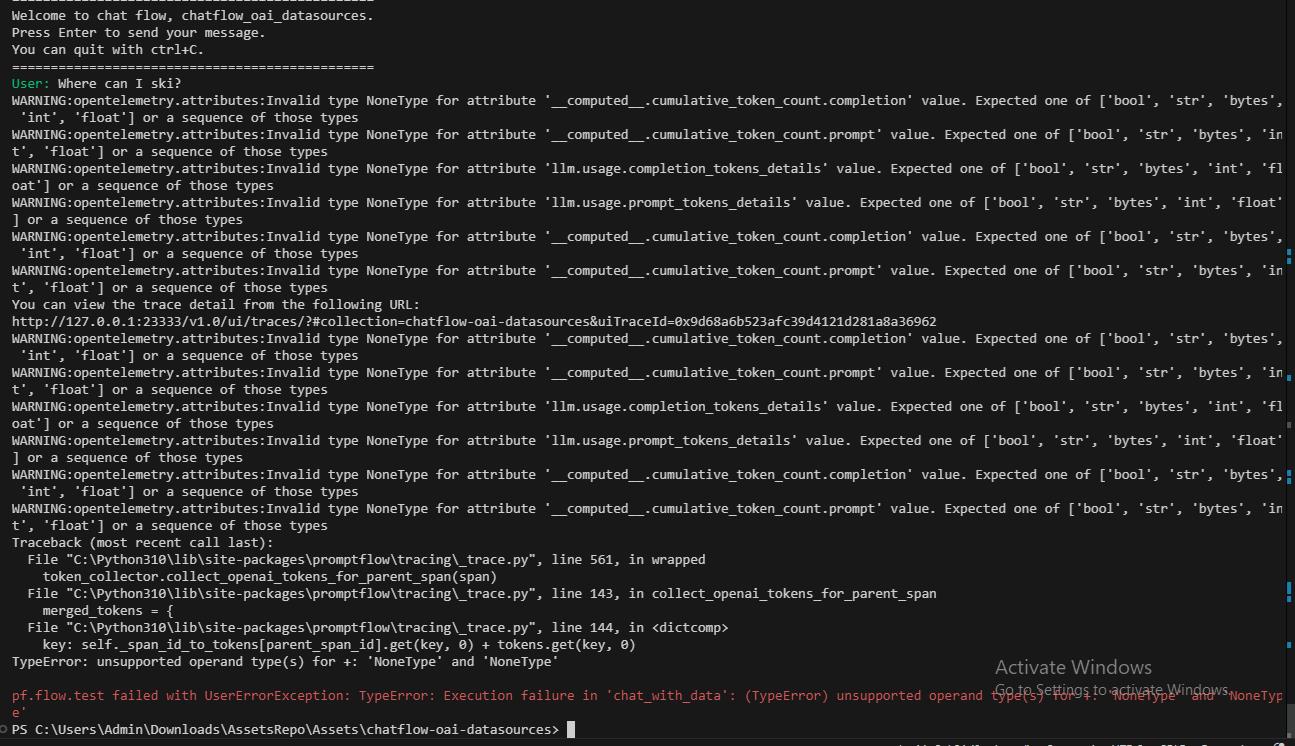
- The installed ‘openai’ Python package may be incompatible with the script and throw the error shown. Downgrading to 1.44.1 should resolve the issue.
- In the terminal you can check its version using pip show openai
- Downgrade the package by using pip install openai==1.44.1
-
Run the interactive flow again:
pf flow test --flow . --interactive