Task 01: Create Azure resources
Introduction
Creating a secure and well-structured cloud environment is critical for the City of Metropolis’s database migration efforts. By setting up an Azure virtual network, the city ensures that its PostgreSQL database is isolated from unauthorized access, aligning with security best practices. A virtual network gateway provides a secure and reliable connection between on-premises systems and Azure, supporting seamless data migration. Additionally, deploying an Azure Database for PostgreSQL within this controlled environment ensures scalability, reliability, and compliance with modern data management standards. These foundational steps enable the city to enhance public service operations while maintaining strong data security and performance.
Description
In this task, you’ll establish the core infrastructure for migrating the City of Metropolis’s PostgreSQL database to Azure. You’ll start by creating an Azure virtual network to isolate and protect database traffic. Then, you’ll create a virtual network gateway to establish a secure connection between the on-premises environment and Azure. You’ll also configure security certificates and set up a point-to-site VPN connection to ensure encrypted data transmission. Finally, you’ll deploy an Azure Database for PostgreSQL within this secured network. This setup mirrors real-world enterprise environments where security, connectivity, and scalability are essential for cloud-based database operations.
Success criteria
- You successfully created a virtual network in Azure with the required subnet configuration.
- You created a virtual network gateway to enable secure connections.
- You successfully generated and configured security certificates for authentication.
- You established a point-to-site VPN connection between the on-premises network and Azure.
- You successfully created an Azure Database for PostgreSQL and confirmed connectivity within the virtual network.
Learning resources
- Virtual network overview
- Create a virtual network
- Virtual network gateway
- Point-to-site VPN connections
- Azure Database for PostgreSQL - Flexible Server
Key tasks
01: Create a virtual network in Azure
Expand this section to view the solution
Connection instructions
-
Connect to the virtual machine using the following credentials:
Item Value Username Your VM username Password Your VM password Select the Type Text icon to enter the associated text into the virtual machine.
-
Change the screen resolution if required.
You may want to adjust the screen resolution to your own preference. Do this by right-clicking on the desktop and choosing Screen resolution and selecting OK when finished.
Create a virtual network in Azure
To securely host the PostgreSQL database, the City of Metropolis needs an isolated network environment. In this task, you’ll create an Azure virtual network, which will serve as the destination for the migrated data, ensuring secure and efficient public service operations.
-
Open Microsoft Edge and go to https://portal.azure.com. Sign in with the following credentials:
Item Value Username Your Azure username Password Your Azure password -
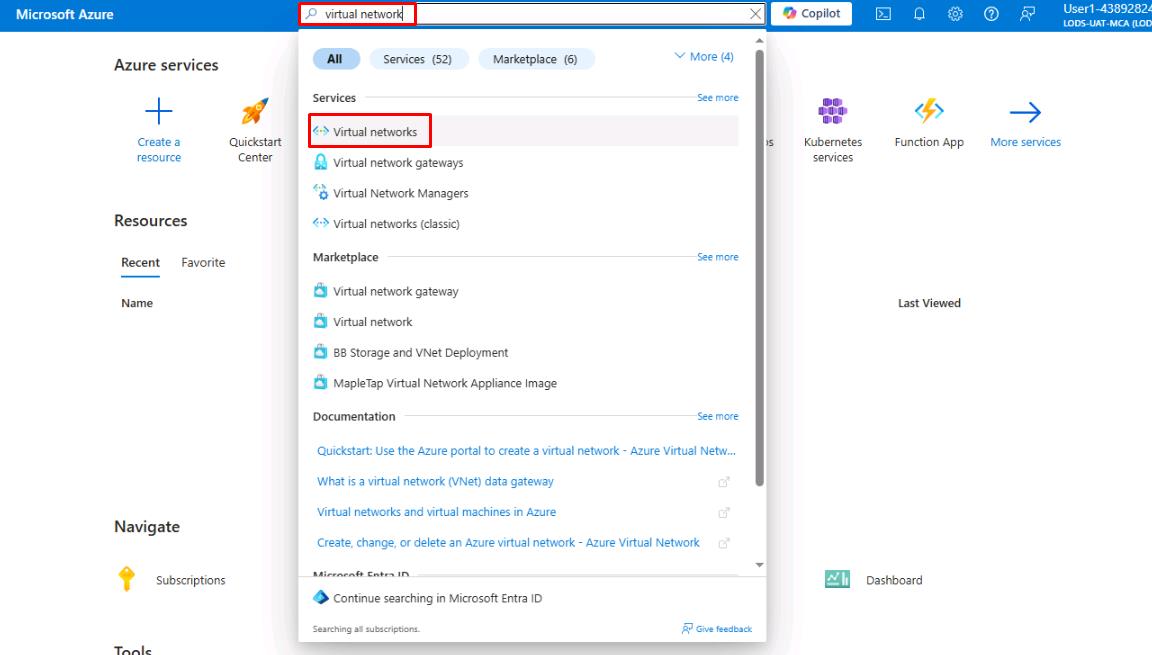
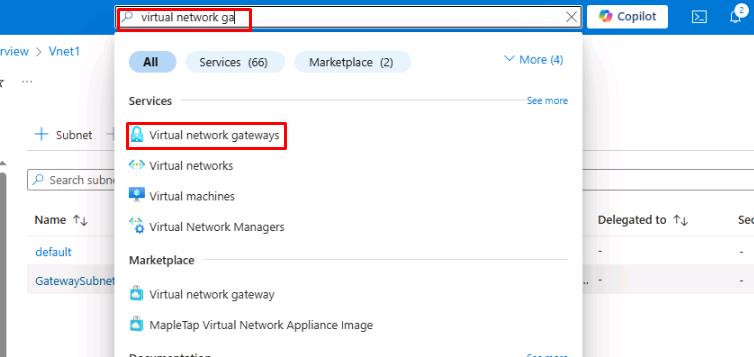
On the Portal home page, on the top global search bar, enter and select Virtual networks.
-
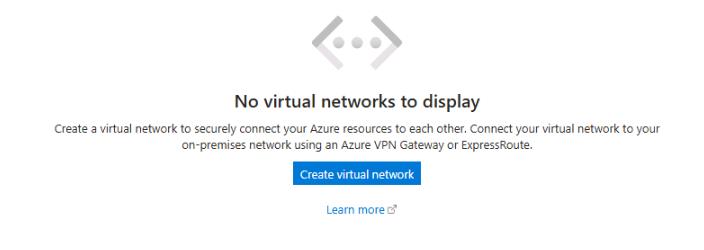
At the bottom of the Virtual Networks page, select Create virtual network.
-
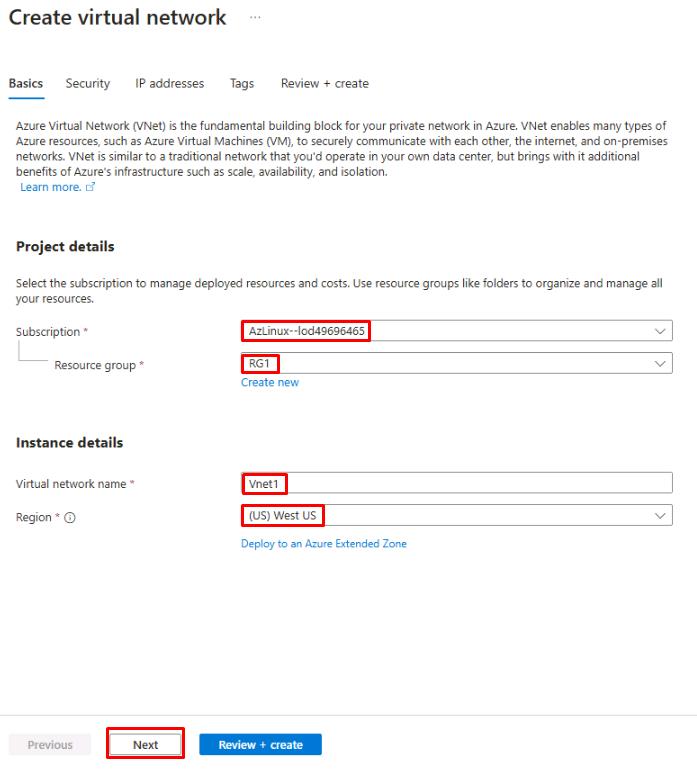
On the Create network page, configure the Basics tab as follows:
Item Value Subscription TechMaster-lodxxxxxxxx Resource group RG1 Virtual network name Vnet1 Region (US) West US Confirm this resource is created in the West US region to ensure proper connectivity in later steps.
-
Select Next to continue.
-
On the Security tab, leave all settings as default and select Next.
-
On the IP addresses tab, leave all settings as default and select Review + create.
The setup manager will automatically create an address space and a subnet for you. The default value is 10.0.0.0/16 for the network, and the default subnet is 10.0.0.0/24. These can be changed to whatever you wish, as long as the ranges don’t overlap. The default values will work for the purposes of this lab.
-
Once the validation finishes, select Create to finish creating the virtual network.
-
Once the deployment completes, select Go to resource.

-
On the Vnet1 page, select Settings on the service menu, then select Subnets.
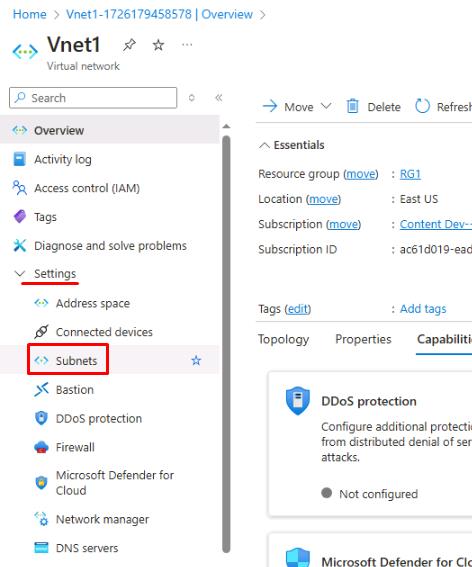
-
On the Vnet1 - Subnets page, select + Subnet.
-
Configure the Add a subnet blade as follows:
Item Value Subnet purpose Virtual Network Gateway IPv4 address range 10.0.0.0/16 Starting address 10.0.1.0 Size **/27 (32 addresses) ** -
Select Add.

02: Create a virtual network gateway in Azure
Expand this section to view the solution
In this task, you’ll set up a virtual network gateway to establish a secure connection between the on-premises PostgreSQL server and Azure. This ensures the city’s systems remain connected without compromising service.
-
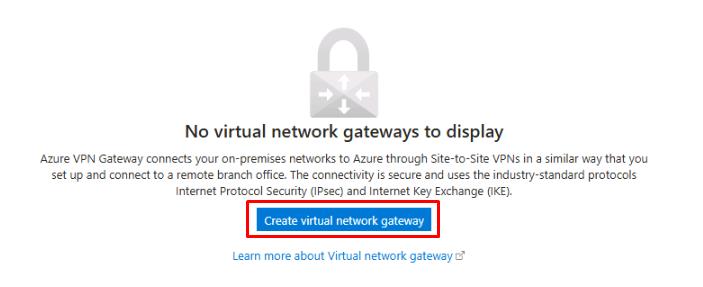
From the Azure portal, on the top global search bar, enter and select Virtual network gateways.
-
At the bottom of the Virtual network gateways page, select Create virtual network gateway.
-
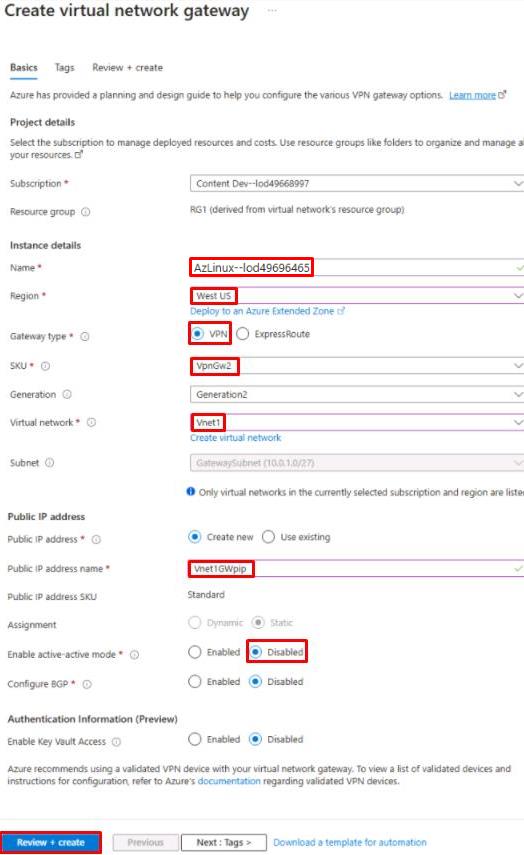
On the Create virtual network gateway page, configure the Basics tab as follows:
Item Value Subscription TechMaster-lodxxxxxxxx Name Vnet1GW Region West US Gateway type VPN SKU VpnGw2 Generation Generation2 Virtual network Vnet1 Public IP address name Vnet1GWpip Enable active-active mode Disabled Confirm this resource is created in the West US region to ensure proper connectivity in later steps.
-
Select Review + create, then select Create.
This process may take around 15 minutes. You can proceed with the following task as this deploys.
-
Minimize Microsoft Edge. You’ll return to it in another task.
03: Generate certificates
Expand this section to view the solution
To safeguard sensitive administrative data during migration, the City of Metropolis implements strong security protocols.
In this task, you’ll generate a server certificate and client certificate on the source server, essential for establishing a secure VPN connection to Azure.
-
On the VM, open Windows File Explorer and go to C:\LabFiles.
-
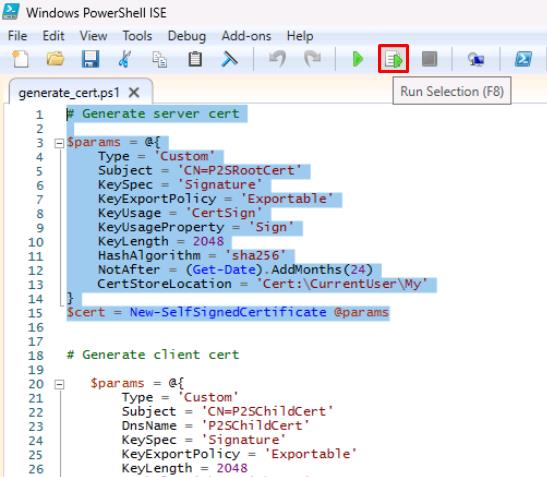
Right-click generate_cert.ps1 and select Edit.
-
Once the file opens in PowerShell ISE, select the top portion of the script, then select the Run Selection button at the top.
-
Select the bottom portion of the script, then select Run Selection.
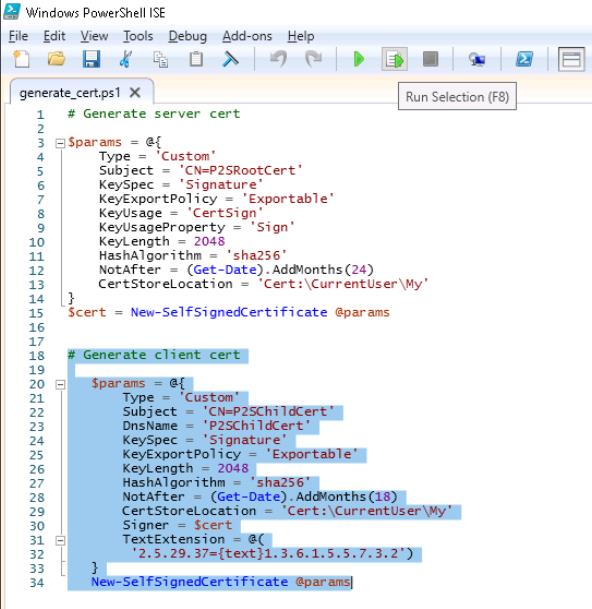
These two scripts are generating the server and client certificates, respectively.
-
In the Windows search bar at the lower left, enter Manage user certificates.
When asked for an administrator password, use Your VM password
-
From the certificate manager, on the left menu, expand Personal and then select Certificates.
-
Right-click the P2SRootCert, select All Tasks, then select Export.
-
In the Certificate Export wizard, select Next.
-
Leave No, do not export the private key selected and select Next.
-
Choose Base-64 encoded X.509 (.CER) and select Next.
-
On the File to Export step, select Browse, go to C:\LabFiles, enter P2SRootCert for File name, then select Save.
-
Once the file name is selected, select Next, then select Finish.
-
Once exported, go to C:\LabFiles in Windows File Explorer.
-
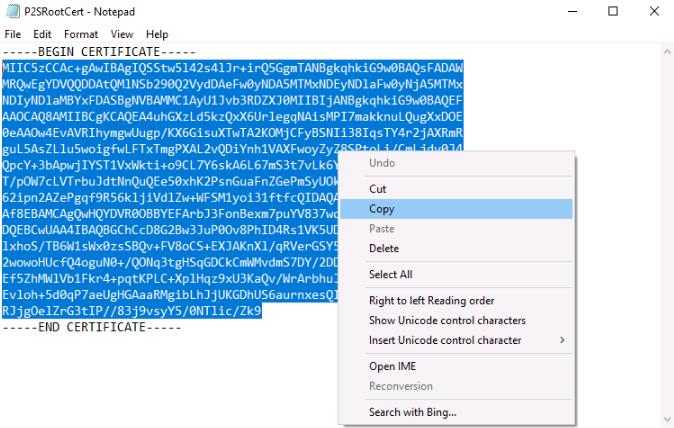
Right-click the P2SRootCert file and select Open with, select Notepad, then select OK.
-
Once the file opens in Notepad, select and copy all the lines between —–BEGIN CERTIFICATE—– and —–END CERTIFICATE—–.
04: Create Azure Point-to-site connection and install VPN client
Expand this section to view the solution
In this task, you’ll configure a Point-to-site connection in Azure and install the VPN client on the source server. This step enables encrypted data transfer, addressing integration and security considerations.
-
From the desktop, switch to Microsoft Edge with the Microsoft Portal.
-
Check the deployment status of the virtual network gateway. When complete, select Go to resource.
Wait until the gateway is deployed before continuing.
-
On the Vnet1GW page, select Settings from the left service menu, and then select Point-to-site configuration.
-
Select Configure now.
-
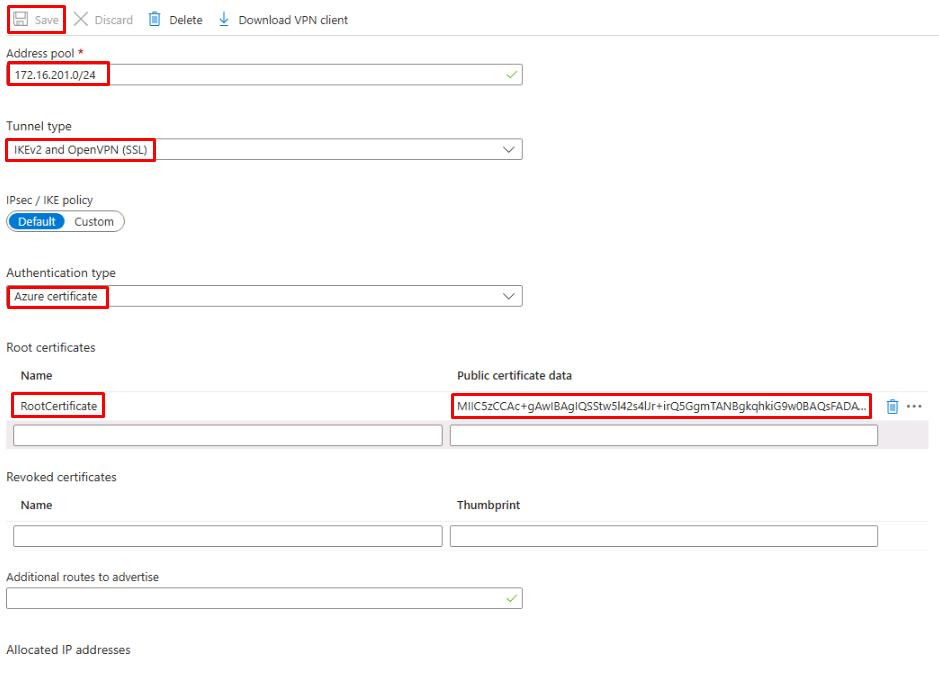
Configure the Vnet1GW - Point-to-site configuration page as follows:
Item Value Address pool 172.16.201.0/24 Tunnel type IKEv2 and OpenVPN (SSL) Authentication type Azure certificate Name (Root certificates) RootCertificate Public certificate data (Root certificates) {Paste the string copied in the previous task into the same row as RootCertificate} -
Select Save at the top when finished.
-
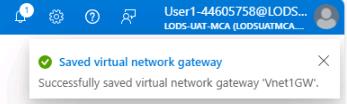
From the Vnet1GW - Point-to-site configuration page, select Download VPN client at the top.
You’ll need to wait until the configuration saves, which will take a couple minutes. Once you see Saved virtual network gateway in the upper right, you’ll be able to download the VPN client file.
-
Once the download completes, open Windows File Explorer and go to the Downloads folder.
-
Right-click Vnet1GW.zip and select Extract All, then select Extract.
-
From the Vnet1GW folder, open the WindowsAmd64 folder.
-
Right-click VpnClientSetupAmd64 and select Run as administrator.
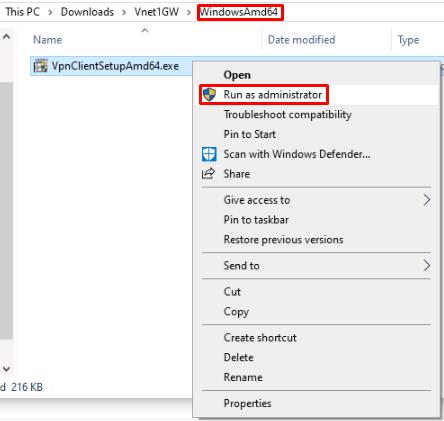
A warning will show stating that the app is unrecognized. Select More info and then select Run anyway.
-
At the User Account Control prompt, enter Your VM password and select Yes.
-
Select Yes to finish installing the VPN client.
-
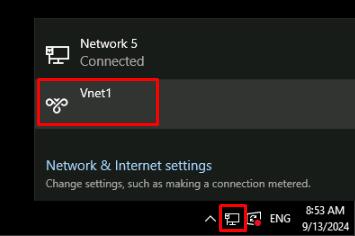
Once the installation is finished, select the network icon in the notification area and then select the Vnet1 connection.
-
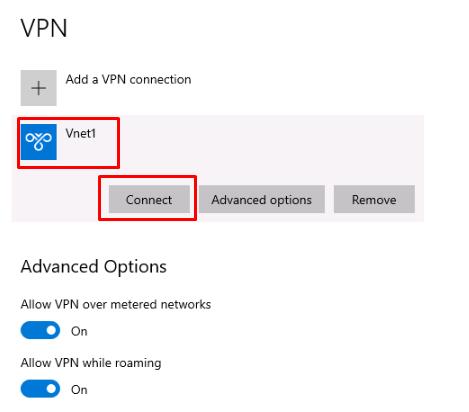
From the VPN settings, select Vnet1 and then select Connect.
-
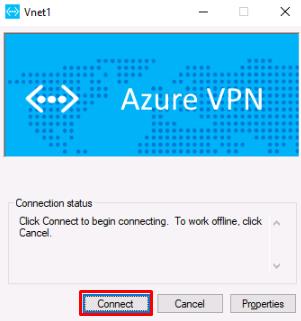
A separate Vnet1 connection window will open in the background. Switch to it and select Connect.
A Window may show asking about privilege escalation, select Continue.
-
At the User Account Control prompt, enter Your VM password, then select Yes.
-
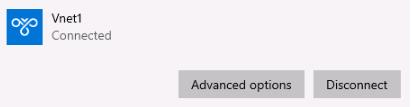
Verify that Vnet1 is connected successfully. The word “Connected” should show under the Vnet1 connection.
05: Create an Azure Database for PostgreSQL
Expand this section to view the solution
Finally, you’ll provision an Azure Database for PostgreSQL 16 instance. This modern database environment provides scalability and reliability, supporting the city’s goal of delivering efficient public services.
-
From Microsoft Edge, return to the Azure portal.
-
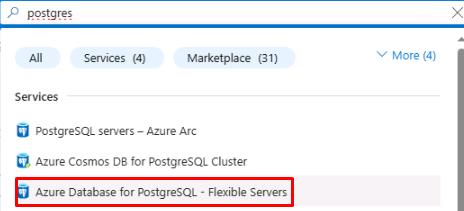
On the top global search bar, enter and select Azure Database for PostgreSQL - Flexible Servers.
-
Select Create Azure Database for PostgreSQL - Felxible Server.
-
On the New Azure Database for PostgreSQL Flexible server page, configure the Basics tab as follows:
Item Value Resource group RG1 Server name azuredb@lab.LabInstance.Id Region West US PostgreSQL version 16 Confirm this resource is created in the West US region to ensure proper connectivity in later steps.
-
Under Compute + storage, select Configure server.
-
Configure the Compute + storage page as follows:
Item Value Compute processor AMD Compute size Standard_D2ads_v5 (2 vCores) Storage size 32 GiB Performance Tier P4 (120 iops) High availability Disabled 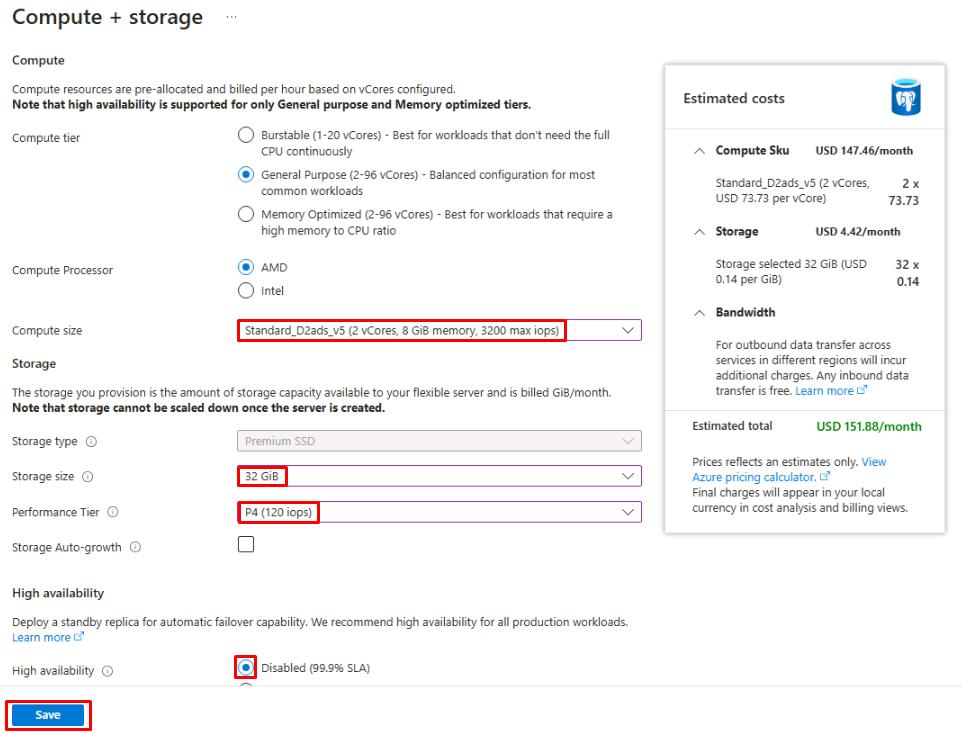
-
Select Save to return to the Basics tab.
-
On the Basics tab, set High availability to Disabled.
-
Under Authentication, for Authentication method select PostgreSQL authentication only.
-
Enter postgres for the Admin username and Passw0rd! for the Password.

-
Select Next: Networking >.
-
On the Networking tab, configure the following settings:
Item Value Connectivity method Private access Virtual network Vnet1 Subnet Vnet1/default Private DNS zone (New) 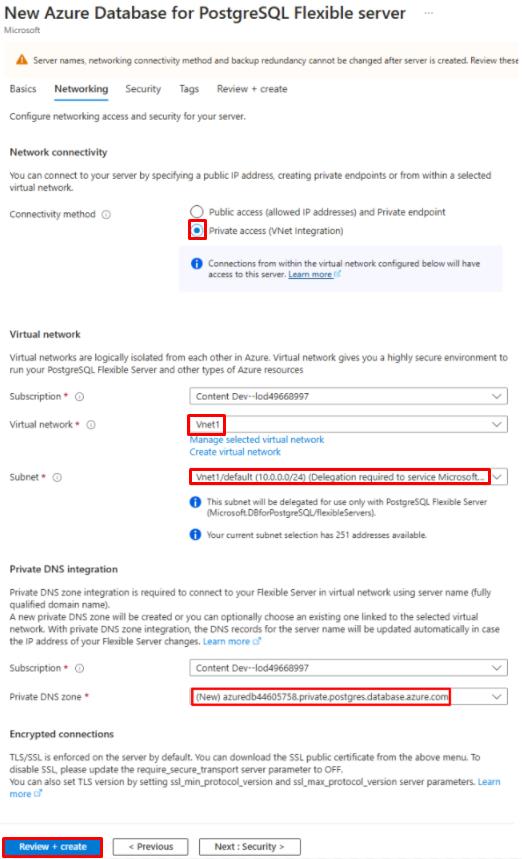
-
Select Review + create, then select Create.
This process may take around 5-7 minutes to complete.
All the networking was set up first so that we could easily assign it to the new server upon creation. This connectivity method will allow anything on the Vnet1 private network to connect. With the point-to-site VPN connection established, the source server is connected to Vnet1.
Congratulations! You’ve successfully completed this task.