Task 02: Complete offline and online migration
Introduction
Migrating databases to the cloud requires careful planning to balance downtime, data integrity, and service continuity. The City of Metropolis needs to migrate its PostgreSQL database from an on-premises server to Azure Database for PostgreSQL while minimizing disruption. To achieve this, you’ll perform both offline and online migrations.
An offline migration transfers all data in a single operation, requiring downtime but offering a simpler process. In contrast, an online migration allows data replication while keeping the source database operational until the final cutover. By using both methods, the city can assess migration strategies that best meet its operational needs.
Description
In this task, you’ll complete an offline and an online migration of the City of Metropolis’s PostgreSQL database to Azure Database for PostgreSQL. You’ll start by performing an offline migration, which involves stopping database activity, transferring all data at once, and validating the results. Next, you’ll configure and execute an online migration, allowing data replication while keeping the database available.
These steps help ensure the city’s critical services can transition to Azure Database for PostgreSQL efficiently, with minimal downtime and maximum data integrity.
Success criteria
- You successfully configured and executed an offline migration of the PostgreSQL database.
- You validated that all data was migrated correctly in offline mode.
- You successfully configured logical replication for an online migration.
- You executed an online migration, ensuring data synchronization between on-premises and Azure.
- You verified that all database records were successfully transferred and are accessible in Azure.
Learning resources
- Azure Database for PostgreSQL - Flexible Server
- What is the migration service in Azure Database for PostgreSQL?
Key tasks
01: Perform offline migration
Expand this section to view the solution
You’ll finalize necessary configurations and perform an offline migration of the Adventureworks database. This approach is suitable when a brief service interruption is acceptable.
-
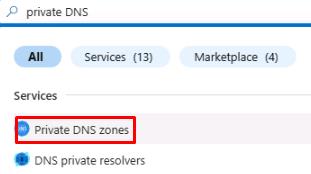
From the Azure portal, on the top global search bar, enter and select Private DNS zones.
-
Select the azuredb@lab.labInstance.Id.private.postgres.database.azure.com entry.
-
On the left service menu, select DNS Management, then select Recordsets.
-
Identify the private IP address listed under Value. This should be the only address, which belongs to the new server.
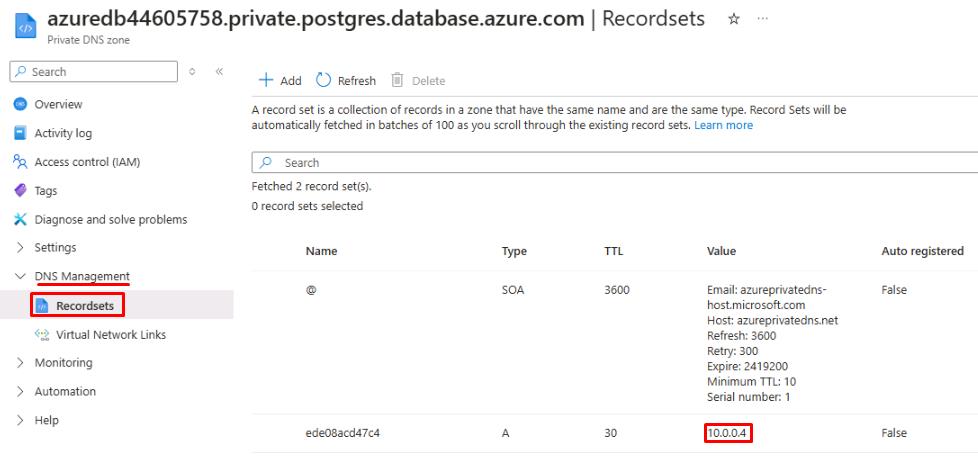
Your IP may differ from the screenshot.
-
Enter the IP address below for future use:
@lab.TextBox(privateIP) -
Select Windows Explorer from the taskbar, and then go to C:\Program files\PostgreSQL\16\data.
-
Right-click the pg_hba.conf file, select Open with, select Notepad, then select OK.
You’ll have to select More apps to see Notepad.
-
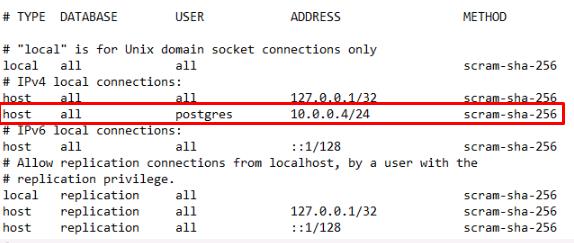
In Notepad, go to the bottom of the pg_hba.conf file and add an entry under # IPv4 local connections with the following:
Item Value TYPE host DATABASE all USER postgres ADDRESS @lab.Variable(privateIP)/24 METHOD scram-sha-256 The ADDRESS listed above is the address from the earlier text box. If it’s blank here, ensure the text box from step 4 is filled out.
-
Ensure the file looks like the image above, with the exception of the ADDRESS, if it’s different.
-
Save and close the file.
-
In the Azure portal, return to the home page by selecting the Home breadcrumb link in the upper left.
-
Under Resources, in the Recent list, select the azuredb@lab.LabInstance.Id Azure Database.
-
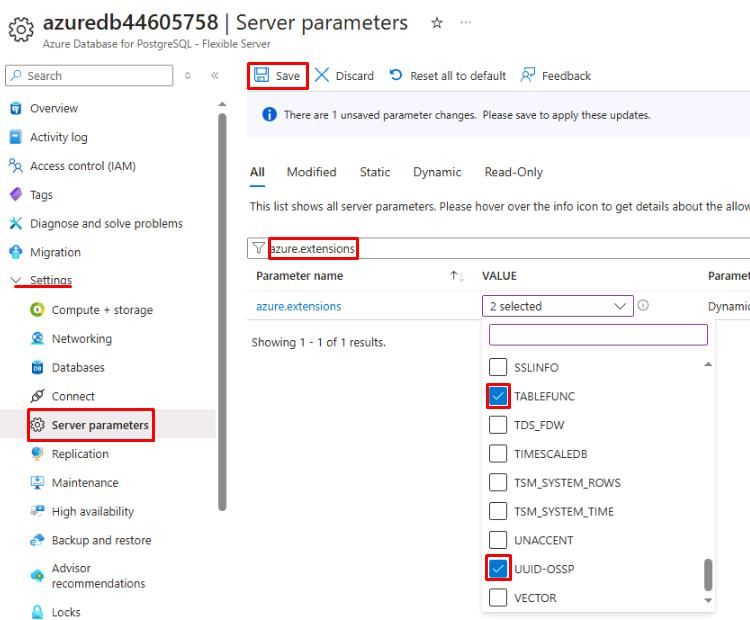
On the azuredb@lab.LabInstance.Id page, on the left service menu, select Settings, then select Server parameters.
-
On the Server parameters tab, enter azure.extensions in the search filter.
-
For the azure.extensions parameter, select the Value dropdown, then select the checkboxes for:
- TABLEFUNC
- UUID-OSSP
-
Select Save.
-
Once the deployment of the parameters is complete, select the azuredb@lab.LabInstance.Id - Server parameters breadcrumb link in the upper left to return to the server page.
-
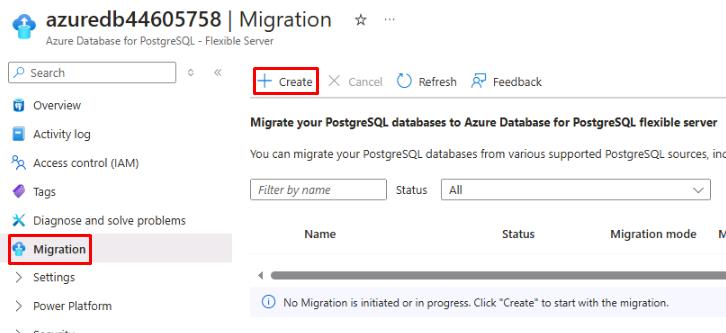
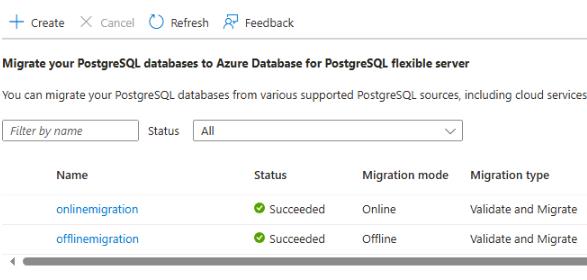
On the azuredb@lab.LabInstance.Id page, on the left service menu, select Migration.
-
On the Migration page, select + Create.
-
On the Migrate PostgreSQL to Azure Database for PostgreSQL Flexible Server page, configure the following settings:
Item Value Migration name offlinemigration Source server type On-premise Server Migration option Validate and Migrate Migration mode Offline 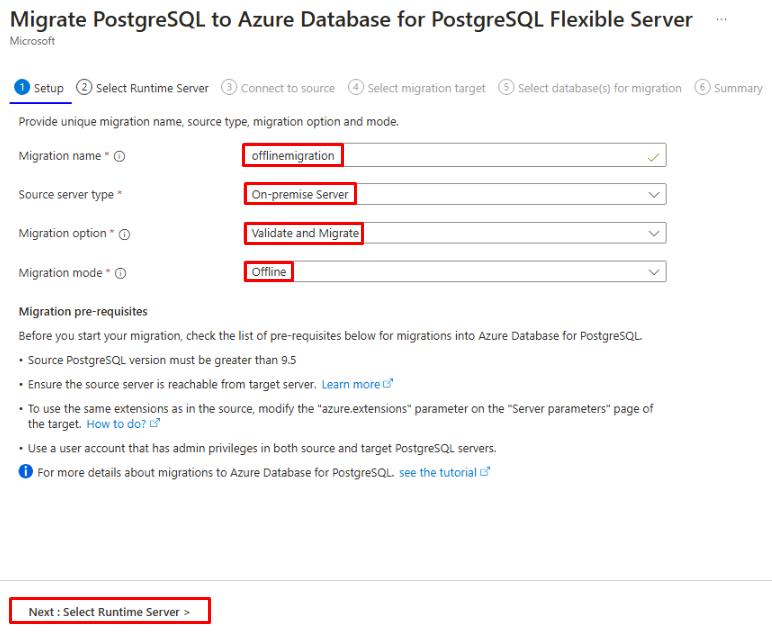
-
Select Next: Select Runtime Server >.
-
On the Select Runtime Server step, leave the default option of No selected, then select Next: Connect to source >.
-
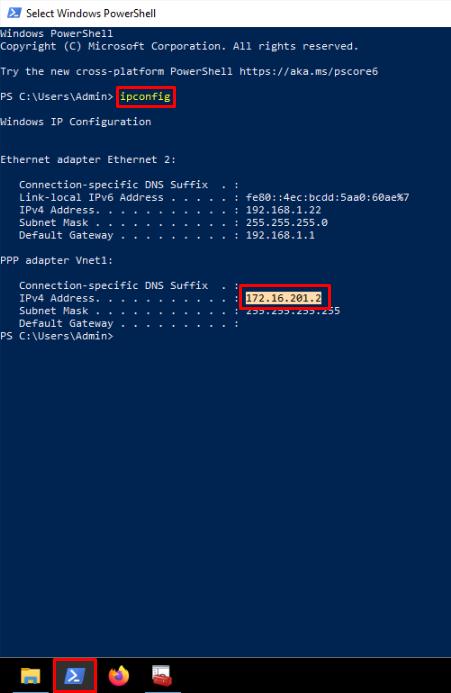
From the Windows taskbar, open Windows PowerShell and run the ipconfig command.
-
Select and copy the IP address listed under the Vnet1 connection, then close PowerShell.
Select the text and then select Ctrl+C to copy.
-
Enter the IP address here for future use:
@lab.TextBox(VPN) -
In Azure portal, on the Connect to source tab, configure the following settings:
Item Value Server name @lab.Variable(VPN) Port 5432 Server admin login name postgres Password Passw0rd! SSL mode Prefer 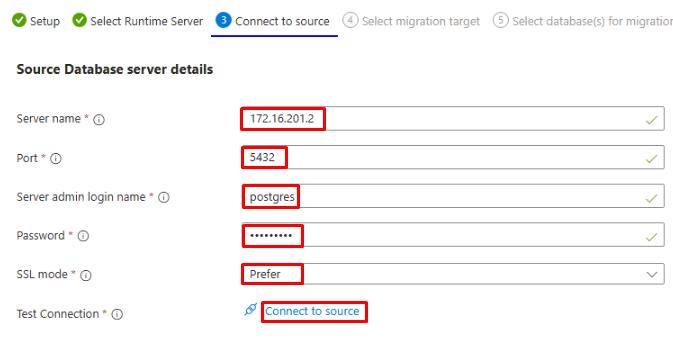
Your IP may differ from the screenshot.
-
Select Connect to source.
-
Once the connection test completes, select Next: Select migration target >.
-
On the Select migration target tab, enter Passw0rd! in the Password field, then select Connect to target.
-
Once the connection test completes, select Next: Select database(s) for migration >.
-
On the Select database(s) for migration tab, select the checkbox for Adventureworks, then select Next: Summary >.
-
Select Start Validation and Migration.
This process may take 3-4 minutes.
In an offline migration, all applications that connect to the source instance are stopped. The tradeoff is that it requires less configuration and performs faster. This can be useful in situations where downtime or maintenance is expected.
-
Select Refresh on the azuredb@lab.LabInstance.Id - Migration page periodically until the offlinemigration job is complete.
-
Once the migration is complete, select offlinemigration.
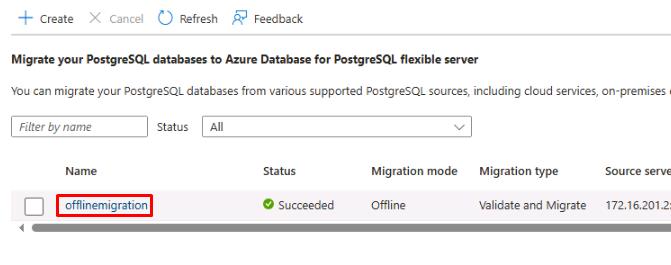
-
Everything should show as Succeeded. At the bottom, select the link to the Adventureworks database.
-
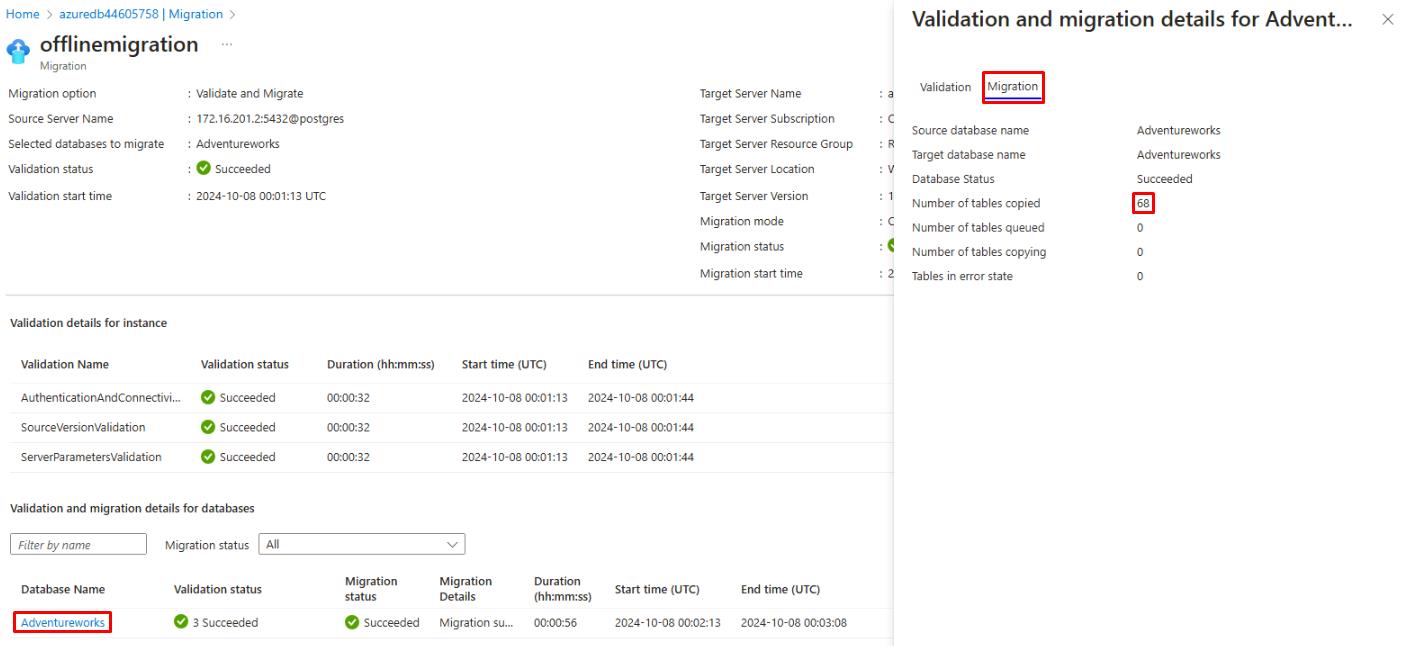
In the Validation and migration details for Adventureworks flyout menu, select the Migration tab.
-
Verify the Database Status shows as Succeeded and the Number of tables copied shows as 68.
02: Perform online migration
Expand this section to view the solution
Next, you’ll configure connection options and execute an online migration, ensuring minimal disruption and enabling the city to continue providing public services without extended downtime.
-
From Windows File Explorer, go to C:\Program Files\PostgreSQL\16\data and open the postgresql.conf file with Notepad.
-
In the postgresql.conf file, select Ctrl+F to find the value wal_level.
-
Delete the # at the start of the line to uncomment the setting.
-
Set the wal_level value to logical, and then remove the comment to the right.
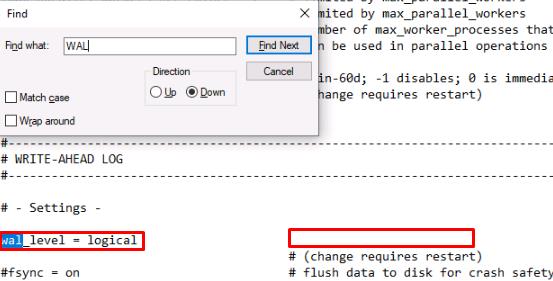
-
Save and close the file.
-
A server restart is required for the changes to take effect. Right-click the Windows icon in the lower left, select Shut down or sign out, then select Restart to reboot the VM.
-
Once the VM has rebooted, sign in again to Your VM username with Your VM password.
-
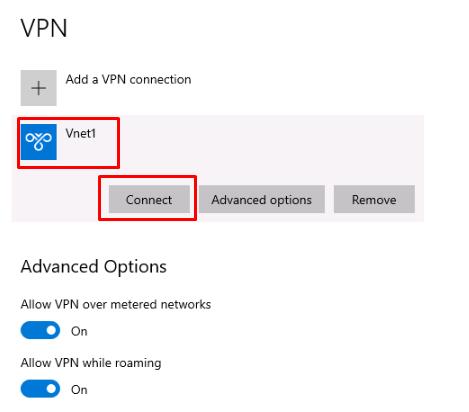
Reconnect to the Vnet1 VPN by selecting the network icon in the notification area and then selecting the Vnet1 connection.
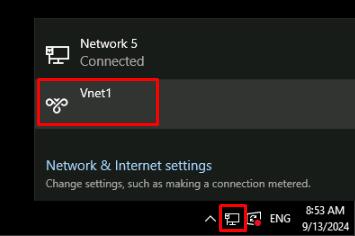
-
From the VPN settings, select Vnet1 and then select Connect.
-
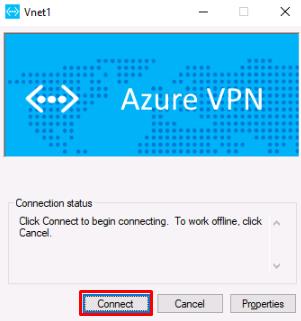
A separate Vnet1 connection window will open in the background. Switch to it and select Connect.
A Window may show asking about privilege escalation, select Continue.
-
At the User Account Control prompt, enter Your VM password and select Yes.
-
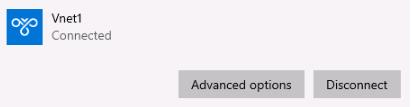
Verify that Vnet1 is connected successfully. The word “Connected” should show under the Vnet1 connection.
-
If your Microsoft Edge session is not restored, open it and go to https://portal.azure.com.
-
If needed, sign in again to the Azure portal with the following:
Item Value Username Your Azure Portal username Password Your Azure Portal password -
From the Azure portal home page, select the azuredb@lab.LabInstance.Id Azure Database from the Recent list of resources.
-
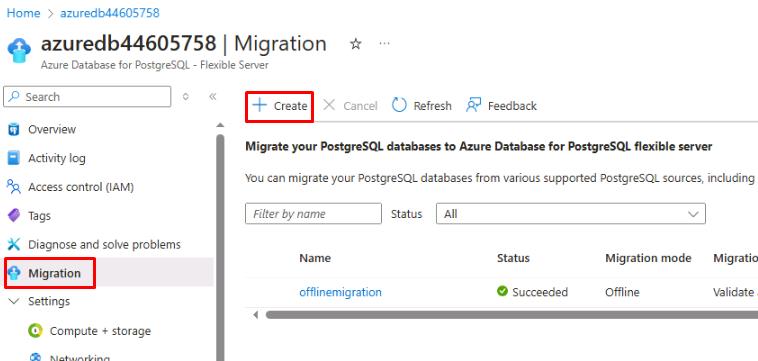
On the azuredb@lab.LabInstance.Id page, select Migration from the left service menu.
-
Select + Create.
-
On the Migrate PostgreSQL to Azure Database for PostgreSQL Flexible Server page, configure the following settings:
Item Value Migration name onlinemigration Source server type On-premise Server Migration option Validate and Migrate Migration mode Online When switching from Offline to Online for the Migration mode, you might notice an additional prerequisite is added below. The additional prerequisite for the online connection is to set the WAL_LEVEL to logical in the source server. This is the reason for the extra configuration and server reboot earlier.
-
Select Next: Select Runtime Server >.
-
On the Select Runtime Server tab, leave the default option of No selected and select Next: Connect to source >.
-
On the Connect to source tab, configure the following settings:
Item Value Server name @lab.Variable(VPN) Port 5432 Server admin login name postgresPassword Passw0rd!SSL mode Prefer -
Select Connect to source.
-
Once the connection test completes, select Next: Select migration target >.
-
On the Select migration target tab, enter
Passw0rd!in the Password field, then select Connect to target. -
Once the connection test completes, select Next: Select database(s) for migration >.
-
On the Select database(s) for migration tab, select the checkbox for Adventureworks and then select Next: Summary >.
After selecting the Adventureworks database, there will be an additional checkbox. This is authorizing Azure to overwrite the data from the previous migration with the data from this one. In this case, the data is the same and you can proceed without fear of data loss. However, in a production environment, pay attention to this setting to determine when you’re about to overwrite data.
-
Select Start Validation and Migration.
This process may take 3-4 minutes.
An online migration has more steps and takes a bit more time, but the source server applications aren’t stopped in the process. Data is copied to the target server, then a cutover is performed to finalize the migration with no downtime in between.
-
Select Refresh on the azuredb@lab.LabInstance.Id - Migration page periodically until the onlinemigration job status shows as Waiting For Use.
-
From the Windows taskbar, select Windows PowerShell and run the following command to connect to the newly migrated Adventureworks database:
psql -h @lab.Variable(privateIP) -p 5432 -U postgres Adventureworks -
Enter Your VM password for the password.
The text cursor for password entry does not move as you type. You may need to select Enter a couple times.
-
Once connected to the Adventureworks database through PowerShell, run the following command:
SELECT name FROM humanresources.department;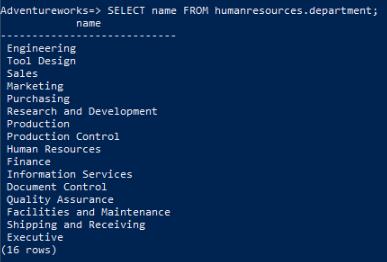
This command should return a list of 16 rows, showing the records in the department table. Since the online migration hasn’t been completed yet, the data is being pulled from the offline migration performed earlier. With the online migration method, data can be added even after the migration has started, as long as the cutover hasn’t been performed yet. Let’s add a new row now to test this.
-
From the PowerShell connection to Adventureworks, run the following command to add a new row to the department table.
INSERT INTO humanresources.department VALUES (17, 'Logistics', 'Inventory Management', DEFAULT); -
Minimize the PowerShell connection, you’ll return to it later.
-
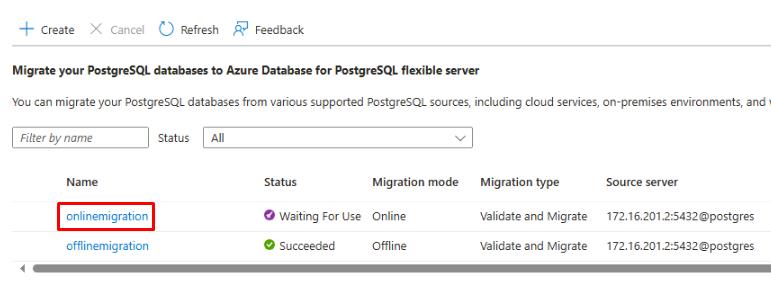
Return to the Azure portal and the azuredb@lab.LabInstance.Id - Migration page.
-
Select onlinemigration from the list.
-
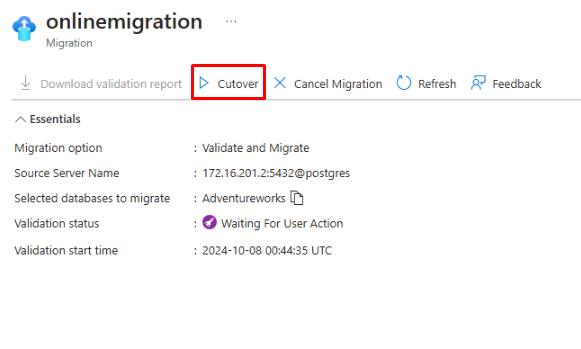
On the onlinemigration page, select Cutover, then select Yes.
This process may take 5-7 minutes to complete.
-
Select Refresh on the onlinemigration page until the Validation status shows as Succeeded.
-
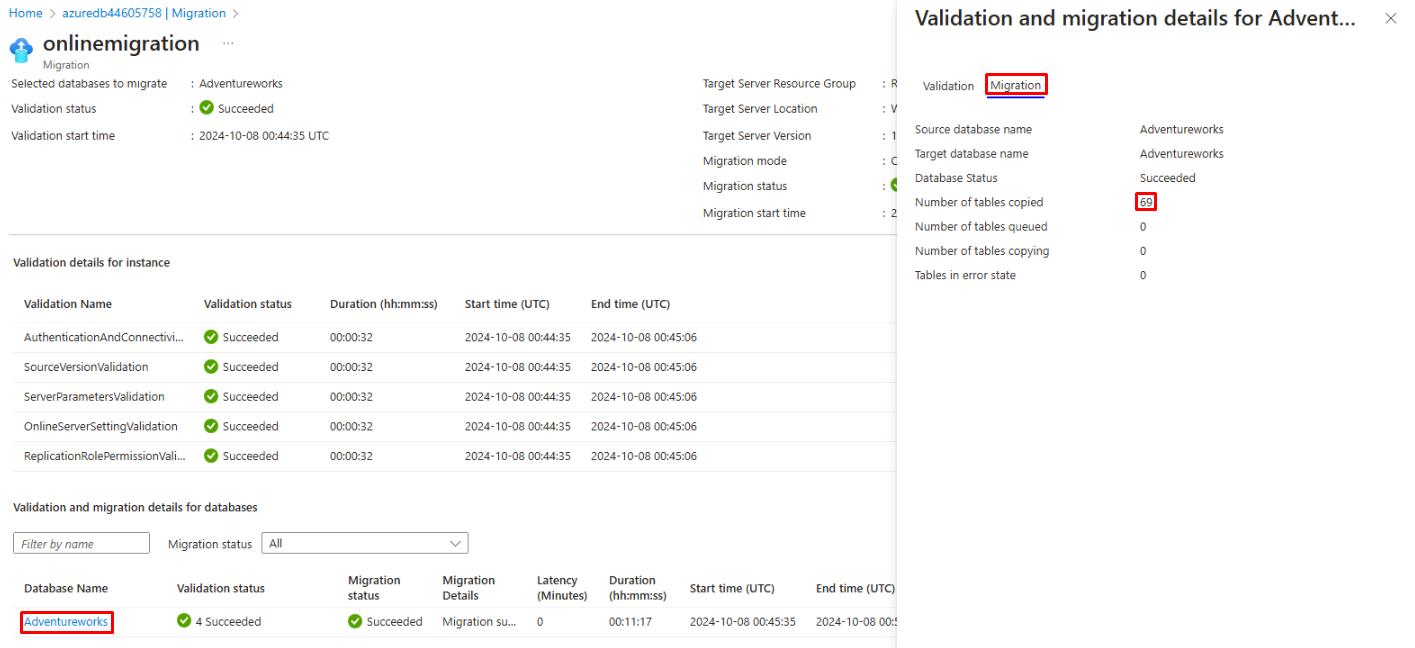
At the bottom of the onlinemigration page, select the link to the Adventureworks database.
-
In the Validation and migration details for Adventureworks flyout menu, select the Migration tab.
-
Verify the Database Status shows as Succeeded and the Number of tables copied shows as 69.
-
Return to the azuredb@lab.LabInstance.Id - Migration page selecting the breadcrumb link in the upper left.
-
Refresh the azuredb@lab.LabInstance.Id - Migration page and verify that the onlinemigration shows as Succeeded.
-
From the Windows taskbar, select Windows PowerShell. You should still be connected to the Adventureworks database. If not, run the following command:
psql -h @lab.Variable(privateIP) -p 5432 -U postgres AdventureworksEnter Your VM password for the password.
-
Once connected to the Adventureworks database through PowerShell, run the following command:
SELECT name FROM humanresources.department;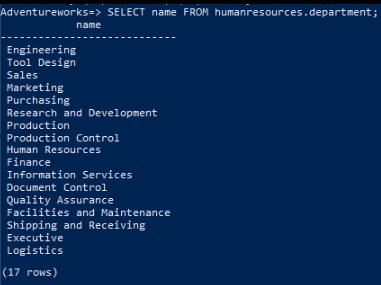
You’re running this command again to check the row names in the department table. At the bottom of the results, notice that the Logistics record was migrated successfully.
Conclusion
Congratulations! You’ve successfully completed this task and have completed the Migrate an on-premises PostgreSQL server to Azure Database for PostgreSQL lab.