Task 01: Get started with AI on Azure PostgreSQL Flexible Server
Introduction
Integrating AI-driven features into PostgreSQL offers several key benefits for the City of Metropolis. By leveraging advanced text processing, city employees can quickly analyze and interpret large volumes of data, leading to more informed decision-making. Semantic search capabilities enable more accurate and relevant search results, improving the efficiency of information retrieval. Additionally, these AI enhancements can automate routine tasks, freeing up staff to focus on more complex and strategic initiatives. Overall, this integration supports a more responsive and proactive approach to municipal services, and also enhances the overall quality of services provided to the community.
Description
In this task, you’ll establish a foundation for AI-driven database operations in Azure PostgreSQL. You’ll clone the necessary lab files, connect to your cases database using both the Azure Cloud Shell and pgAdmin, and install the azure_ai extension for direct integration with Azure AI services. This setup mirrors the City of Metropolis’s approach to modernizing public services through robust data handling and advanced analytics.
Success criteria
- You accessed and cloned the repository containing the necessary scripts and configuration files.
- You established a connection to the cases database using both Azure Cloud Shell and pgAdmin.
- You installed the
azure_aiextension to enable AI functionalities within the PostgreSQL environment. - You used AI-driven text processing features to analyze and interpret data.
- You configured and executed semantic search queries to retrieve relevant and accurate information efficiently.
Learning resources
- Integrate Azure AI capabilities into Azure Database for PostgreSQL - Flexible Server
- Build AI Apps with Azure Database for PostgreSQL
Key tasks
01: Clone TechConnect lab repo
Expand this section to view the solution
Connection Instructions
-
Sign in to the virtual machine with the following credentials:
Item Value Username Your VM username Password Your VM password Select the Type Text icon to enter the associated text into the virtual machine.
Clone TechConnect lab repo
The City of Metropolis relies on standardized scripts and templates to manage its data environment. By cloning the TechConnect lab repository, you ensure that everyone follows the same procedures when deploying AI features. In this task, you’ll clone the TechConnect lab repository, which contains the scripts and configuration files needed to configure AI features within an Azure Database for PostgreSQL Flexible Server environment.
-
Open a browser, go to https://portal.azure.com, then sign in with your lab credentials:
Item Value Username Your Azure Portal username Password Your Azure Portal password -
Select the Cloud Shell icon in Azure’s global controls to open a new Cloud Shell pane.

-
Select Bash.

-
Select No storage account required, select your Subscription, then select Apply.

-
At the Cloud Shell prompt, enter the following to clone the GitHub repo containing exercise resources:
git clone https://github.com/Azure-Samples/mslearn-pg-ai.git
02: Connect to your database using psql in the Azure Cloud Shell
Expand this section to view the solution
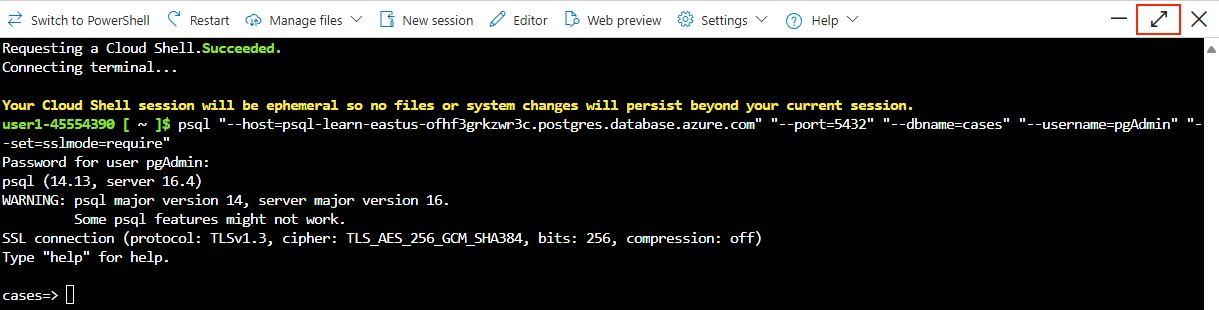
Municipal IT teams often work in varied environments. Using the Azure Cloud Shell ensures secure, consistent access to PostgreSQL resources without requiring local installations or complex VPN setups. In this task, you’ll connect to the cases database on your Azure Database for PostgreSQL flexible server using the psql command-line utility from the Azure Cloud Shell.
-
In the Azure portal, under the Navigate section, select Resource Groups.
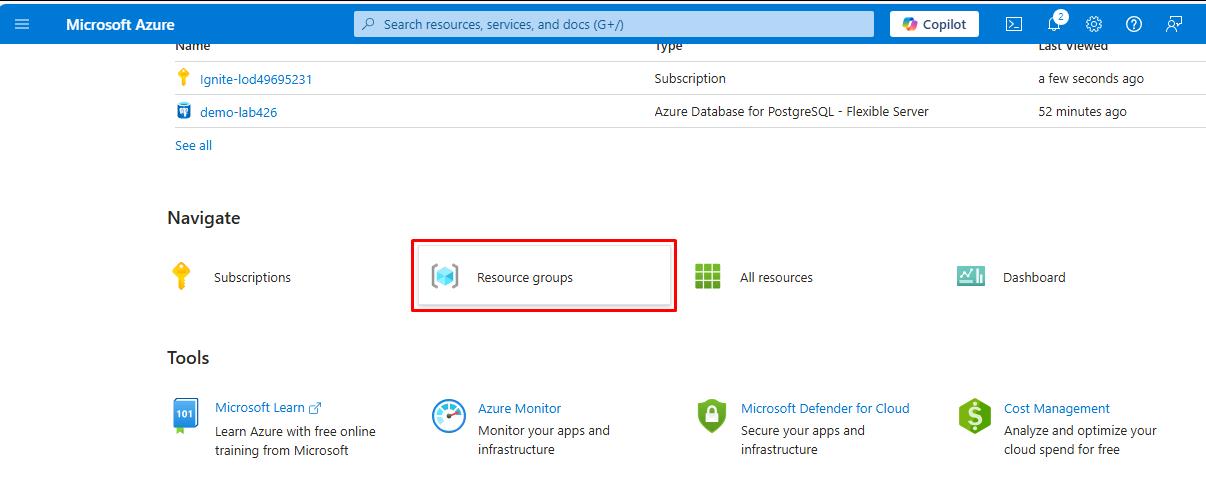
-
Select ResourceGroup1.
-
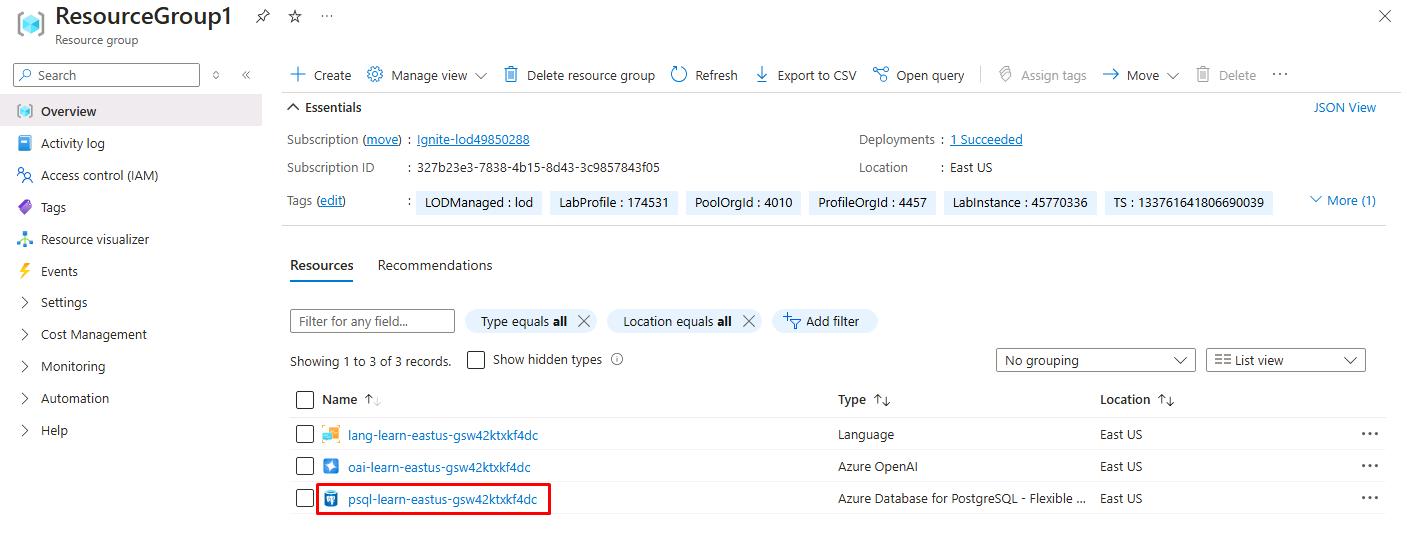
In the resource group, select the pre-deployed Azure Database for PostgreSQL Flexible Server resource.
It may take 5-10 minutes to start and finish deploying.
-
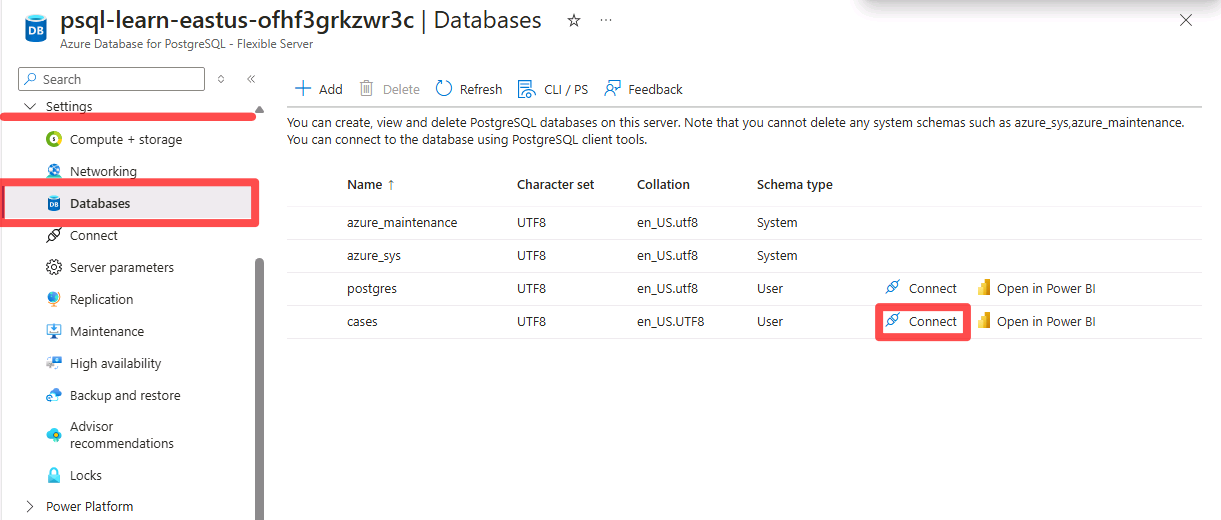
In the left service menu, under Settings, select Databases.
-
Select Connect to the right of the cases database.
-
On the Open New Cloud Shell dialog, select Continue. You won’t lose the previously cloned content.
-
At the Password for user pgAdmin prompt in the Cloud Shell, enter the password for the pgAdmin sign in.
The text cursor for password entry does not move as you type.
Password: passw0rd
Once signed in, the psql prompt for the cases database is displayed.

-
You’ll continue working in the Cloud Shell throughout the remainder of this exercise, so it may be helpful to select the Maximize button at the upper right of the pane.
03: Populate the database with sample data and explore
Expand this section to view the solution
Before configuring AI services, the City of Metropolis needs relevant test data. By creating tables and inserting sample records, officials can validate the AI features on realistic data (for example, legal cases or citizen service requests). In this task, you’ll add a couple of tables to the cases database and populate them with sample data so you have information to work with as you review the extension’s functionality.
-
Run the following commands to create the cases tables for storing law cases data:
\i mslearn-pg-ai/Setup/SQLScript/initialize_dataset.sql; -
Enter the following command to allow the extended display to be automatically applied:
\x autoEnabling the extended display for query results in psql improves the readability of output for subsequent commands.
-
Retrieve a sample of data from the cases table. This allows you to examine the structure and content of the data stored in the database.
 SELECT * FROM cases
 LIMIT 1;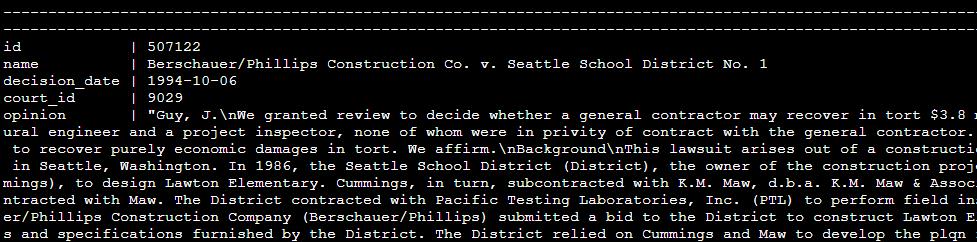
04: Set up PGAdmin
Expand this section to view the solution
Beyond command-line interfaces, the City of Metropolis benefits from a graphical tool for easier database management. pgAdmin streamlines administrative tasks, letting staff quickly configure AI capabilities. In this task, after verifying connections via the Azure Cloud Shell, you’ll switch to pgAdmin — a robust, open-source platform for PostgreSQL administration and development. This step accelerates the city’s ability to configure and manage AI features.
Using pgAdmin makes it easier to explore the output and understand how the AI features work in PostgreSQL.
-
Open a new tab, then go to https://portal.azure.com.
-
Under Navigate, select Resource Groups.
-
Select ResourceGroup1.
-
In the resource group, select the Azure Database for PostgreSQL Flexible Server resource.
-
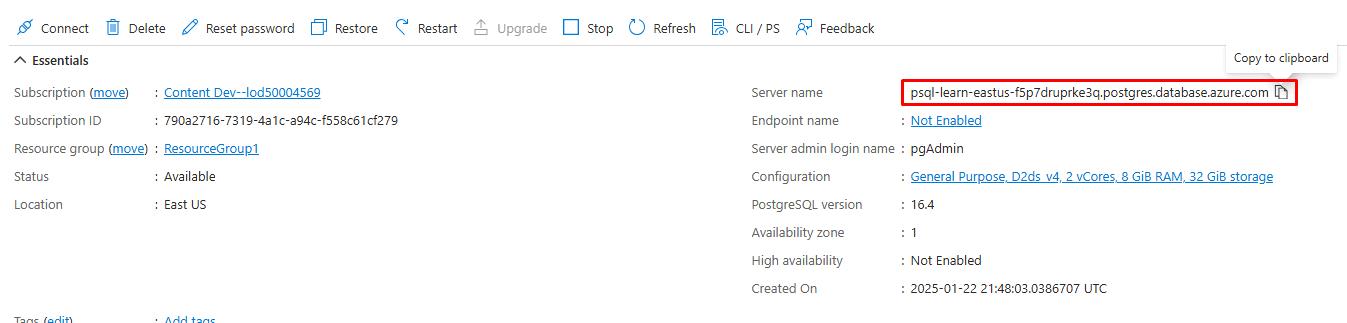
Paste the value of Server name into the below text box. This will be used to connect to the server.
@lab.TextBox(PGHOST)
-
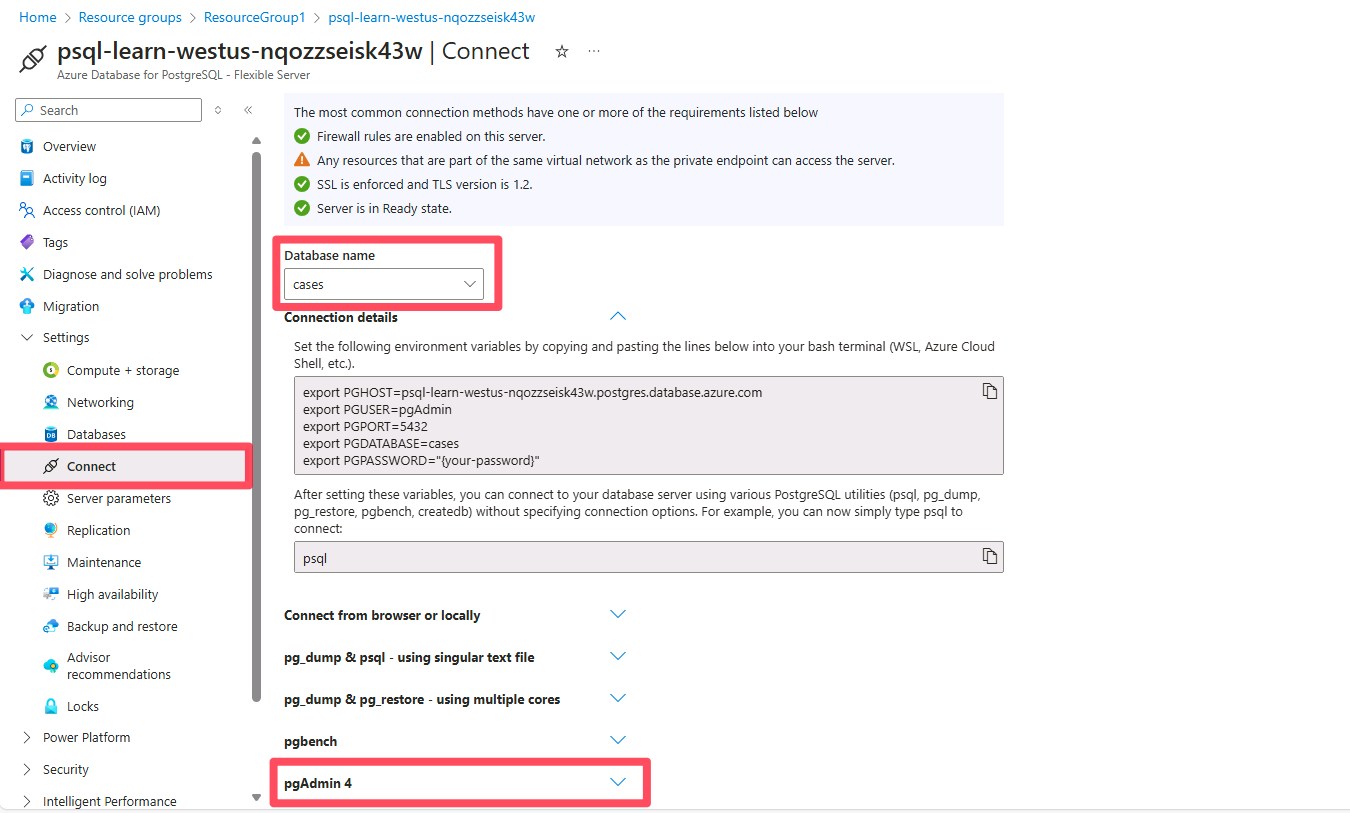
On the service menu, under Settings, select Connect. Follow instructions in Azure Portal on how to connect to pgAdmin.
pgAdmin is already installed on your VM.
-
On your VM’s desktop, open pgAdmin 4 v8.
-
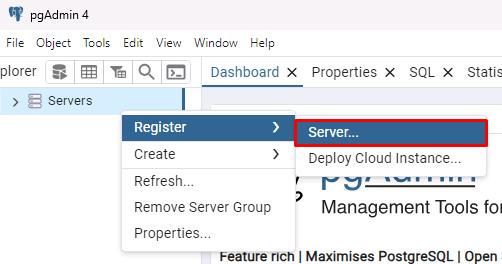
In the pgAdmin 4 interface, on the left side browser tree, right-click Servers, select Register, then select Server.
-
On the Register - Server window, in the Name field, enter Azure Database for PostgreSQL.
-
Select the Connection tab, then enter the following:
Item Value Host name/address @lab.Variable(PGHOST) Port 5432 Maintenance database cases Username pgAdmin Password passw0rd 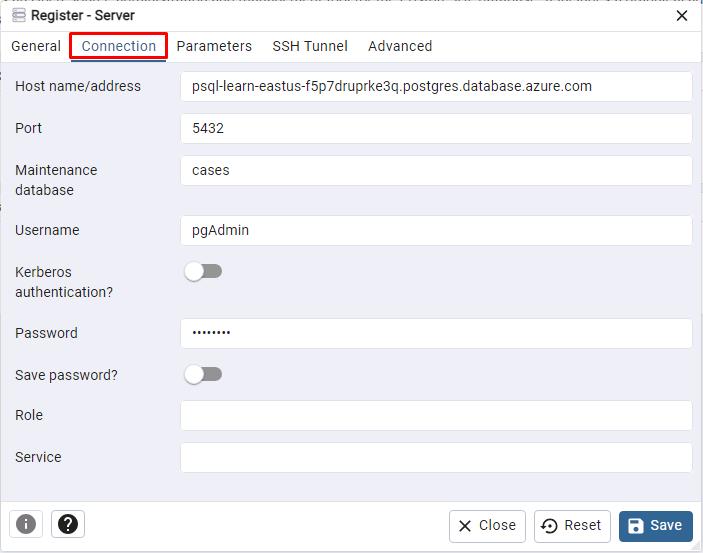
-
Select Save on the bottom right to save the server registration. pgAdmin 4 will establish the connection.
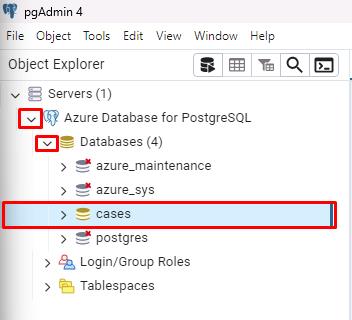
Once connected, you can expand the server in the left side browser tree to view databases, schemas, and tables. You can also interact with the server using the built-in query tool and manage your database objects.
-
On the left side browser tree, expand Azure Database for PostgreSQL, then expand Databases, then select cases.
-
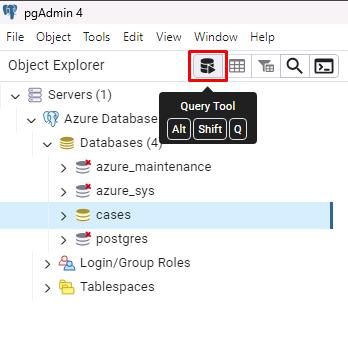
With cases selected, select the Query Tool button at the top of that pane to start working with queries in the upcoming sections.
05: Install and configure the azure_ai extension
Expand this section to view the solution
For advanced data processing, Metropolis must integrate Azure AI services directly within PostgreSQL. The azure_ai extension allows seamless interaction with Azure OpenAI and Azure AI Language services. In this task, you will install the azure_ai extension into your database and set up connections to your Azure AI Services resources. Doing so enables direct communication for automated text analysis, summarizations, and more.
You’ll use pgAdmin for the following steps.
Before an extension can be installed and used in an Azure Database for PostgreSQL flexible server database, it must be added to the server’s allowlist, as described in how to use PostgreSQL extensions.
To enable the extension in your database, follow these steps:
-
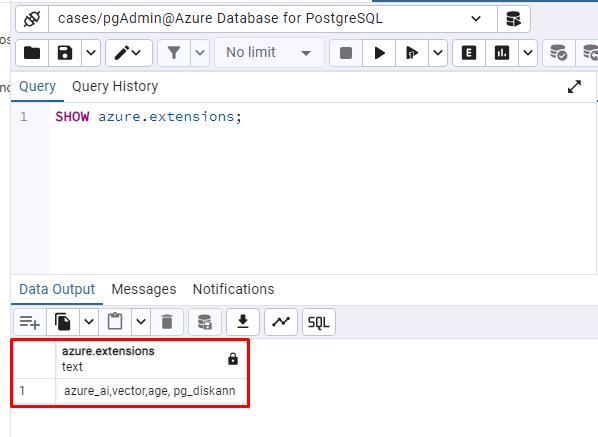
Enter the following command in the pgAdmin Query pane.
SHOW azure.extensions;This verifies the azure_ai, vector, age and pg_diskann extensions were successfully added to your server’s allowlist by the Bicep deployment script that ran when setting up your environment.
-
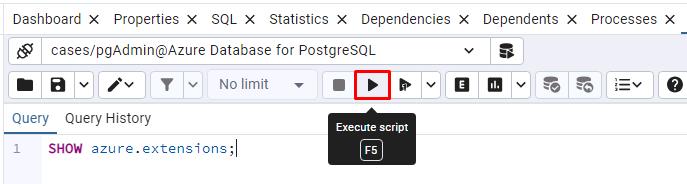
Select the Execute script button.
-
Your output will look similar to the following:
-
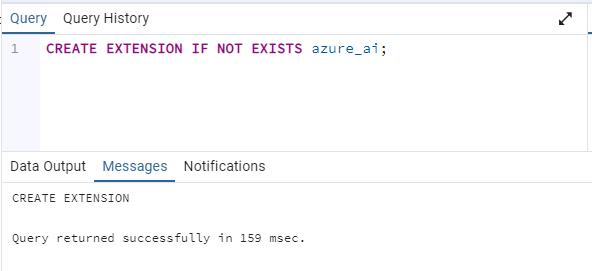
Install the azure_ai extension using the CREATE EXTENSION command. Overwrite the previous query used with the following:
CREATE EXTENSION IF NOT EXISTS azure_ai;
CREATE EXTENSION loads a new extension into the database by running its script file. This script typically creates new SQL objects such as functions, data types, and schemas. An error is thrown if an extension of the same name already exists. Adding IF NOT EXISTS allows the command to execute without throwing an error if it’s already installed.
06: Explore the Azure AI schema
Expand this section to view the solution
Metropolis’s IT department needs to understand how AI services function within PostgreSQL to effectively manage user queries and automate tasks.
The azure_ai schema provides the framework for directly interacting with Azure AI and ML services from your database. It contains functions for setting up connections to those services and retrieving them from the settings table, also hosted in the same schema. The settings table provides secure storage in the database for endpoints and keys associated with your Azure AI and ML services.
Review the schema: Configure the azure_ai extension
- Review the functions defined in the azure_ai schema.
| Schema | Name | Result data type | Argument data types | Type |
|---|---|---|---|---|
| azure_ai | get_setting | text | key text | func |
| azure_ai | set_setting | void | key text, value text | func |
| azure_ai | version | text | func |
Because the connection information for Azure AI services, including API keys, is stored in a configuration table in the database, the azure_ai extension defines a role called azure_ai_settings_manager to ensure this information is protected and accessible only to users who have been assigned that role. This role enables reading and writing of settings related to the extension.
Explore the Azure AI functions
Only members of the azure_ai_settings_manager role can invoke the azure_ai.get_setting() and azure_ai.set_setting() functions. In an Azure Database for PostgreSQL flexible server, all admin users (those with the azure_pg_admin role assigned) are also assigned the azure_ai_settings_manager role.
Once these settings are properly configured, Metropolis can quickly integrate cognitive services—for example, to process lengthy legal documents or citizen requests—directly in its database.
To demonstrate how you use the azure_ai.set_setting() and azure_ai.get_setting() functions, configure the connection with your Azure OpenAI resource.
-
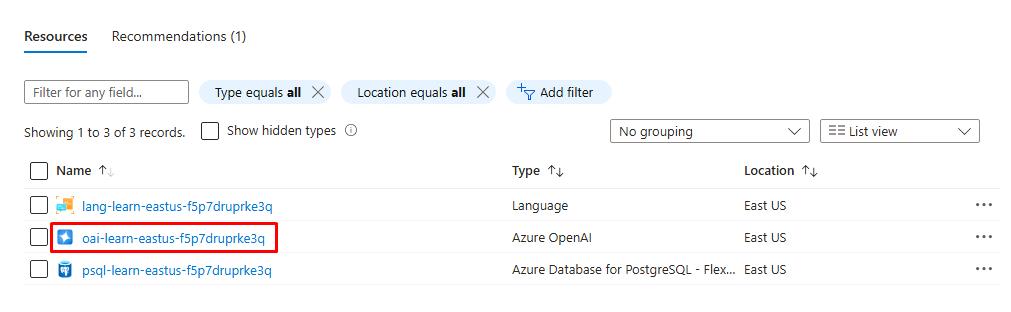
Go to the tab where Cloud Shell is open, minimize the Cloud Shell pane, then select the ResourceGroup1 breadcrumb link.

-
Select the Azure OpenAI resource.
-
On the Azure OpenAI resource page, in the service menu, under the Resource Management section, select Keys and Endpoint.
-
Enter the value for KEY 1 in the below textbox:
@lab.TextBox(API_KEY) -
Enter the value for Endpoint:
@lab.TextBox(ENDPOINT)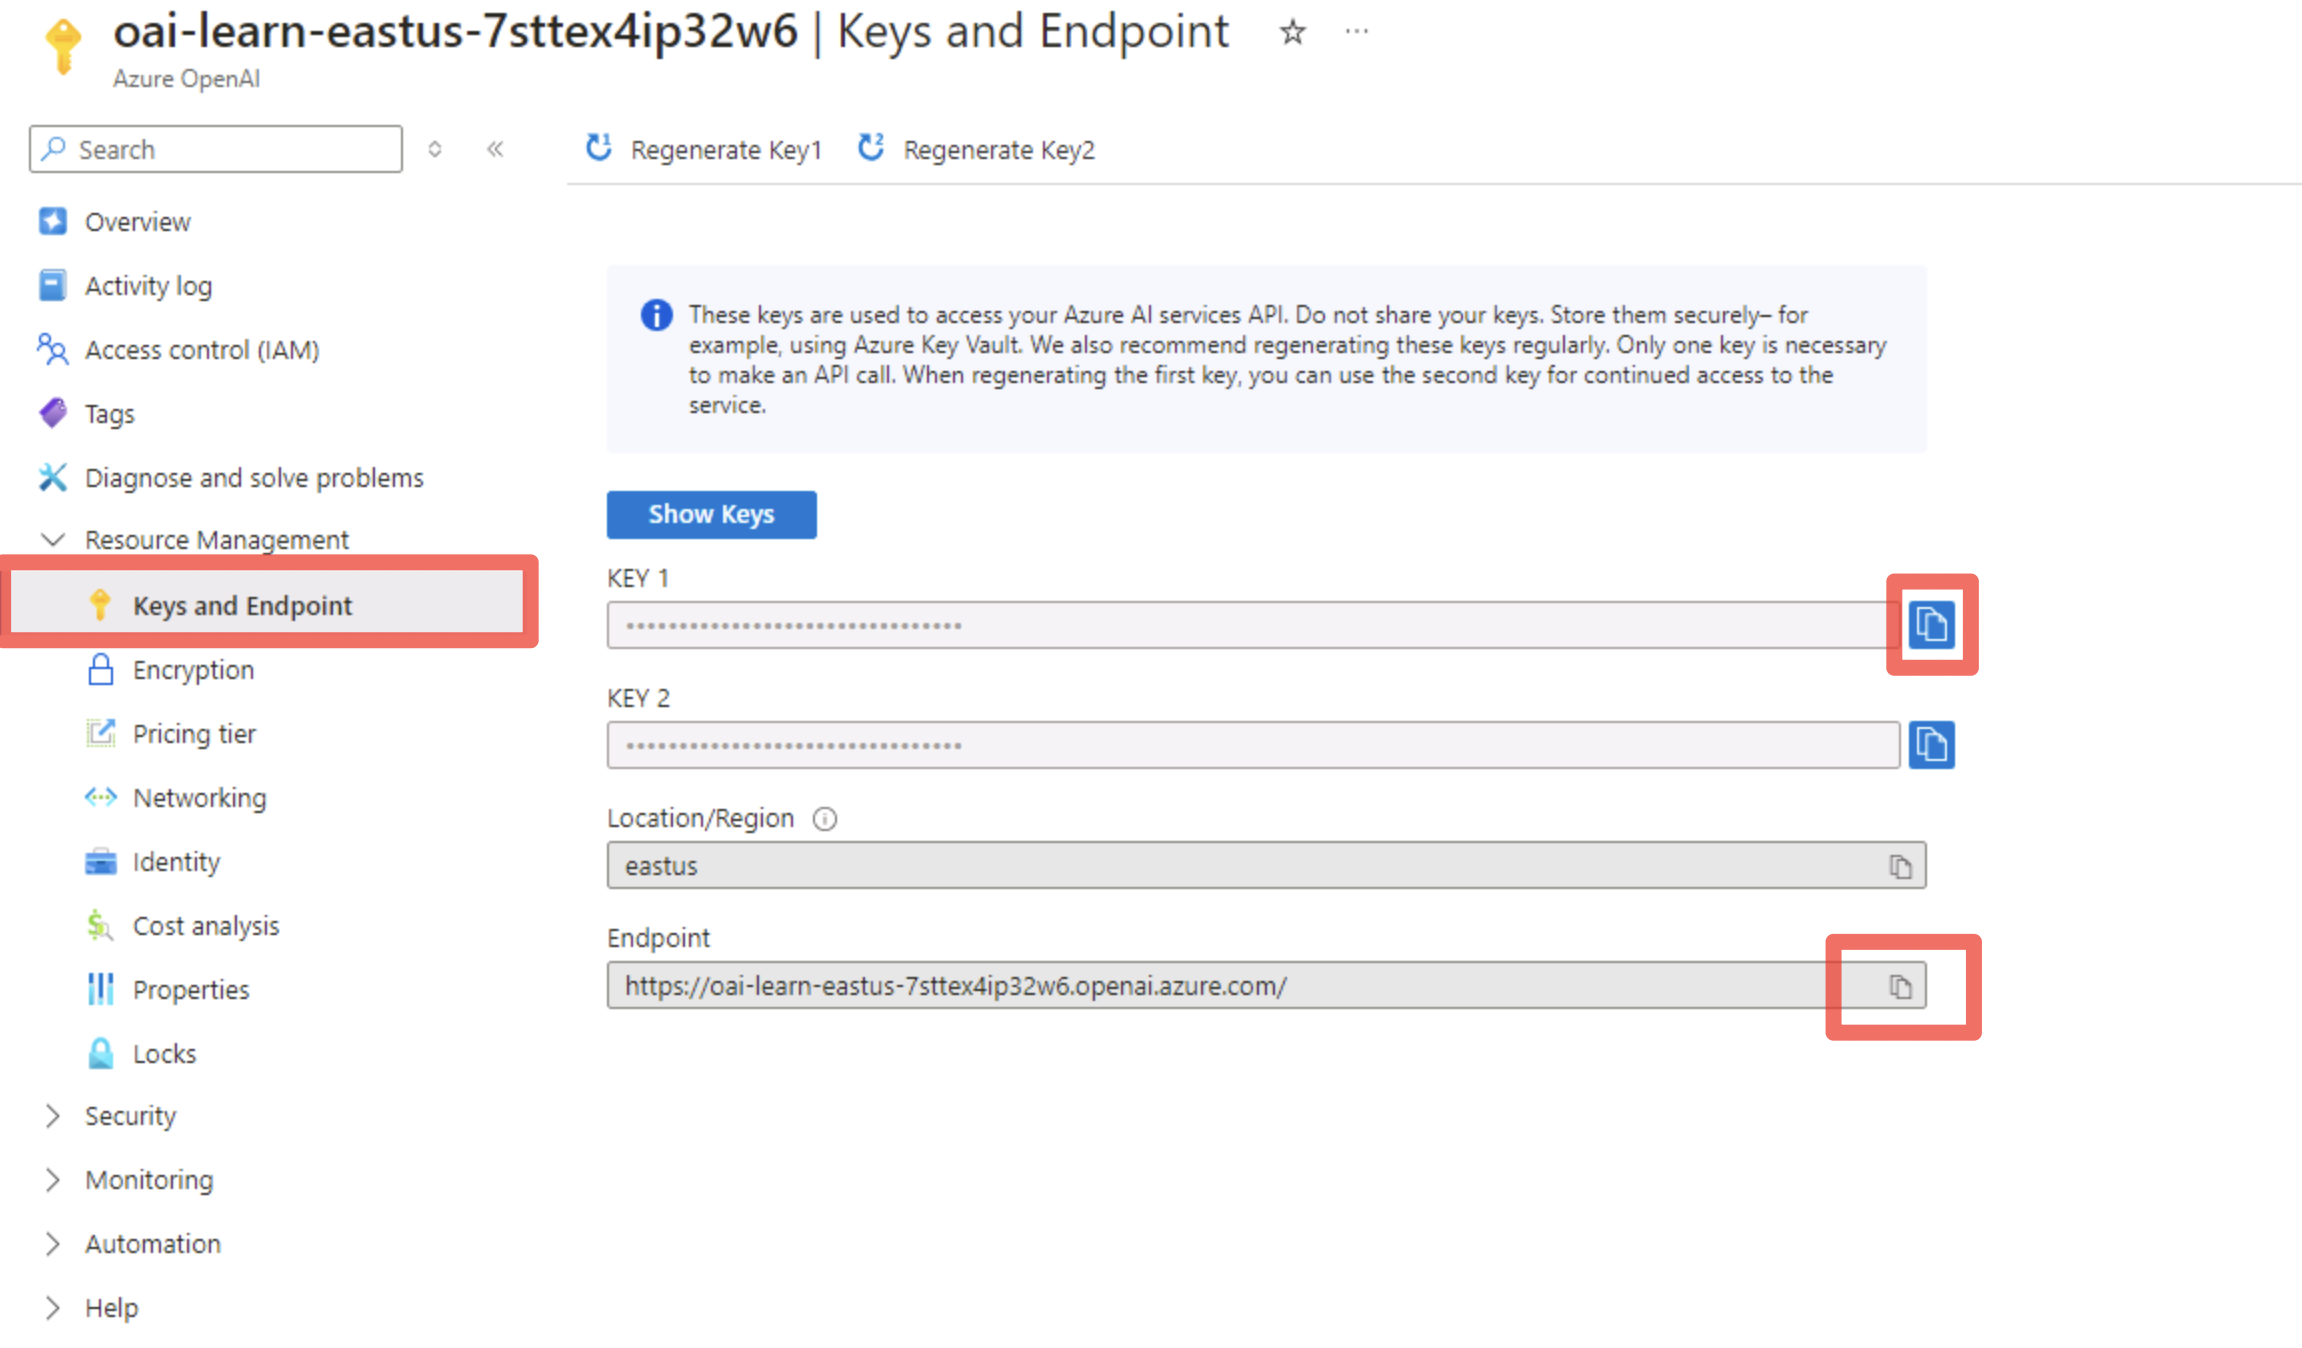
You can use either KEY 1 or KEY 2. Always having two keys allows you to securely rotate and regenerate keys without causing service disruption.
-
Once you have your endpoint and key, maximize the pgAdmin window.
-
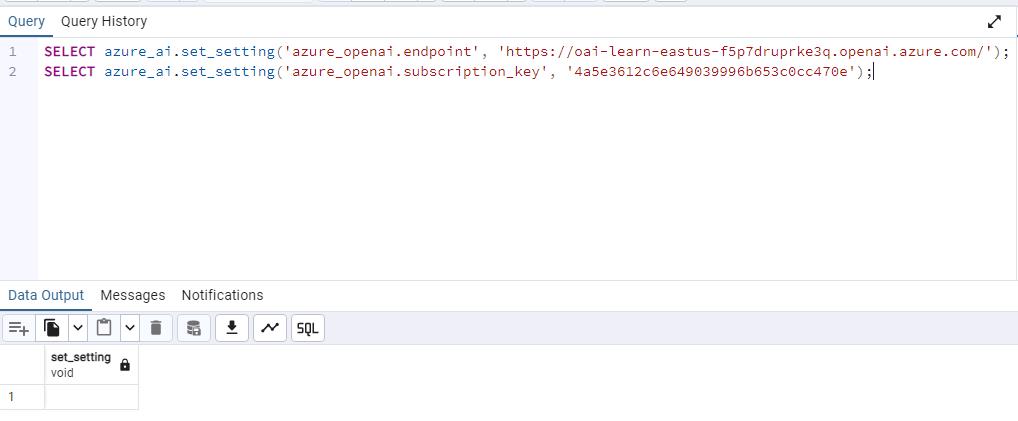
Enter the following in the Query pane to add your values to the configuration table:
 SELECT azure_ai.set_setting('azure_openai.endpoint', '@lab.Variable(ENDPOINT)');
 SELECT azure_ai.set_setting('azure_openai.subscription_key', '@lab.Variable(API_KEY)');
This code block uses your input from the above text boxes for KEY 1 and Endpoint.
-
Select the Execute script button on the toolbar. The input and output should look similar to the following.
-
Verify the settings were written into the azure_ai.settings table. Enter the following, then select Execute script:
SELECT azure_ai.get_setting('azure_openai.endpoint'); -
Enter the following, then select Execute script:
SELECT azure_ai.get_setting('azure_openai.subscription_key');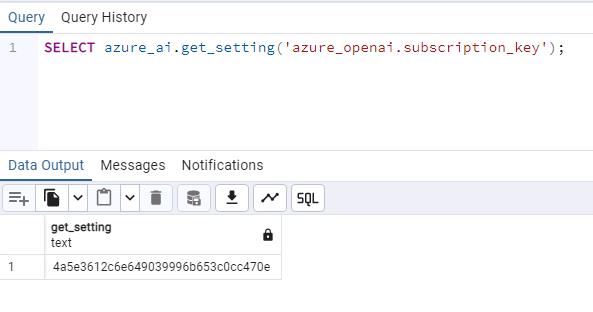
The azure_ai extension is now connected to your Azure OpenAI account.
Review the Azure OpenAI schema
The azure_openai schema provides the ability to integrate the creation of vector embedding of text values into your database using Azure OpenAI. Using this schema, you can generate embeddings with Azure OpenAI directly from the database to create vector representations of input text, which can then be used in vector similarity searches, as well as consumed by machine learning models.
The schema contains a single function, create_embeddings(), with two overloads. One overload accepts a single input string, and the other expects an array of input strings.
Review the details of the functions in the azure_openai schema: Configure OpenAI endpoint and key
The documentation shows the two overloads of the azure_openai.create_embeddings() function, allowing you to review the differences between the two versions of the function and the types they return.
-
Enter the following query and select Execute script:
SELECT azure_openai.create_embeddings('text-embedding-3-small', 'Sample text for PostgreSQL Lab') AS vector;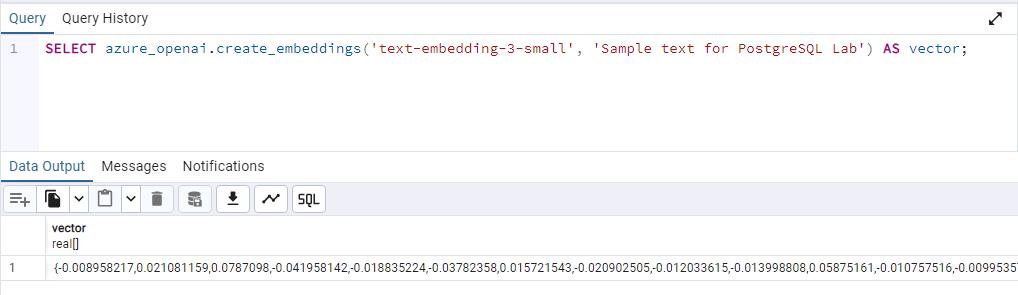
This is a simplified example of using the function, creating a vector embedding for a sample query. The deployment_name parameter is set to embedding, which is the name of the deployment of the text-embedding-3-small model in your Azure OpenAI service.
Embeddings are a concept in machine learning and natural language processing (NLP) that involves representing objects such as words, documents, or entities, as vectors in a multi-dimensional space.
Embeddings allow machine learning models to evaluate how closely two pieces of information are related. This technique efficiently identifies relationships and similarities between data, allowing algorithms to identify patterns and make accurate predictions.
The azure_ai extension allows you to generate embeddings for input text. To enable the generated vectors to be stored alongside the rest of your data in the database, you must install and enable the vector extension. However, that’s outside the scope of this exercise.
Congratulations! You’ve successfully completed this task.