Task 01: Explore Copilot for data flows
-
Open a new browser tab and go to https://app.powerbi.com/.
-
On the Power BI Home page, in the left menu pane, select Workspaces and then select + New workspace.
-
In the Name box, enter CopilotDataFlowDemo@lab.LabInstance.Id. After Azure verifies that the name is available, select Advanced.
-
In the License mode section, verify that Fabric capacity is selected and then select Apply.
-
On the ContosoDataFlowDemo@lab.LabInstance.Id page, select + New item.
-
Scroll to the Store data section of the New item dialog and select Lakehouse.
-
In the Name field for the New lakehouse dialog, enter +++CopilotDataFlow@lab.LabInstance.Id+++ and then select Create.
-
In the left menu pane for the page, select CopilotDataFlow@lab.LabInstance.Id and then select + New item.
-
Scroll to the Prepare data section and select Dataflow Gen2 and then select Create. The collapsed Power Query ribbon displays.

-
Select the down arrow (∨) that appears at the right end of the ribbon to expand the ribbon.

-
On the Home tab of the Power Query ribbon, select Copilot. The Copilot pane displays on the right side of the page.

-
In the Copilot pane, select Get data from.
-
On the Choose data source page, select Azure SQL database.
For this task, you’ll connect to the same database that you connected to in the previous exercise.
-
Configure the connection by using the values in the following table. Leave all other settings at their default values.
If there’s no value listed for the Server setting, right-click the instructions pane in the lab environment and select Refresh.
Default Value Server [Your SQL Server Name] Database **Adventureworks** Authentication kind Basic Username [Your SQL Admin Username] Password [Your SQL Admin Password] -
Select Next to test the connection. If the connection is successful, the Choose data page displays.
-
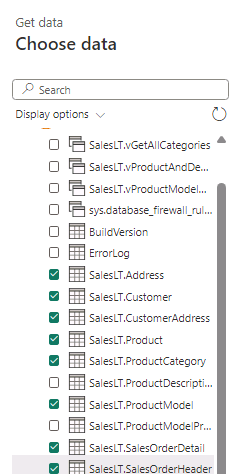
Select the following eight tables from the list of tables and then select Create.
- SalesLT.Address
- SalesLT.Customer
- SalesLT.CustomerAddress
- SalesLT.Product
- SalesLT.ProductCategory
- SalesLT.ProductModel
- SalesLT.SalesOrderDetail
- SalesLT.SalesOrderHeader
-
In the Copilot pane, enter Only keep Canadian customers in the Describe what you’d like to do box and then select Submit.
-
Verify that Copilot has added a step to the query. You should see the added filter in the Query settings pane. You should also see the response from Copilot in the Copilot pane.

Copilot for Fabric notebooks is in preview. During lab testing, we experienced mixed results when we submitted this prompt. In most cases, Coplilot successfully added a step to filter rows according to the query. Occasionally, Copilot was not able to perform the requested action.
-
If Copilot doesn’t add the query step, you can add the step manually. In the grid that previews the data, select the drop-down list next to the CountryRegion column. Clear the Select All checkbox and then select Canada. Select OK to implement the filter. </br>
At the top of the Power Query window, you should see the formula displayed that filters the data.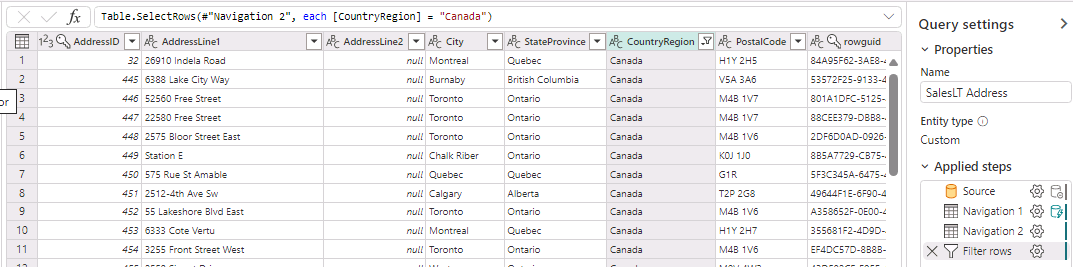
-
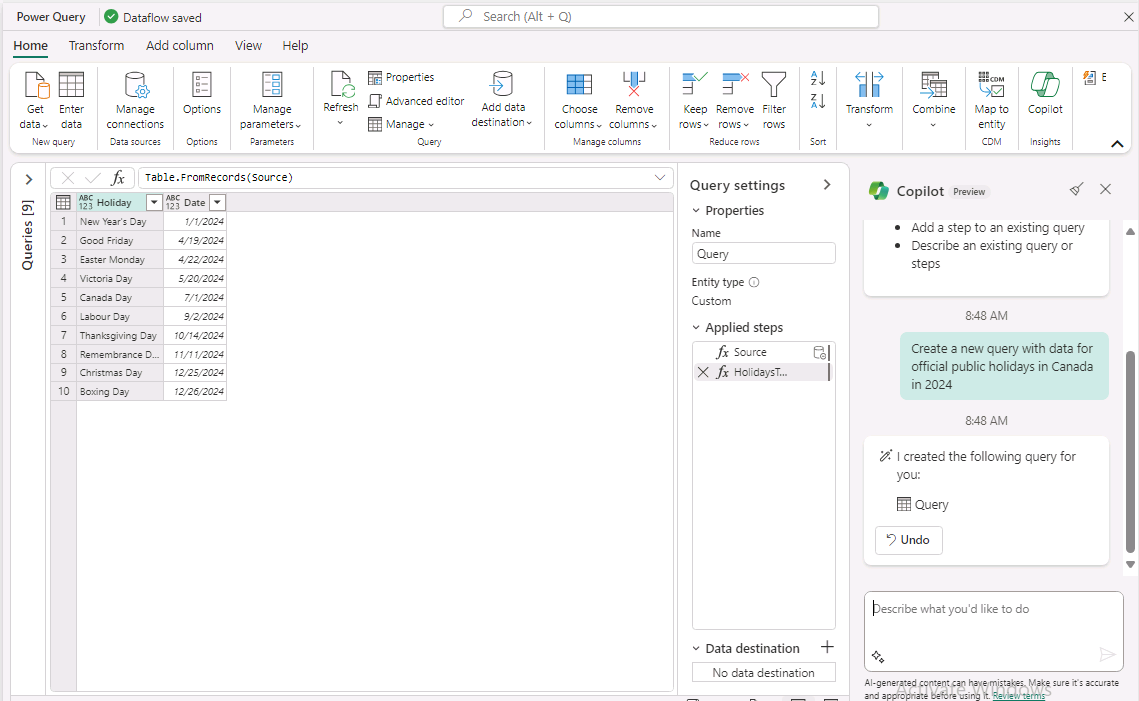
In the Copilot pane, enter Create a new query with data for official public holidays in Canada in 2024 in the Describe what you’d like to do box and then select Submit. A new query is added.
-
Select Publish. You’ll be returned to the CopilotDataFlowDemo workspace page.