Customizing an LLM Tool#
In this document, we will guide you through the process of customizing an LLM tool, allowing users to seamlessly connect to a large language model with prompt tuning experience using a PromptTemplate.
Prerequisites#
Please ensure that your Prompt flow for VS Code is updated to version 1.8.0 or later.
How to customize an LLM tool#
Here we use an existing tool package as an example. If you want to create your own tool, please refer to create and use tool package.
Develop the tool code as in this example.
Add a
CustomConnectioninput to the tool, which is used to authenticate and establish a connection to the large language model.Add a
PromptTemplateinput to the tool, which serves as an argument to be passed into the large language model.from jinja2 import Template from promptflow.core import tool from promptflow.connections import CustomConnection from promptflow.contracts.types import PromptTemplate @tool def my_tool( connection: CustomConnection, api: str, deployment_name: str, temperature: float, prompt: PromptTemplate, **kwargs ) -> str: # Replace with your tool code, customise your own code to handle and use the prompt here. # Usually connection contains configs to connect to an API. # Not all tools need a connection. You can remove it if you don't need it. rendered_prompt = Template(prompt, trim_blocks=True, keep_trailing_newline=True).render(**kwargs) return rendered_prompt
Generate the custom LLM tool YAML.
Run the command below in your tool project directory to automatically generate your tool YAML, use -t “custom_llm” or –tool-type “custom_llm” to indicate this is a custom LLM tool:python <promptflow github repo>\scripts\tool\generate_package_tool_meta.py -m <tool_module> -o <tool_yaml_path> -t "custom_llm"
Here we use an existing tool as an example.
cd D:\proj\github\promptflow\examples\tools\tool-package-quickstart

python D:\proj\github\promptflow\scripts\tool\generate_package_tool_meta.py -m my_tool_package.tools.tool_with_custom_llm_type -o my_tool_package\yamls\tool_with_custom_llm_type.yaml -n "My Custom LLM Tool" -d "This is a tool to demonstrate how to customize an LLM tool with a PromptTemplate." -t "custom_llm"
This command will generate a YAML file as follows:
my_tool_package.tools.tool_with_custom_llm_type.my_tool:
name: My Custom LLM Tool
description: This is a tool to demonstrate how to customize an LLM tool with a PromptTemplate.
# The type is custom_llm.
type: custom_llm
module: my_tool_package.tools.tool_with_custom_llm_type
function: my_tool
inputs:
  connection:
    type:
      - CustomConnection
  api:
    type:
      - string
  deployment_name:
    type:
      - string
  temperature:
    type:
      - double
Use the tool in VS Code#
Follow the steps to build and install your tool package and use your tool from VS Code extension.
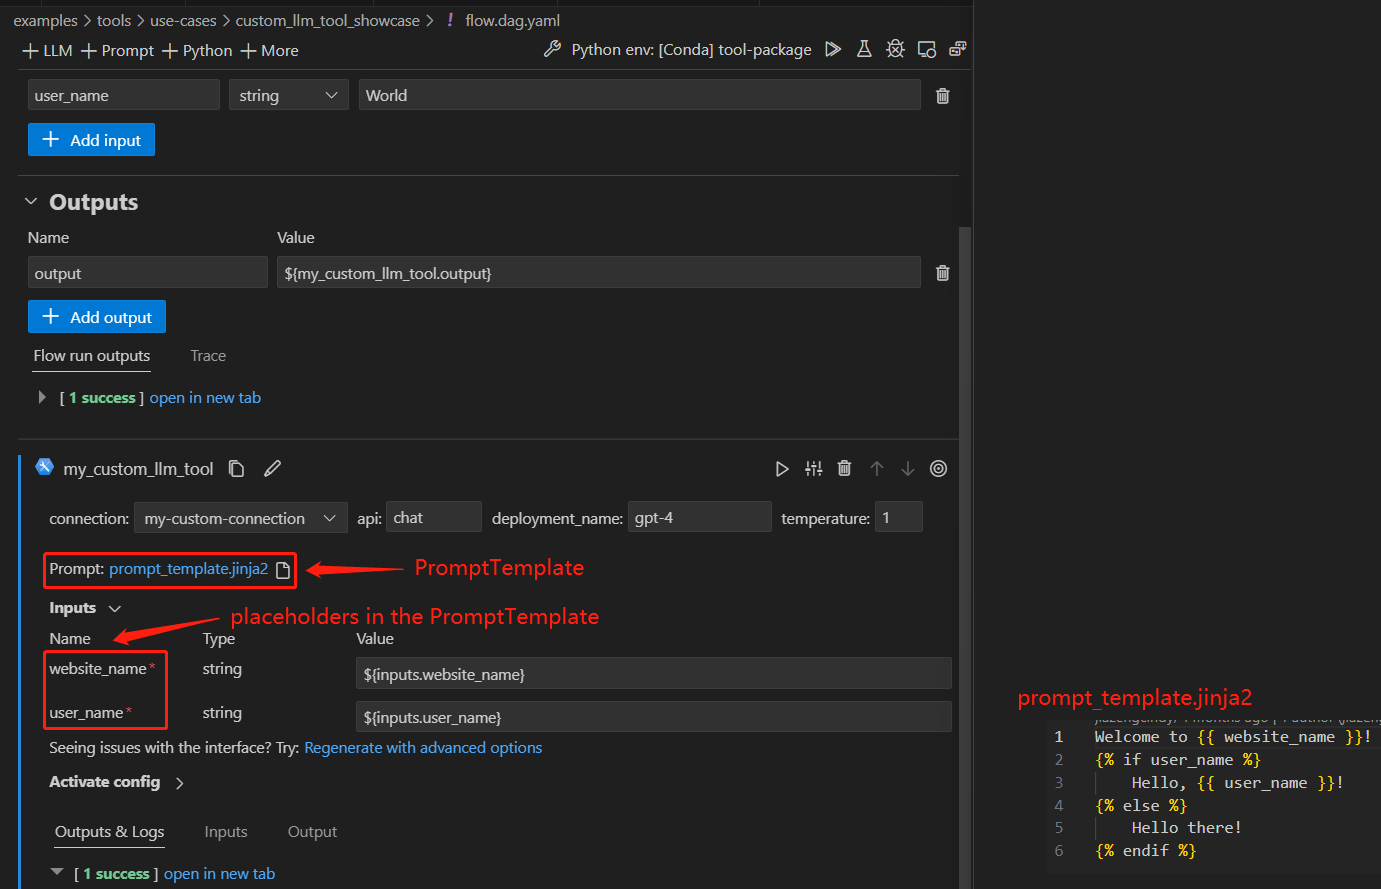
Here we use an existing flow to demonstrate the experience, open this flow in VS Code extension.
There is a node named “my_custom_llm_tool” with a prompt template file. You can either use an existing file or create a new one as the prompt template file.

FAQs#
Can I customize text box size for my tool inputs?#
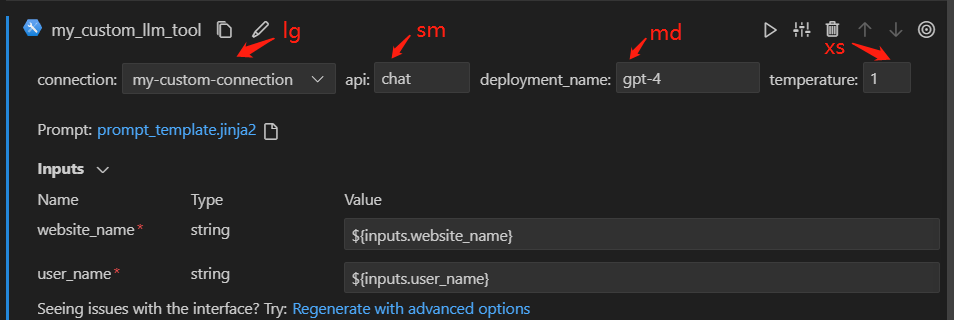
Yes, you can add ui_hints.text_box_size field for your tool inputs. There are 4 sizes available which range from extra small to large as xs, sm, md, lg. The table below provides detailed information about these sizes:
Value |
Description |
UI display size |
|---|---|---|
xs |
extra small |
40px |
sm |
small |
80px |
md |
medium |
130px |
lg |
large |
180px |
You can choose to use different values for your tool inputs based on their expected value length. Take the following yaml as example:
my_tool_package.tools.tool_with_custom_llm_type.my_tool:
  name: My Custom LLM Tool
  description: This is a tool to demonstrate how to customize an LLM tool with a PromptTemplate.
  type: custom_llm
  module: my_tool_package.tools.tool_with_custom_llm_type
  function: my_tool
  inputs:
    connection:
      type:
        - CustomConnection
      ui_hints:
        text_box_size: lg
    api:
      type:
      - string
      ui_hints:
        text_box_size: sm
    deployment_name:
      type:
      - string
      ui_hints:
        text_box_size: md
    temperature:
      type:
      - double
      ui_hints:
        text_box_size: xs
When you use the tool in this example flow, you could see the sizes of the input text boxes are displayed as the set values.
