Receiving props from PowerBI visual
Step by step guide how to build React-based Custom Visual
-
Let the component display data from its own state. Extend
src/component.tsx.export interface State { textLabel: string, textValue: string } export const initialState: State = { textLabel: "", textValue: "" } export class ReactCircleCard extends React.Component<{}, State>{ constructor(props: any){ super(props); this.state = initialState; } render(){ const { textLabel, textValue } = this.state; return ( <div className="circleCard"> <p> {textLabel} <br/> <em>{textValue}</em> </p> </div> ) } } -
Add some styles for new markup by editing
styles/visual.less..circleCard { position: relative; box-sizing: border-box; border: 1px solid #000; border-radius: 50%; width: 200px; height: 200px; } p { text-align: center; line-height: 30px; font-size: 20px; font-weight: bold; position: relative; top: -30px; margin: 50% 0 0 0; } -
Custom Visuals receive current data as an argument of
updatemethod. Opensrc/visual.tsand add the following code intoupdatemethod://... import { ReactCircleCard, initialState } from "./component"; //... export class Visual implements IVisual { //... public update(options: VisualUpdateOptions) { if(options.dataViews && options.dataViews[0]){ const dataView: DataView = options.dataViews[0]; ReactCircleCard.update({ textLabel: dataView.metadata.columns[0].displayName, textValue: dataView.single.value.toString() }); } } else { this.clear(); } } private clear() { ReactCircleCard.update(initialState); } }It picks
textValueandtextLabelfromDataViewand, if data exists, updates component state. This update method will be implemented at the next step. -
To send updates to component instance, insert the following code into
ReactCircleCardclass:private static updateCallback: (data: object) => void = null; public static update(newState: State) { if(typeof ReactCircleCard.updateCallback === 'function'){ ReactCircleCard.updateCallback(newState); } } public state: State = initialState; public componentWillMount() { ReactCircleCard.updateCallback = (newState: State): void => { this.setState(newState); }; } public componentWillUnmount() { ReactCircleCard.updateCallback = null; } -
Now you can test the component. Make sure that
pbiviz startis run and all files are saved, then update the visual you’ve created.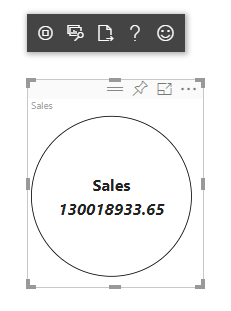
At the next step we will make the component resizable.