
TIP
🔥 Checkout our new Azure Developer page at azure.com/developer (opens new window).
💡 Learn more : How to create custom VM images in Azure (opens new window).
This post was brought to you by Kumar Allamraju (opens new window).
# Creating Custom VM Images in Azure using Packer
Azure provides rich support for open source tools to automate the infrastructure deployments. Some of the tools include Hashicorp's Packer (opens new window) and Terraform (opens new window). In few simple steps, we'll learn how to create custom VM Linux images in Azure using Packer.
Packer is an open source tool for creating identical machine images for multiple platforms from a single source configuration. Packer is lightweight, runs on every major operating system, and is highly performant. It is capable of creating machine images for multiple platforms in parallel.
Since Packer is a command line tool, we will be relying on Azure CLI and Packer to build machine images. Pls make sure Azure CLI (opens new window) and Packer (opens new window) are installed on your development machine prior to running the following steps.
# 1. Create a Resource Group
- az group create (opens new window) -n myResourceGroup -l eastus
# 2. Create a service principal
Packer authenticates with Azure using a service principal. An Azure service principal is a security identity that you can use with apps, services, and automation tools like Packer. You control and define the permissions as to what operations the service principal can perform in Azure.
- az ad sp create-for-rbac (opens new window) --query "{ client_id: appId, client_secret: password, tenant_id: tenant }"
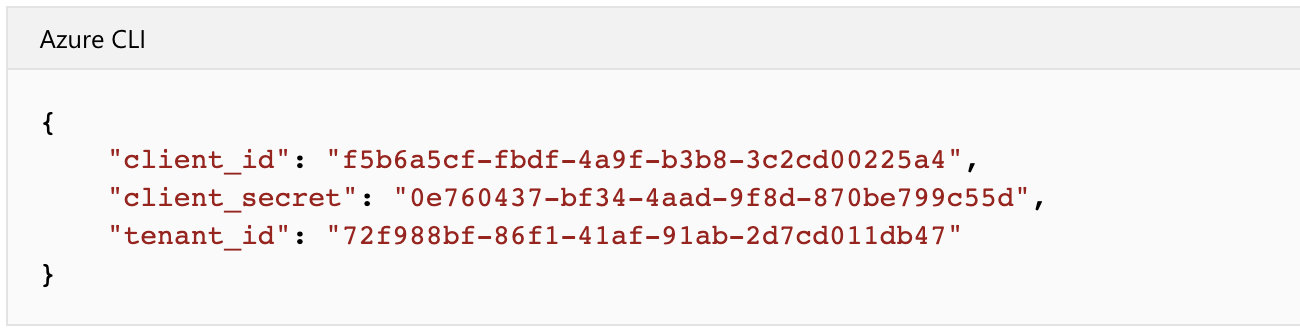
Pls make a note of client_id, client_secret and tenant_id from the above output. We also need an Azure subscription ID to build the packer template
- az account show (opens new window) --query "{ subscription_id: id }"
# 3. Define a packer template
After completing the above pre-requisites, we have to define a packer template in a json file. The template file typically contains the builders and provisioners that carry out the actual build process. Packer has a provisioner for Azure (opens new window) that allows us to define Azure resources, such as the service principal credentials created in the preceding step.
# 4. Create a custom VM
Now create a file named ubuntuVM.json and copy the following
{
	"builders": [{
		"type": "azure-arm",

		"client_id": "f5b6a5cf-fbdf-4a9f-b3b8-3c2cd00225a4",
		"client_secret": "0e760437-bf34-4aad-9f8d-870be799c55d",
		"tenant_id": "72f988bf-86f1-41af-91ab-2d7cd011db47",
		"subscription_id": "xxxxxxxx-xxxx-xxxx-xxxx-xxxxxxxxxxx",

		"managed_image_resource_group_name": "myResourceGroup",
		"managed_image_name": "myPackerImage",

		"os_type": "Linux",
		"image_publisher": "Canonical",
		"image_offer": "UbuntuServer",
		"image_sku": "16.04-LTS",

		"azure_tags": {
			"dept": "Engineering",
			"task": "Image deployment"
		},

		"location": "East US",
		"vm_size": "Standard_DS2_v2"
	}],
	"provisioners": [{
		"execute_command": "chmod +x {{ .Path }}; {{ .Vars }} sudo -E sh '{{ .Path }}'",
		"inline": [
			"apt-get update",
			"apt-get upgrade -y",
			"apt-get -y install nginx",

			"/usr/sbin/waagent -force -deprovision+user && export HISTSIZE=0 && sync"
		],
		"inline_shebang": "/bin/sh -x",
		"type": "shell"
	}]
}
2
3
4
5
6
7
8
9
10
11
12
13
14
15
16
17
18
19
20
21
22
23
24
25
26
27
28
29
30
31
32
33
34
35
36
37
38
39
This template builds an Ubuntu 16.04 LTS image, installs NGNIX web server and deprovisions the VM. You can customize your packer template file with any custom tools or software of your choice.
# 5. Build the Packer Image
./packer build ubuntuVM.json
An example of the output from the preceding commands is as follows:
==> azure-arm: Running builder ...
    azure-arm: Creating Azure Resource Manager (ARM) client ...
==> azure-arm: Creating resource group ...
==> azure-arm:  -> ResourceGroupName : ‘packer-Resource-Group-swtxmqm7ly’
==> azure-arm:  -> Location          : ‘East US’
==> azure-arm:  -> Tags              :
==> azure-arm:  ->> dept : Engineering
==> azure-arm:  ->> task : Image deployment
==> azure-arm: Validating deployment template ...
==> azure-arm:  -> ResourceGroupName : ‘packer-Resource-Group-swtxmqm7ly’
==> azure-arm:  -> DeploymentName    : ‘pkrdpswtxmqm7ly’
==> azure-arm: Deploying deployment template ...
==> azure-arm:  -> ResourceGroupName : ‘packer-Resource-Group-swtxmqm7ly’
==> azure-arm:  -> DeploymentName    : ‘pkrdpswtxmqm7ly’
==> azure-arm: Getting the VM’s IP address ...
==> azure-arm:  -> ResourceGroupName   : ‘packer-Resource-Group-swtxmqm7ly’
==> azure-arm:  -> PublicIPAddressName : ‘packerPublicIP’
==> azure-arm:  -> NicName             : ‘packerNic’
==> azure-arm:  -> Network Connection  : ‘PublicEndpoint’
==> azure-arm:  -> IP Address          : ‘40.76.218.147’
==> azure-arm: Waiting for SSH to become available...
==> azure-arm: Connected to SSH!
==> azure-arm: Provisioning with shell script: /var/folders/h1/ymh5bdx15wgdn5hvgj1wc0zh0000gn/T/packer-shell868574263
    azure-arm: WARNING! The waagent service will be stopped.
    azure-arm: WARNING! Cached DHCP leases will be deleted.
    azure-arm: WARNING! root password will be disabled. You will not be able to login as root.
    azure-arm: WARNING! /etc/resolvconf/resolv.conf.d/tail and /etc/resolvconf/resolv.conf.d/original will be deleted.
    azure-arm: WARNING! packer account and entire home directory will be deleted.
==> azure-arm: Querying the machine’s properties ...
==> azure-arm:  -> ResourceGroupName : ‘packer-Resource-Group-swtxmqm7ly’
==> azure-arm:  -> ComputeName       : ‘pkrvmswtxmqm7ly’
==> azure-arm:  -> Managed OS Disk   : ‘/subscriptions/guid/resourceGroups/packer-Resource-Group-swtxmqm7ly/providers/Microsoft.Compute/disks/osdisk’
==> azure-arm: Powering off machine ...
==> azure-arm:  -> ResourceGroupName : ‘packer-Resource-Group-swtxmqm7ly’
==> azure-arm:  -> ComputeName       : ‘pkrvmswtxmqm7ly’
==> azure-arm: Capturing image ...
==> azure-arm:  -> Compute ResourceGroupName : ‘packer-Resource-Group-swtxmqm7ly’
==> azure-arm:  -> Compute Name              : ‘pkrvmswtxmqm7ly’
==> azure-arm:  -> Compute Location          : ‘East US’
==> azure-arm:  -> Image ResourceGroupName   : ‘myResourceGroup’
==> azure-arm:  -> Image Name                : ‘myPackerImage’
==> azure-arm:  -> Image Location            : ‘eastus’
==> azure-arm: Deleting resource group ...
==> azure-arm:  -> ResourceGroupName : ‘packer-Resource-Group-swtxmqm7ly’
==> azure-arm: Deleting the temporary OS disk ...
==> azure-arm:  -> OS Disk : skipping, managed disk was used...
Build ‘azure-arm’ finished.

==> Builds finished. The artifacts of successful builds are:
--> azure-arm: Azure.ResourceManagement.VMImage:

ManagedImageResourceGroupName: myResourceGroup
ManagedImageName: myPackerImage
ManagedImageLocation: eastus
2
3
4
5
6
7
8
9
10
11
12
13
14
15
16
17
18
19
20
21
22
23
24
25
26
27
28
29
30
31
32
33
34
35
36
37
38
39
40
41
42
43
44
45
46
47
48
49
50
51
52
53
54
55
It takes a few minutes for Packer to build the VM, run the provisioners, and finally to clean up the deployment.
# 6. Create a VM from the Custom Image
Now that our custom image is ready, we need to create a VM from the custom image with az vm create (opens new window). Specify the image you created with the --image parameter. The following example creates a VM named myVM from myPackerImage and generates SSH keys if they do not already exist:
    az vm create \
    --resource-group myResourceGroup \
    --name myVM \
    --image myPackerImage \
    --admin-username azureuser \
    --generate-ssh-keys
2
3
4
5
6
If you wish to create VMs in a different resource group or region than your Packer image, specify the image ID rather than image name. You can obtain the image ID with az image show (opens new window).
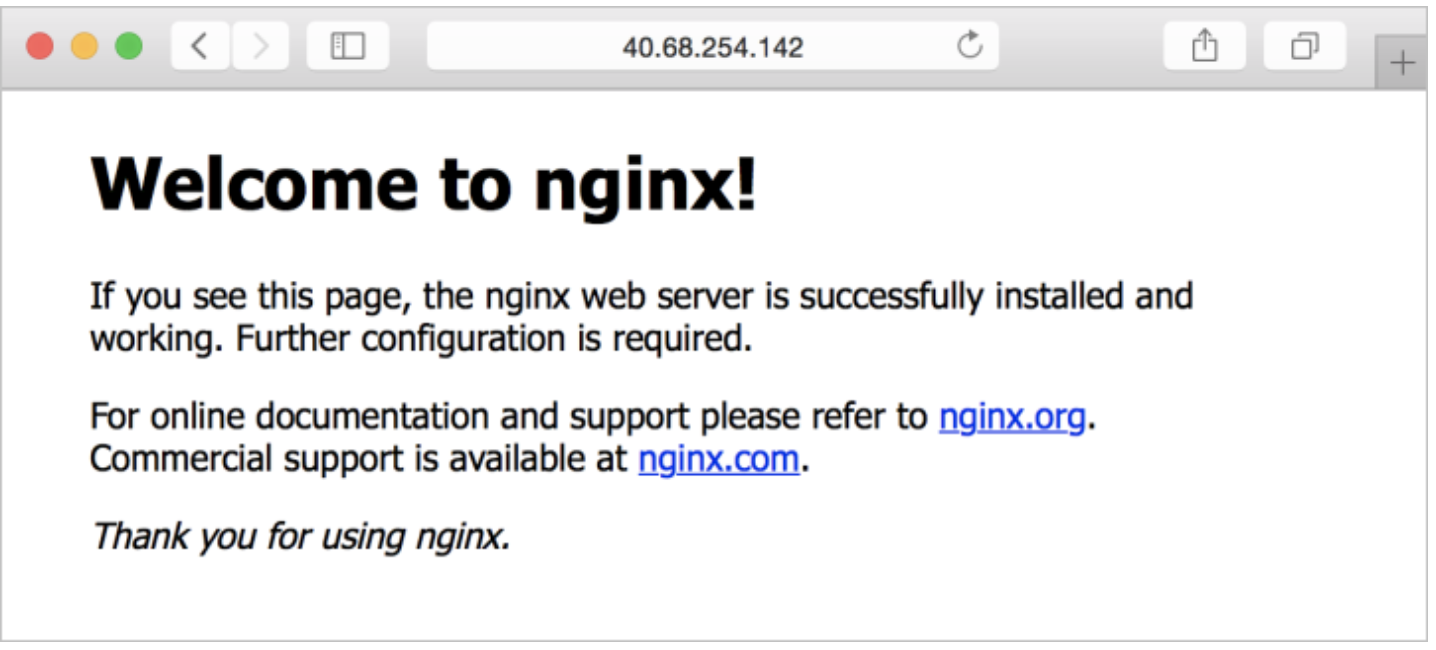
It takes a few minutes to create the VM. Once the VM has been created, take note of the publicIpAddress displayed by the Azure CLI. This address is used to access the NGINX site via a web browser.
To allow web traffic to reach your VM, open port 80 from the Internet with
az vm open-port (opens new window) --resource-group myResourceGroup --name myVM --port 80
# 7. Test your VM and NGINX web server
Now point your web browser to the public IP address of your VM in the address bar. The default NGINX home page will be displayed as shown below:
Although this posting focused on building Linux VM images, the same process can be applied to build Windows VMs. In the future episode, we will learn how to create a virtual machine using this custom VM image using Terraform (opens new window)
# Conclusion
Pre-baked machine images have a lot of advantages, but most have been unable to benefit from them because images have been too tedious to create and manage. Packer changes all of this. In this posting, we have seen how easy it is easy to create custom images in Azure using Packer. Go and try it out!