TIP
🔥 Download the FREE Azure Developer Guide eBook here (opens new window).
💡 Learn more : Cognitive Services in containers (opens new window).
📺 Watch the video : How to run Cognitive Service Text Analytics for Health in a Web App for Containers (opens new window).
# How to run Cognitive Service Text Analytics for Health in a Web App for Containers
# Cognitive Services in containers
Azure Cognitive Services (opens new window) provide pre-trained AI capabilities. There are many types of Cognitive Services, including services for Speech, Decision, Language, and Vision. You can simply create a Cognitive Service resource, and use it by calling its API from your application.
You can also deploy Cognitive Services to Docker containers (opens new window). This enables you to increase performance by running Cognitive Services close to your data, control where data gets processed, and use Cognitive Services in a portable solution.
In this post, we'll deploy and run a Cognitive Service Text Analytics for Health (opens new window) service in a container that runs in an Azure Web app for Containers (opens new window).
# Prerequisites
If you want to follow along, you'll need the following:
- An Azure subscription (If you don't have an Azure subscription, create a free account (opens new window) before you begin)
# Use a Cognitive Services container
We are going to deploy an Azure Cognitive Service into a container that runs in an Azure Web App for Containers. The Cognitive Service in the container needs to communicate with a Cognitive Service resource in Azure for billing information. To enable that, we will start by creating a Text Analytics Cognitive Service in the Azure portal.
- Go to the Azure portal (opens new window)
- Click the Create a resource button (the plus-sign in the top left corner)
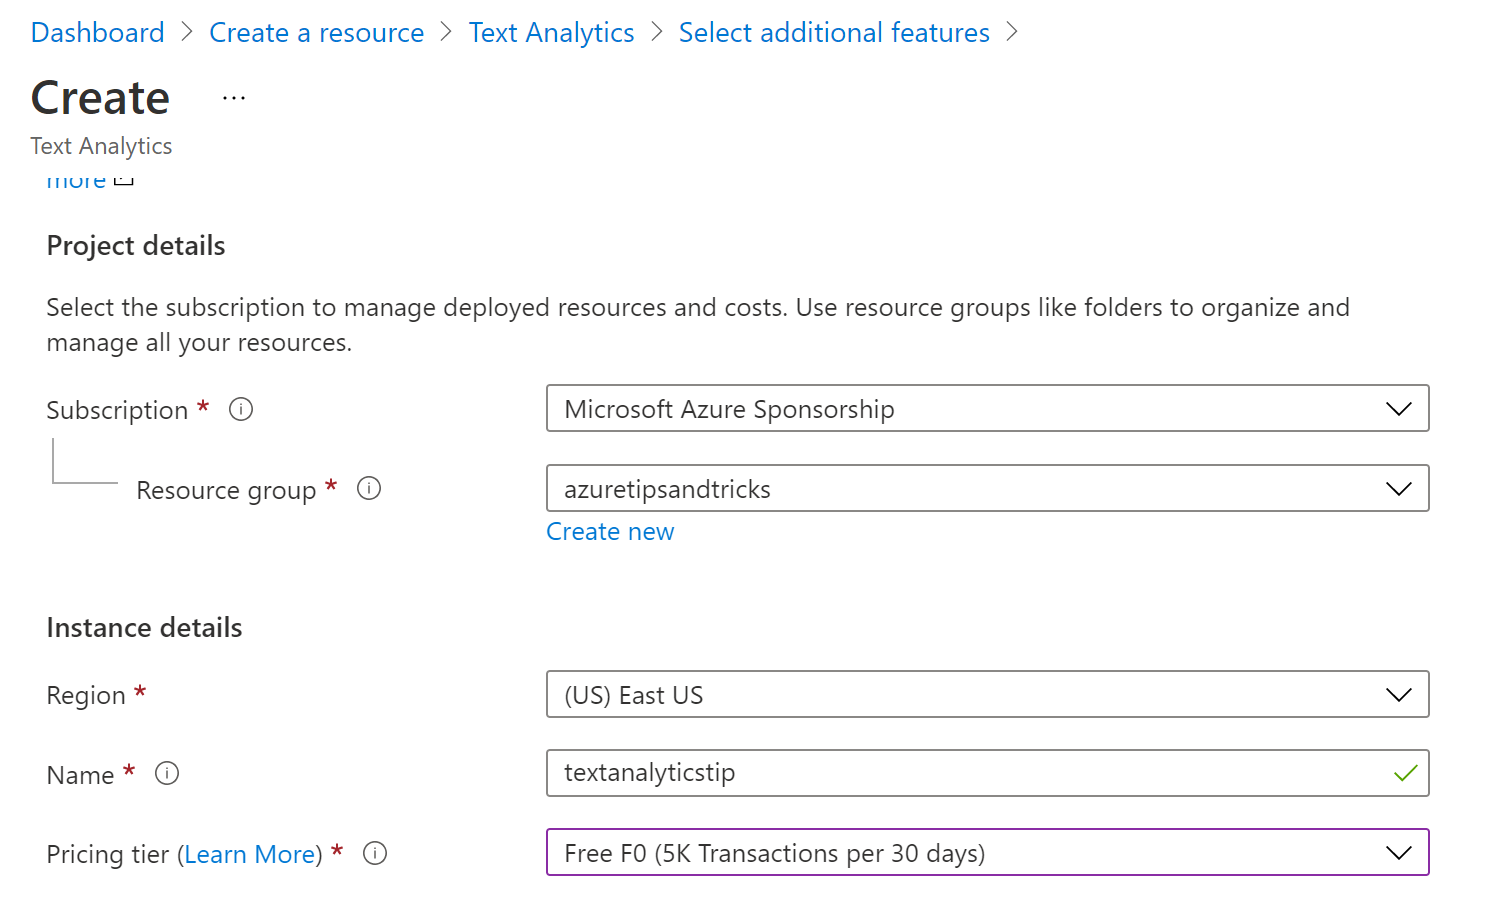
- Search for text analytics, select the "Text Analytics" result and click Create
- Select a Resource Group
- Type in a Name
- Select a Pricing tier. The free tier is fine for this exercise
- Accept the terms of the Responsible AI notice
- Click Review + create and then Create

(Create an Azure Text Analytics resource in the Azure portal)
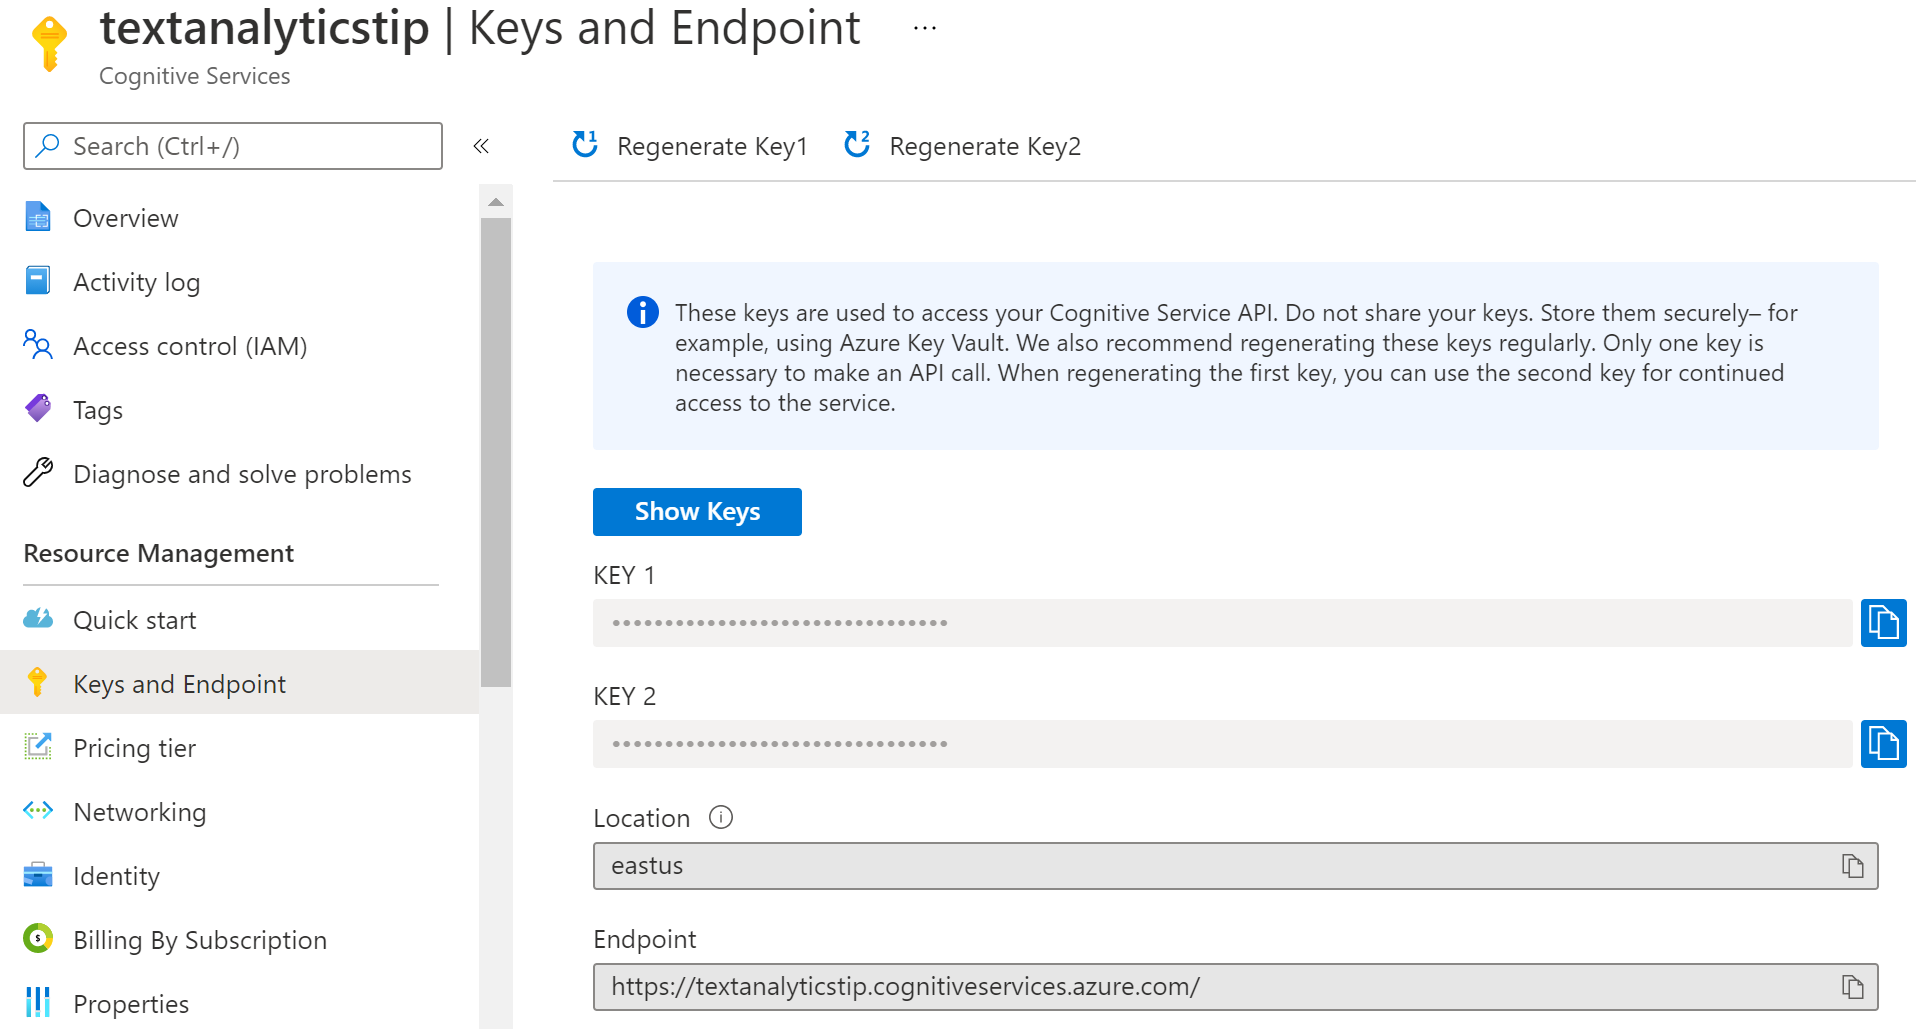
When the Text Analytics resource is created, navigate to it in the Azure portal. Select the Keys and Endpoint. In there, copy the Key and the Endpoint. We'll need to feed this information into the container that we are going to create, so that it can send billing information to the Text Analytics resource.

(Key and Endpoint of the Azure Text Analytics)
Next, we create a container that contains a Text Analytics resource, and deploy that into a Web App for Containers that we'll create. We do that using a PowerShell script that we execute in the Azure Cloud Shell (opens new window). You can also execute this script in a local installation of the Azure CLI (opens new window). The container image is one of several special Cognitive Services images (opens new window) that you can use. We are using the image for the Text Analytics for health feature (opens new window). This can detect illnesses, treatments, medications, and more, in any given text.
- Go to the Azure Cloud Shell (https://portal.azure.com/#cloudshell (opens new window))
- Make sure that PowerShell is selected as the language of the cloud shell
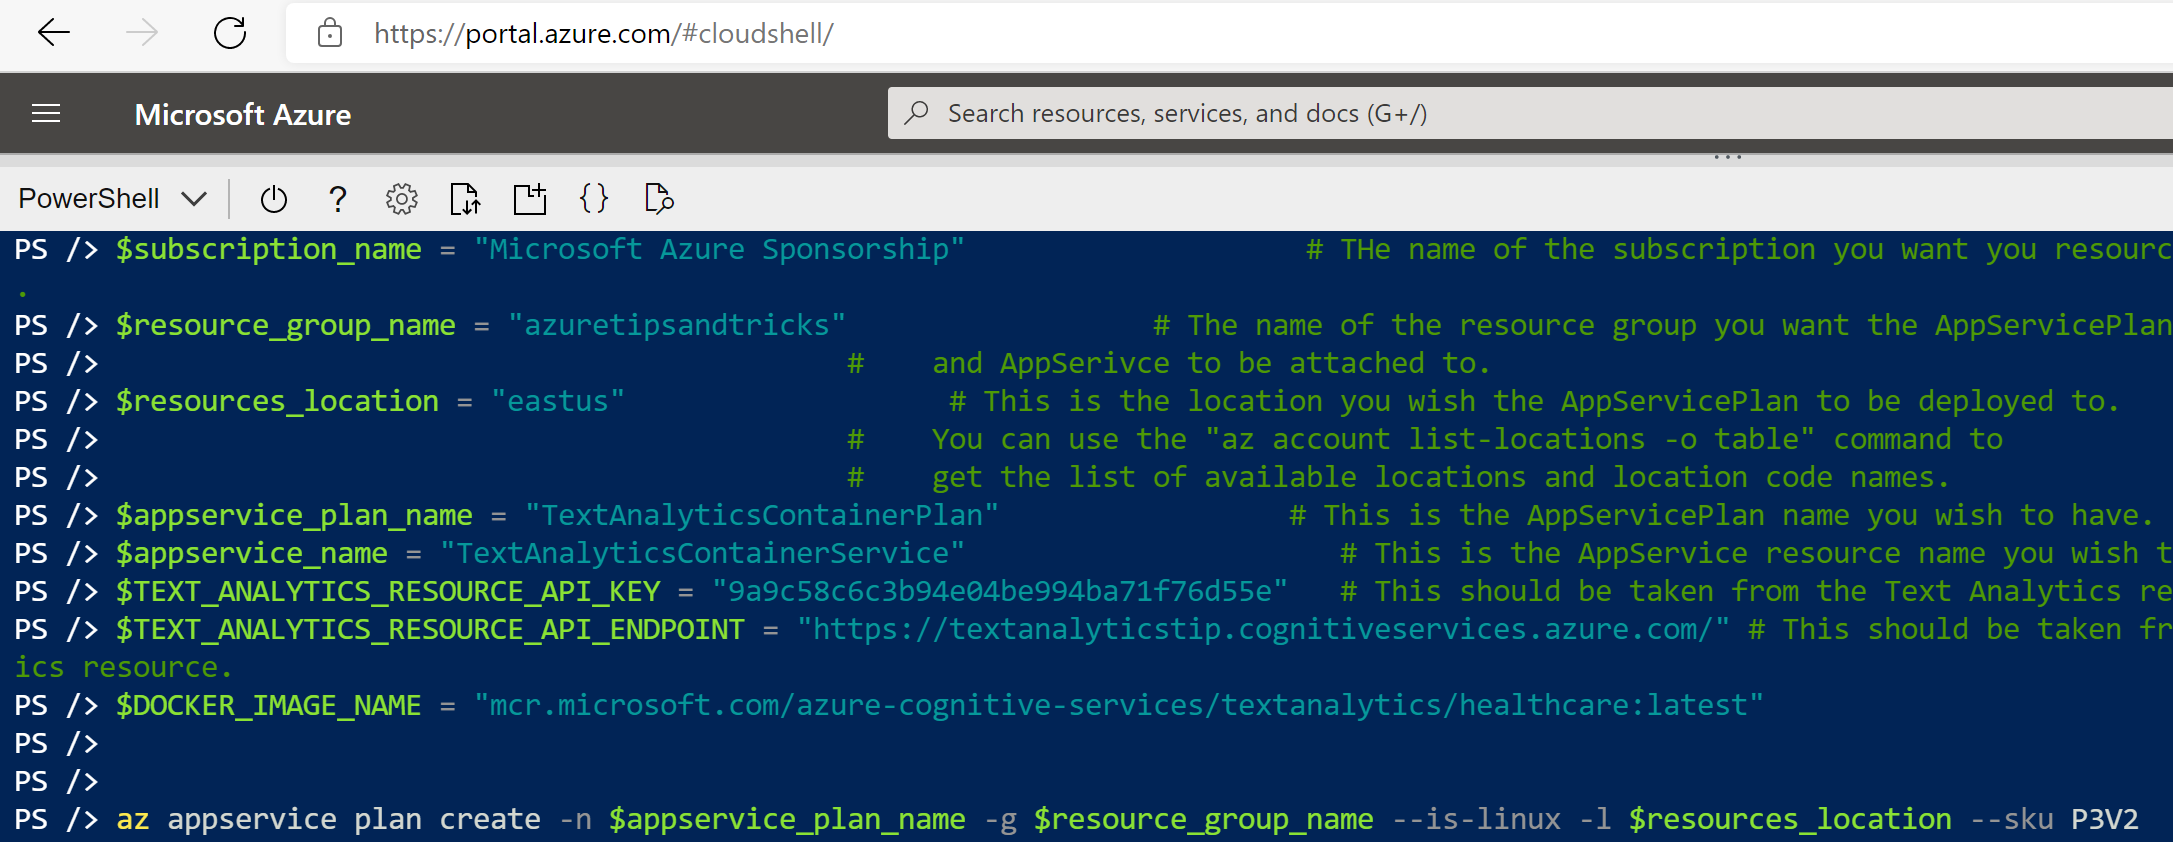
- Paste the PowerShell code that you find below into the Cloud Shell. Make sure to fill in the subscription name, resource group name, resource location, App Service plan and service name, and the API key and endpoint
$subscription_name = ""                    # THe name of the subscription you want you resource to be created on.
$resource_group_name = ""                  # The name of the resource group you want the AppServicePlan
                                           #    and AppSerivce to be attached to.
$resources_location = ""                   # This is the location you wish the AppServicePlan to be deployed to.
                                           #    You can use the "az account list-locations -o table" command to
                                           #    get the list of available locations and location code names.
$appservice_plan_name = ""                 # This is the AppServicePlan name you wish to have.
$appservice_name = ""                      # This is the AppService resource name you wish to have.
$TEXT_ANALYTICS_RESOURCE_API_KEY = ""      # This should be taken from the Text Analytics resource.
$TEXT_ANALYTICS_RESOURCE_API_ENDPOINT = "" # This should be taken from the Text Analytics resource.
$DOCKER_IMAGE_NAME = "mcr.microsoft.com/azure-cognitive-services/textanalytics/healthcare:latest"

az appservice plan create -n $appservice_plan_name -g $resource_group_name --is-linux -l $resources_location --sku P3V2
az webapp create -g $resource_group_name -p $appservice_plan_name -n $appservice_name -i $DOCKER_IMAGE_NAME
az webapp config appsettings set -g $resource_group_name -n $appservice_name --settings Eula=accept rai_terms=accept Billing=$TEXT_ANALYTICS_RESOURCE_API_ENDPOINT ApiKey=$TEXT_ANALYTICS_RESOURCE_API_KEY
2
3
4
5
6
7
8
9
10
11
12
13
14
15

(PowerShell script to create a Web App and deploy a Cognitive Services container to it)
- After 20 minutes or so, the container will be ready. Navigate to the Web App for Containers in the Azure portal
- In the Overview blade of the Web App for Containers, you'll find the URL for the Web App. Click on it to navigate to it
- Append the URL with /demo. The URL should look something like https://yourappservicename.azurewebsites.net/demo
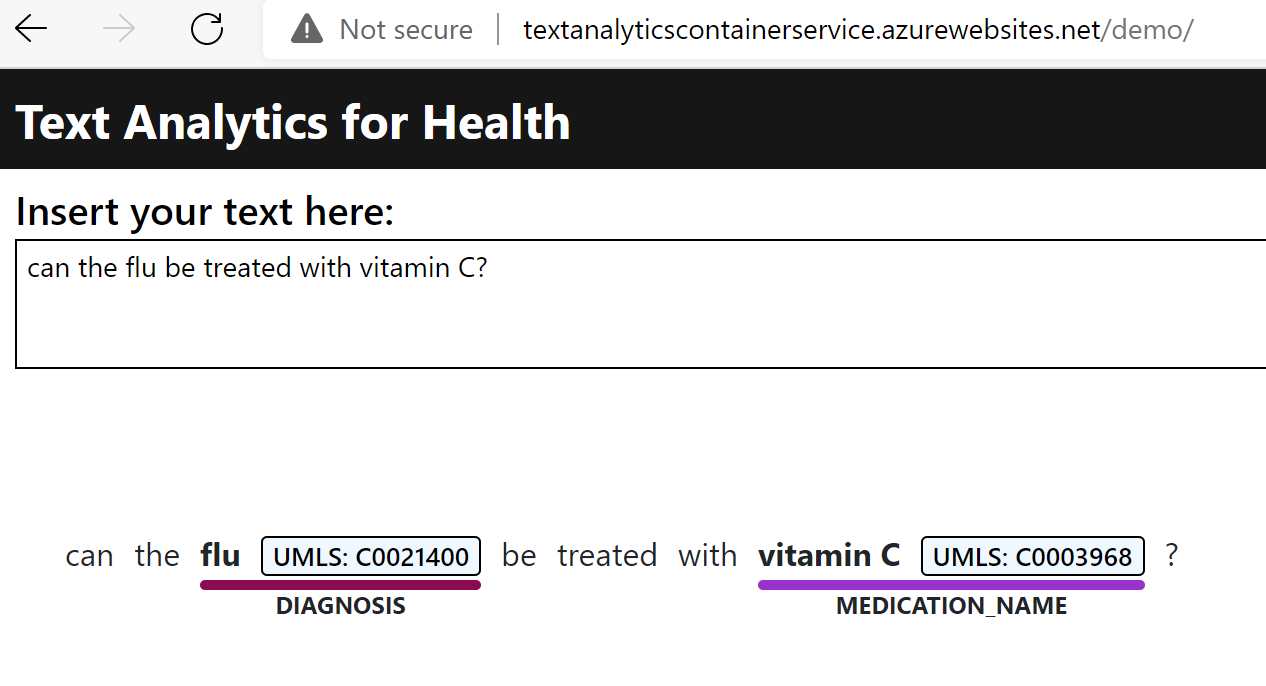
- This opens the Text Analytics for Health demo UI. Type in some text, like "can the flu be treated with vitamin C?", and click Analyze
- The text will be sent to the Cognitive Service that runs in the container. It will analyze the text and return the result. The Health feature of the Text Analytics service identifies terms that indicate illness, treatment, medications, and more

(The demo UI of the Text Analytics Health feature that runs in a container)
# Conclusion
Running Azure Cognitive Services (opens new window) in containers (opens new window) enables you to take control of your data, improve speed, and create portable solutions. It's easy to get started with any of the Cognitive Services container images (opens new window). Go and check it out!
