Task 04 - Creating the AKS Cluster
Introduction
In this task, you will be able to create the AKS cluster in your resource group and connect kubectl to AKS.
Description
After you complete this exercise, you will be able to:
- Create and validate the creation of an AKS cluster
- Connect Kubectl to your AKS cluster
Success Criteria
- Successfully generate the resources of the AKS cluster in your subscription
- Connect
kubectlto your newly created AKS cluster
Step-by-Step Instructions
-
You will now create an AKS cluster in your resource group already established. From your terminal, issue the following Azure CLI command. Make sure to replace the
[YOUR_GLOBALLY_UNIQUE_ACR_NAME]with your own globally unique value before running the command:az aks create \ --resource-group rg-tailspin \ --name tailspin_aks1000 \ --node-count 1 \ --enable-addons monitoring \ --generate-ssh-keys \ --attach-acr [YOUR_GLOBALLY_UNIQUE_ACR_NAME]IMPORTANT: The above command assumes you are using the
rg-tailspinresource group you created in Exercise 0. If you used a different name, please replace it in the az command above.Note: This command may take several minutes to complete.
-
You can verify in the Azure portal that your resource group now contains a
Kubernetes serviceresource. -
Retrieve the credentials for AKS using the following command, which will save the credentials locally on your machine in your users folder under
.kube\config.az aks get-credentials \ --resource-group rg-tailspin \ --name tailspin_aks1000IMPORTANT: The above command assumes you are using the
rg-tailspinresource group you created in Exercise 0. If you used a different name, please replace it in the az command above. -
Execute the following command to verify that you have nodes ready in your Kubernetes service:
kubectl get nodesYou should see a response with 1 node with status
Readyas a response. -
Now you are ready to deploy the application to AKS. First, you need to create a
deployment.yamlfile under theaks_demo_appfolder and the content should be:apiVersion: apps/v1 kind: Deployment metadata: name: aks-demo spec: replicas: 2 selector: matchLabels: app: aks-demo template: metadata: labels: app: aks-demo spec: containers: - name: aks-demo image: [YOUR_GLOBALLY_UNIQUE_ACR_NAME].azurecr.io/aks-demo:1.0 ports: - containerPort: 3000 -
Replace the
[YOUR_GLOBALLY_UNIQUE_ACR_NAME]token with your own globally unique value for the ACR resource in theimageproperty of the yaml file, then save the file. -
Issue the
kubectlcommand to apply the deployment file.kubectl apply -f deployment.yaml -
You can execute the following command to check the pods. You should see 2 pods based on the
deployment.yamlfile requesting 2 replicas.kubectl get pods
-
Now, it is time to create a new
service.yamlfile in the same folder to expose the application and set the load balancer.apiVersion: v1 kind: Service metadata: name: aks-demo-service spec: type: LoadBalancer selector: app: aks-demo ports: - port: 80 targetPort: 3000 -
Apply the
service.yamlfile.kubectl apply -f service.yaml -
Execute the following command to get the EXTERNAL IP Address for the service. If you see an
EXTERNAL-IPwith the value<pending>, wait for few seconds and re-run the command until you get the actual IP Address.kubectl get svc aks-demo-service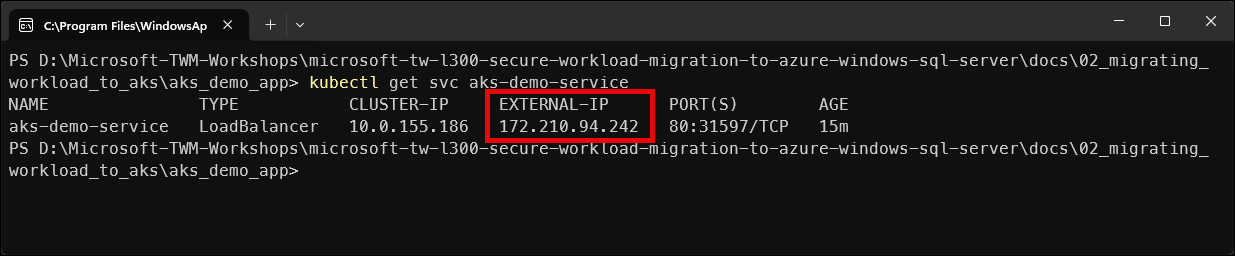
-
Copy the
EXTERNAL-IPvalue and navigate to it in your browser. You should see the message from the Node.js application confirming that the application is running correctly.Note: If you get a messag that the site doesn’t support a secure connection, select Continue to site.
-
You have the ability to scale up in real-time by using the following command and verifying the replicas.
kubectl scale deployment aks-demo --replicas=5This scale command will increase the instances from 2 to 5 and add them to the load balancer automatically.
-
To verify, execute the following command:
kubectl get pods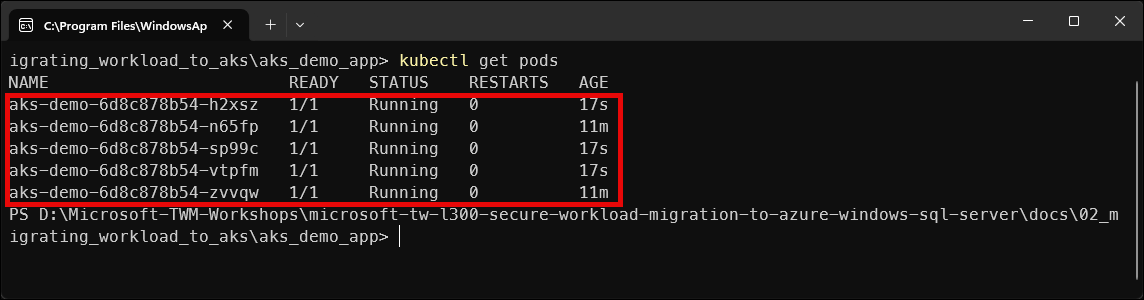
Important: A very common and important scenario is what changes must take place when the workload is an application that uses Azure SQL Databases or Azure SQL MI instances. An AKS deployment DOES NOT fundamentally change just because the application uses Azure SQL Database or SQL MI. What does change are configuration, security, and connectivity considerations, not Kubernetes itself.
What Does NOT Change:
These steps remain identical:
Area Status Dockerfile Same Image build Same Push to ACR Same AKS cluster creation Same Deployment object Same Service / Ingress Same Scaling Same Kubernetes does not care what database you use.
What DOES Change When Using SQL Server:
There are 4 key areas that must be addressed professionally:
- Connection string management - modify the
deployment.yamlfile to include the server, database, username and password loaded from kubectl secrets - Secrets handling - use the
kubectl create secret generic sql-credentials... - Network connectivity - most important part: allow AKS outbound IP or VNet, private endpoint (preferred)
- Identity & security - Can be done with SQL Authentication but Entra ID is preferred so Managed Identity is the recommended authentication method for AKS with SQL based apps.
- Connection string management - modify the