Task 02: Ingest Third-Party (3P) or custom logs using DCR
Introduction
You can onboard third-party logs (such as firewall or IoT data) into the Data Lake using Data Collection Endpoints (DCE) and Data Collection Rules (DCR).
Description
You’ll create a sample custom log, build a custom table, and ingest the data through the Logs Ingestion API.
Success criteria
-
Custom table (CustomFirewall_CL) created and receiving data.
-
Data visible in both Sentinel and the Data Lake.
Key steps:
-
Open Notepad and save the following JSON as
firewall_logs.jsonon the virtual machine Desktop.[ { "TimeGenerated": "2025-10-17T10:15:00Z", "DeviceID": "fw01", "SourceIP": "10.1.1.5", "DestinationIP": "8.8.8.8", "Action": "Allow" }, { "TimeGenerated": "2025-10-17T10:16:00Z", "DeviceID": "fw02", "SourceIP": "10.1.1.9", "DestinationIP": "1.1.1.1", "Action": "Block" } ] -
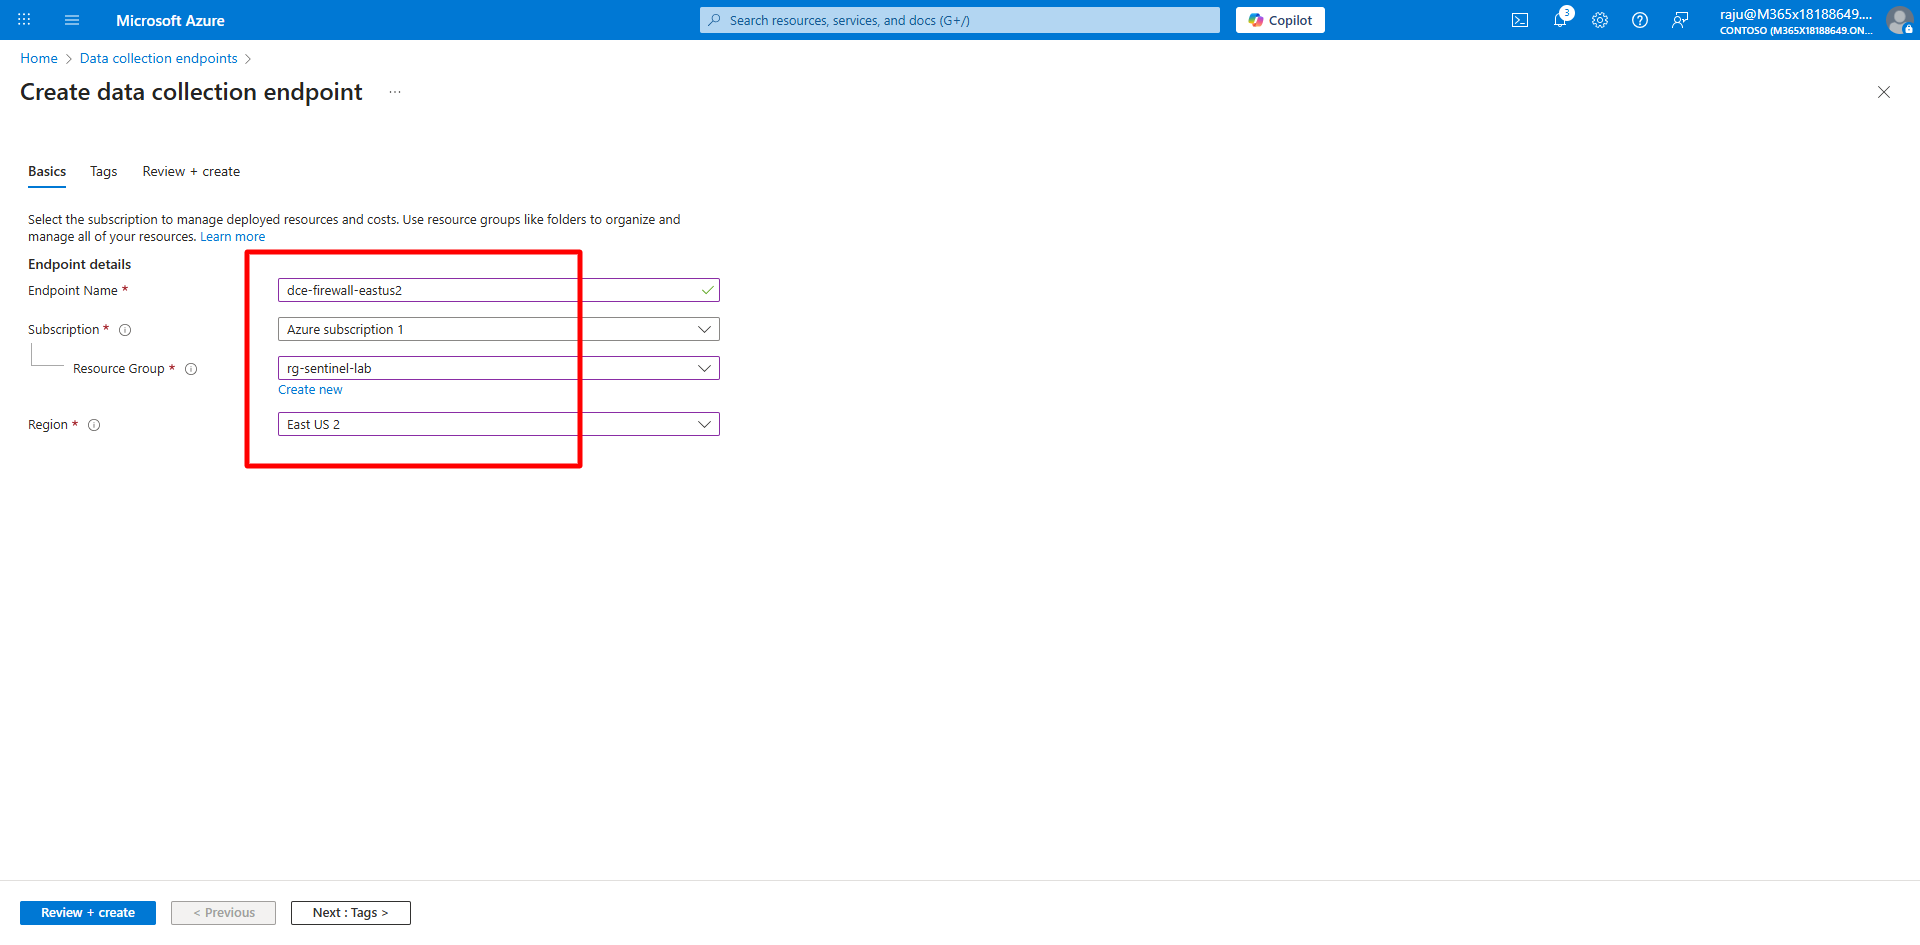
Create a Data Collection Endpoint (DCE) named
dce-firewall-eastus2.Expand here for detailed steps
- In the Azure portal, search for and select
Monitor. - On the left menu, select Settings, then select Data Collection Endpoints.
-
Select + Create and enter the following values:
Setting Value Name dce-firewall-eastus2Subscription Your SubscriptionResource group rg-sentinel-labRegion East US 2 -
Select Review + Create, then select Create.
- In the Azure portal, search for and select
-
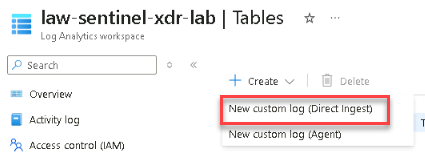
Create a custom table named
CustomFirewalland a DCR nameddcr-firewall-to-lake.Expand here for detailed steps
- In the Azure portal, search for and select
Log Analytics workspaces, and then select law-sentinel-xdr-lab. - On the left menu, select Settings, then select Tables.
-
Select + Create, then select Create a custom log (Direct Ingest).
-
On the Basics tab, enter the following details:
Field Value Table name CustomFirewallDescription (optional) Enter a short description Table plan Select Analytics Data collection rule Select Create a new data collection rule and name it dcr-firewall-to-lakeData collection endpoint dce-firewall-eastus2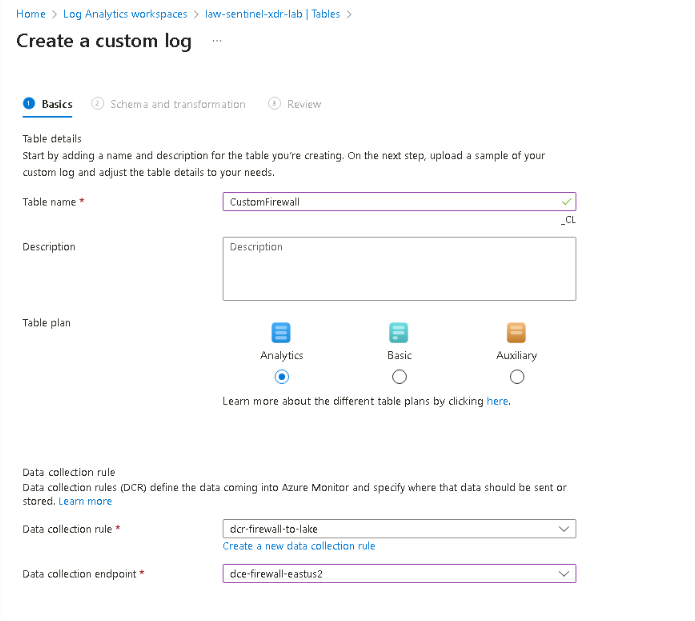
- Select Next.
-
Locate the
firewall_logs.jsonfile on the Desktop and select Open.
- Review the schema mapping and select Next.
- On the Review + Create tab, select Create to finish table creation.
- In the Azure portal, search for and select
-
Validate and push test data using the Logs Ingestion API.
Expand here for detailed steps
- On the lab virtual machine, open PowerShell 7 as an administrator.
-
Go to the lab files directory:
cd "C:\LabFiles" -
Run the validation and ingestion script:
.\CustomLogIngestion.ps1 -WorkspaceName "law-sentinel-xdr-lab" - The script will:
- Verify your Log Analytics workspace, Data Collection Endpoint (DCE), and Data Collection Rule (DCR).
- Ensure transformation rules are correctly configured.
- Create or reuse a service principal and assign required permissions.
- Generate sample test data and ingest it into the CustomFirewall_CL table.
- Validate that records are indexed in Log Analytics.
-
When the process completes, verify a summary similar to the following appears:
 ✓ SUCCESS! Found 3 records in the table
 ✓ DCR Transformation: source
 ✓ Test Data Ingestion: Success (HTTP 204)
The
CustomLogIngestion.ps1script is preinstalled in your lab VM underC:\LabFiles.This script automates ingestion testing using the Azure Logs Ingestion API, ensuring that your
CustomFirewall_CLtable, DCR (dcr-firewall-to-lake), and DCE (dce-firewall-eastus2) are correctly configured before proceeding. -
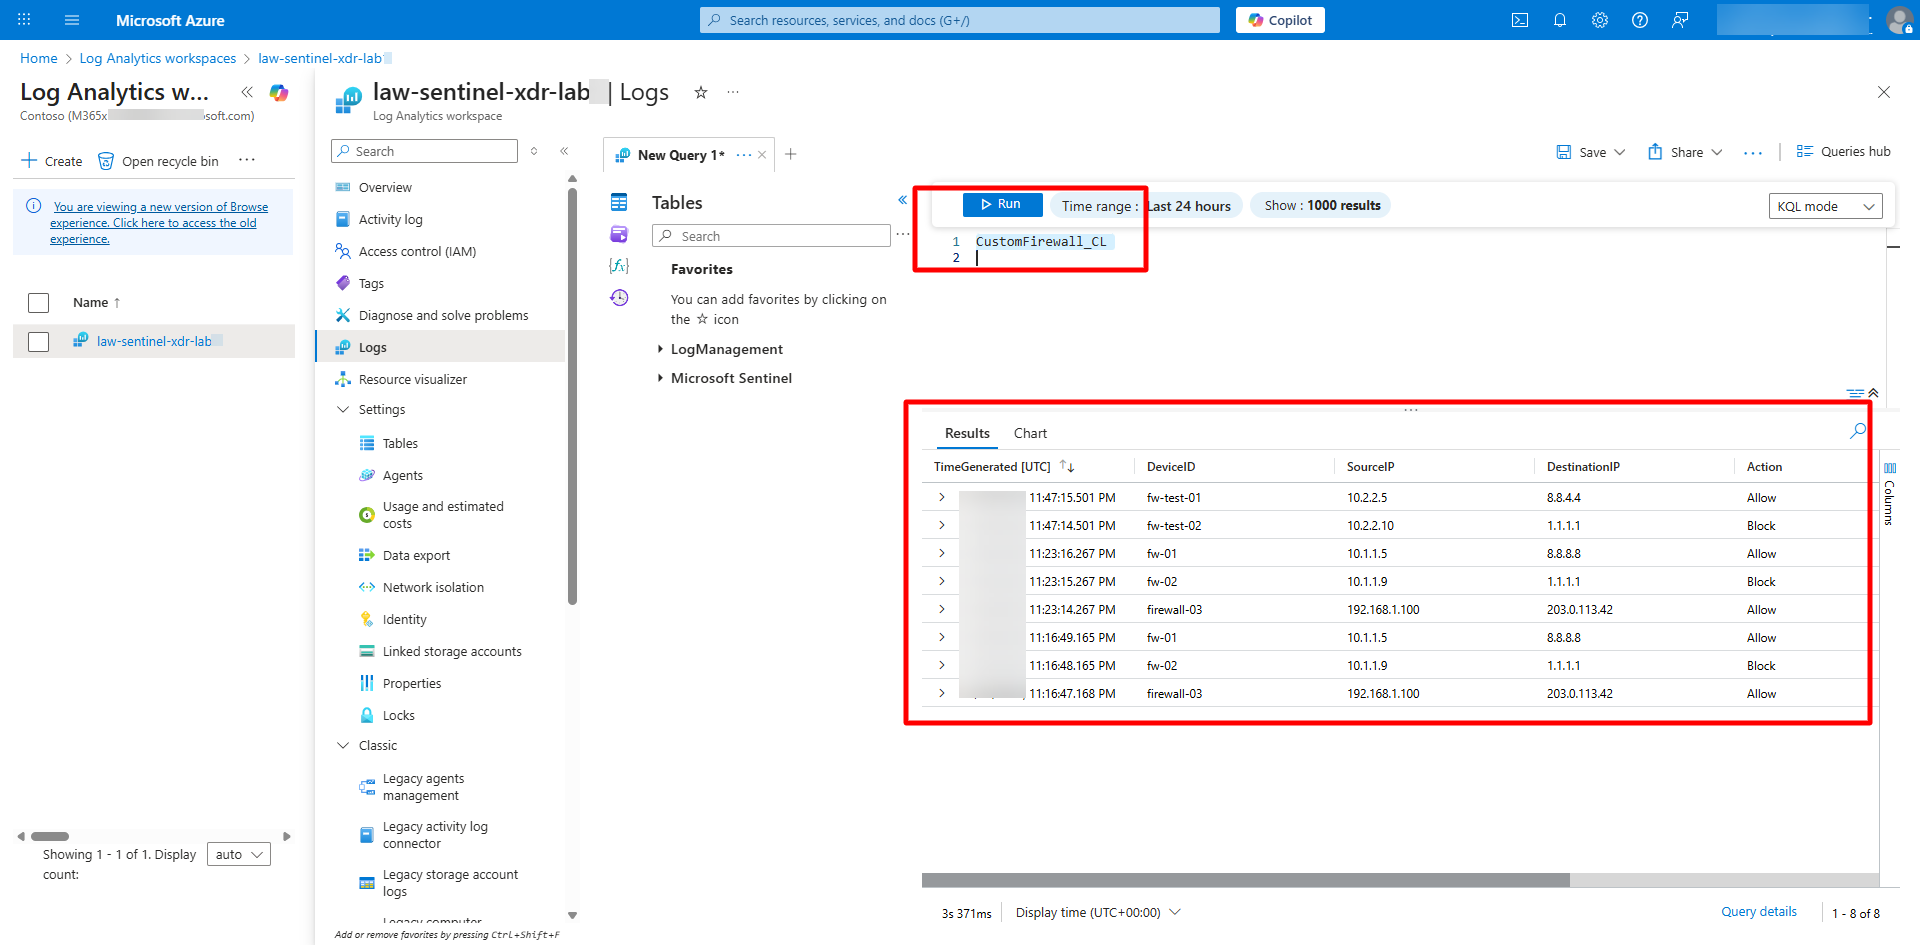
Validate data ingestion in Microsoft Sentinel.
Expand here for detailed steps
- In the Sentinel portal, open your workspace law-sentinel-xdr-lab.
- On the left menu, select General, then select Logs.
- Close the Queries hub.
-
Run the following query to view the ingested data:
CustomFirewall_CL -
Verify that records appear in the query results.
-
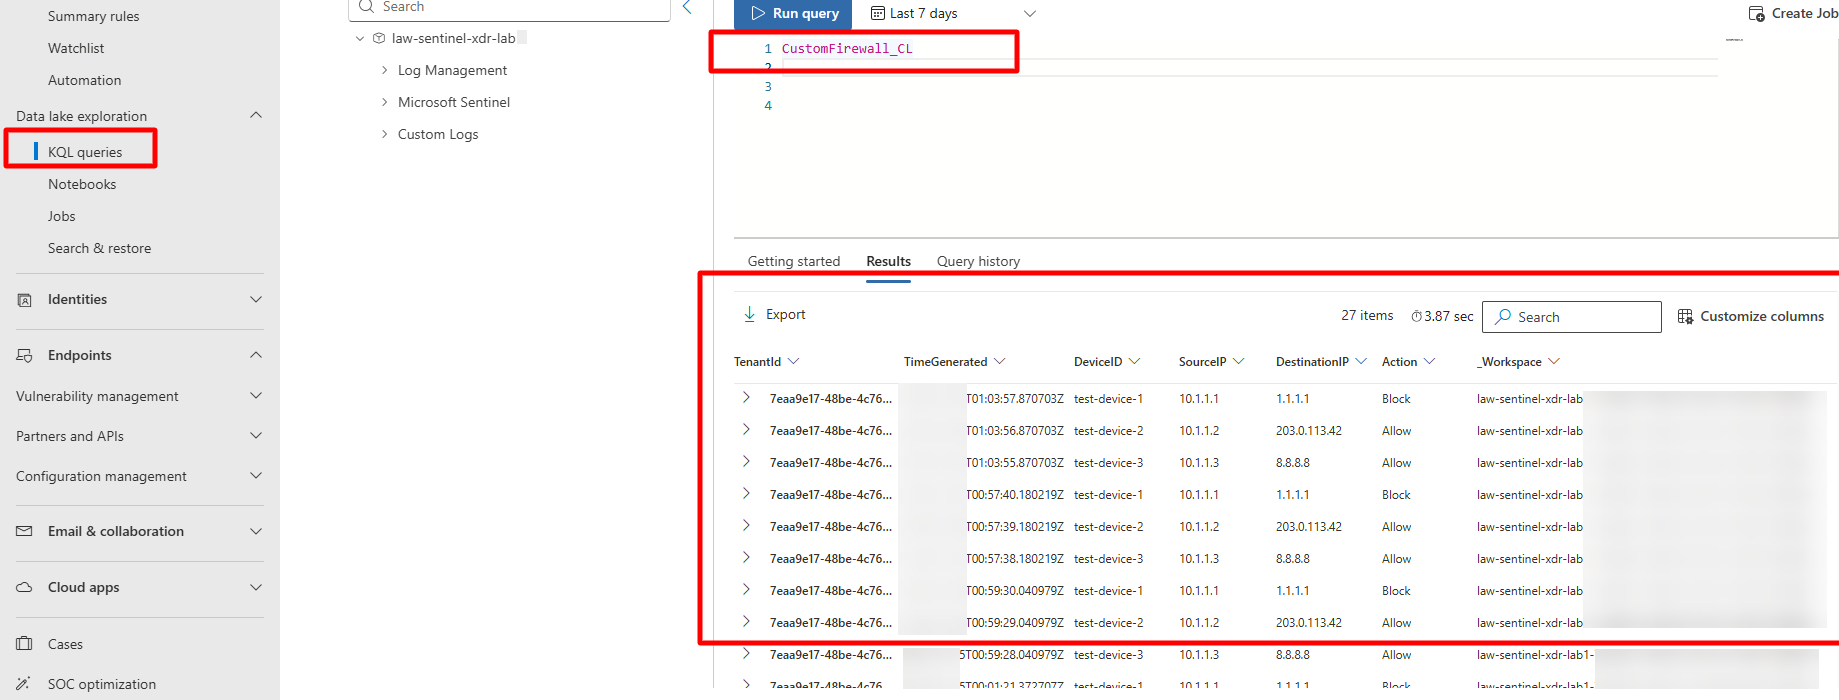
Validate replication in the Sentinel Data Lake.
Expand here for detailed steps
Replication can take 10–25 minutes.
-
In the Defender portal, go to Microsoft Sentinel > Data Lake Exploration > KQL Queries.
-
Run the same query to confirm the data has replicated into the Lake:
CustomFirewall_CL -
Change the date range to 7 days due to UTC format date time.
-
Verify that records appear in the Lake query results.
-