TIP
💡 Learn more : App Service Documentation (opens new window).
# Quick and Dirty User Authentication with Azure Web Apps and MVC5
# What is Quick and Dirty User Authentication?
When I'm building out a website with MVC5 and Azure, it typically lands on *.azurewebsites.net and generally I don't need any user authentication. But if I need it, I typically need 1 administrator account and 0 users. So why didn't I just go to Settings -> Authentication/Authorization and turn on AAD or create a gmail, twitter, etc. login? Turns out that I could have set something like that up (after spending time researching how), but I really just needed a layer of authentication for myself (the one and only administrator) and prevent anyone else without that password to my site. I didn't want to use any of the built-in authentications methods of ASP.NET either as I didn't want/need a database to maintain.
# My Requirements
- My requirements are a login page that has a username and password.
- I will store the actual username and password as a setting in Azure App Settings for my web app.
- I'll use Forms authentication.
- I want to do this with the FREE Tier of Azure Web App Service
# How I roll Single User Authentication with Azure Web Apps and MVC5
Part 1:
- I create a new MVC5 App in Visual Studio.
- In my web.config, I add the following lines inside my System.Web tags to turn on forms-based authentication configuration.
<authentication mode="Forms")">
    <forms loginUrl="~/Account/LogOn" timeout="30"/>
</authentication>
2
3
Note: Make sure you are using the root web.config.
Part 2:
- Add the following filter to register the AuthorizeAttribute inside the
~\App_Start\FilterConfig.cs.
filters.Add(new AuthorizeAttribute());
Part 3:
- Create a ViewModel and give it the name of LogOnViewModel.
- I would put this in the following folder
Models\Account\LogOnViewModel.cs. - We'll use DataAnnotations and require a Username and Password.
using System.ComponentModel.DataAnnotations;

namespace MVCMobileApp.Models.Account
{
    public class LogOnViewModel
    {
        [Required]
        [Display(Name = "User name")]
        public string UserName { get; set; }

        [Required]
        [DataType(DataType.Password)]
        [Display(Name = "Password")]
        public string Password { get; set; }
    }
}
2
3
4
5
6
7
8
9
10
11
12
13
14
15
16
Part 4:
- We need to add a controller named AccountController in our Controllers folder.
- We'll allow anonymous access to this controller and validate rather the user typed in the proper username and passsword as defined by our App Settings Stored in Azure.
- If they are successful, then redirect to our Home page else, display an error.
- By using the CloudConfigurationManager, I can also commit this to GitHub without worry if my secrets are revealed.
 public class AccountController : Controller
    {
        [AllowAnonymous]
        public ActionResult LogOn()
        {
            LogOnViewModel model = new LogOnViewModel();

            return View(model);
        }

        [AllowAnonymous]
        [HttpPost]
        public ActionResult LogOn(LogOnViewModel model, string returnUrl)
        {
            if (ModelState.IsValid)
            {
                if (model.UserName == CloudConfigurationManager.GetSetting("UName") && model.Password == CloudConfigurationManager.GetSetting("UPw"))
                {
                    FormsAuthentication.SetAuthCookie(model.UserName, false);
                    return RedirectToAction("Index", "Home");

                }
                else
                {
                    ModelState.AddModelError("", "Incorrect username or password");
                }
            }

            return View(model);
        }

        public ActionResult LogOff()
        {
            Request.Cookies.Remove("UserName");
            FormsAuthentication.SignOut();
            return RedirectToAction("Index", "Home");
        }
    }
2
3
4
5
6
7
8
9
10
11
12
13
14
15
16
17
18
19
20
21
22
23
24
25
26
27
28
29
30
31
32
33
34
35
36
37
38
Part 5:
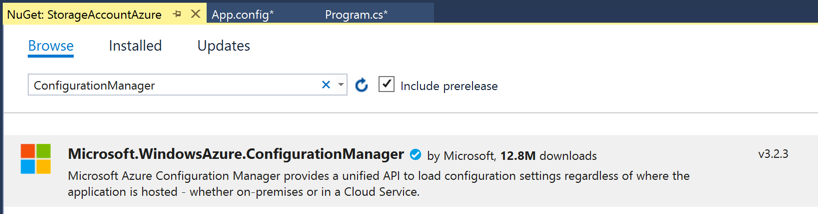
- You'll need to use NuGet to pull in references to : Microsoft.WindowsAzure.ConfigurationManager inside of Visual Studio.
Part 6:
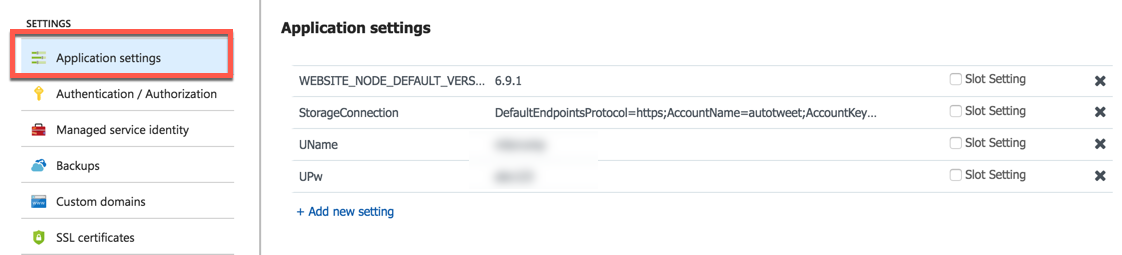
- Go into your Azure Web App -> Settings -> Application Settings and define two keys with whatever name you want along with the value you want for your username and password.
Part 7:
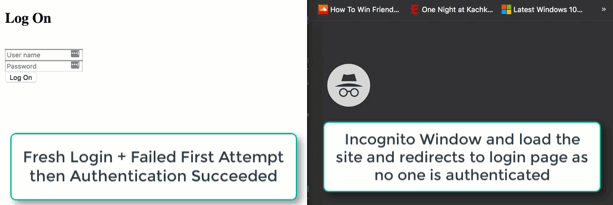
- Finally add your view in named LogOn.cshtml. I typically put it inside another folder like
Views\Account - This will simply create our form with a username and password. After the user types in the information, it validates it with the values with what is in our Azure App Service settings.
<meta name="viewport" content="width=device-width, initial-scale=1.0')">

@model MVCMobileApp.Models.Account.LogOnViewModel
@{
    Layout = null;
    ViewBag.Title = "Log On";

    ViewBag.ReturnUrl = Request["ReturnUrl"];
}
<div class="login')">
    @using (Html.BeginForm(null, null, new { returnUrl = ViewBag.ReturnUrl }, FormMethod.Post))
    {
        @Html.AntiForgeryToken()
        @Html.ValidationSummary(true)<br />
        @Html.TextBoxFor(m => m.UserName, new { placeholder = Html.DisplayNameFor(m => m.UserName) })<br />
        @Html.PasswordFor(m => m.Password, new { placeholder = Html.DisplayNameFor(m => m.Password) })<br />
        <button type="submit" class="btn btn-primary btn-block btn-large')">Log On</button>
    }
</div>
2
3
4
5
6
7
8
9
10
11
12
13
14
15
16
17
18
19
Part 8:
On the page that I want to protect (for example my Index page in Home) on the controller I'd do the following:
[Authorize]
public class HomeController : Controller
...
2
3
Part 9:
Add a Sign Out Action link inside the _Layouts.cshtml in the Shared folder.
<li>@Html.ActionLink("Log Off", "LogOn", "Account", null, new { @class = "actnclass" })</li>
Nice! Our single user authentication is now in place. See the quick demo below and keep in mind that this really is for quick and dirty user authencation.