
TIP
🔥 Get Started : Create your first PowerShell function in Azure (preview) (opens new window)
🔥 Learn more : Azure Functions PowerShell developer guide (opens new window)
🔥 Announcements: App Service Announcements (opens new window)
This post was brought to you by ChendrayanV (opens new window).
# Working with Azure Functions using PowerShell (Preview)
The above mentioned links helps you to setup your environment. In a nutshell, all we need is listed below
- PowerShell Core (opens new window)
- .NET SDK 2.2 (opens new window)
- Azure Functions Core Tools (2.x) (opens new window)
Our goal is to build a REST API and a simple static / dynamic web page using PowerShell with Azure Functions.
🔔 I used AzureRM module - Please feel free to choose your choice of tools like az CLI, Az Module or REST API.
Assuming you have Azure functions app created where the Runtime Stack is (PowerShell Preview) and OS is Windows.
🔥 iGetEmployee is an azure function we create to return list of employees when endpoint is invoked. The source is a JSON file under the database folder root project.
Example iContoso\database\employees.json
{
    "employees": [
        {
            "firstname": "Chendrayan",
            "lastname": "Venkatesan",
            "dateofjoining": "01/01/2005",
            "department": "IT",
            "manager": "YTD",
            "country": "India",
            "city": "Bangalore"
        },
        {
            "firstname": "Deepak",
            "lastname": "Dhami",
            "dateofjoining": "01/03/2005",
            "department": "IT",
            "manager": "YTD",
            "country": "India",
            "city": "Bangalore"
        }
    ]
}
2
3
4
5
6
7
8
9
10
11
12
13
14
15
16
17
18
19
20
21
22
# 1. Do it in DevOps Way
Yes, it's easy to create a repository in Azure DevOps or GitHub and deploy azure functions at ease. For our demo I used Azure DevOps.
Create a GitHub repo (blank) on github.com and give it the name iContoso and then follow the directions below:
PS C:\Projects> git clone '<url> of your repo'
# Navigate to project root folder
PS C:\Projects> cd .\iContoso
PS C:\Projects\iContoso> ls
# You see an empty repo with a readme.md
2
3
4
5
# 2. Create an Azure Functions
# Initialize the functions by choosing worker runtime (In our case it's PowerShell)
PS C:\Projects\iContoso> func init --worker-runtime powershell
# Now, create the function
PS C:\Projects\iContoso> func new --name iGetEmployee --template HTTPTrigger
# creates two files (function.json and run.ps1) under iGetEmployee folder
2
3
4
5
# 3. Replace the run.ps1 code
Default Code
using namespace System.Net

# Input bindings are passed in via param block.
param($Request, $TriggerMetadata)

# Write to the Azure Functions log stream.
Write-Host "PowerShell HTTP trigger function processed a request."

# Interact with query parameters or the body of the request.
$name = $Request.Query.Name
if (-not $name) {
    $name = $Request.Body.Name
}

if ($name) {
    $status = [HttpStatusCode]::OK
    $body = "Hello $name"
}
else {
    $status = [HttpStatusCode]::BadRequest
    $body = "Please pass a name on the query string or in the request body."
}

# Associate values to output bindings by calling 'Push-OutputBinding'.
Push-OutputBinding -Name Response -Value ([HttpResponseContext]@{
    StatusCode = $status
    Body = $body
})
2
3
4
5
6
7
8
9
10
11
12
13
14
15
16
17
18
19
20
21
22
23
24
25
26
27
28
29
New Code
using namespace System.Net
param($Request, $TriggerMetadata)
$employees = Get-Content .\database\employees.json | ConvertFrom-Json
Push-OutputBinding -Name Response -Value ([HttpResponseContext]@{
    headers = @{'content-type'='application\json'}
    StatusCode = [httpstatuscode]::OK
    Body = $employees
})
2
3
4
5
6
7
8
💡 If your localhost site spins and no response. Check if Az module is installed. If not modify your host.json file as illustrated below (True to False)
{
  "version": "2.0",
  "managedDependency": {
    "enabled": false
  }
}
2
3
4
5
6
Now, test your REST API endpoint which is #serverless using func start
PS C:\Projects\iContoso> func start
# OPEN NEW POWERSHELL INSTANCE and TRY BELOW SNIPPET
PS C:\> $employees = Invoke-RestMethod -Uri "http://localhost:7071/api/iGetEmployee"
PS C:\> $employees.employees

#RETURNS AS SHOWN BELOW

firstname     : Chendrayan
lastname      : Venkatesan
dateofjoining : 01/01/2005
department    : IT
manager       : YTD
country       : India
city          : Bangalore

firstname     : Deepak
lastname      : Dhami
dateofjoining : 01/03/2005
department    : IT
manager       : YTD
country       : India
city          : Bangalore
2
3
4
5
6
7
8
9
10
11
12
13
14
15
16
17
18
19
20
21
22
23
❤️ Voila! Congratulations! Your first azure functions is successfully working.
# 4. Let's make a simple web page to present the employee data using PSHTML
If you are new to PSHTML - Refer the DOCS (opens new window)
Create a new function named iListEmployee and add a new folder names modules under root folder and save the PSHTML module underneath it.
# Create a modules folder
PS C:\Projects\iContoso> mkdir modules
# Save the module - DO NOT use Import-Module cmdlet
PS C:\Projects\iContoso> Save-Module -Name PSHTML -Path .\modules
# Create a new function named iListEmployee
PS C:\Projects\iContoso> func new --name iListEmployee --template HTTPTrigger
2
3
4
5
6
Use the below code to get the HTML page!
using namespace System.Net
param($Request, $TriggerMetadata)
$body = html -Content {
    head -Content {
        title -Content "Contoso Employee"
    }
    body -Content {
        $employees = Get-Content .\database\employees.json | ConvertFrom-Json
        table -Content {
            Thead -Content {
                th -Content "First Name"
                th -Content "Last Name"
                th -Content "Department"
                th -Content "Country"
            }
            Tbody -Content {
                foreach($employee in $employees.employees) {
                    tr -Content {
                        td -Content $employee.firstname
                        td -Content $employee.lastname
                        td -Content $employee.department
                        td -Content $employee.country
                    }
                }
            }
        }
    }
}
# Associate values to output bindings by calling 'Push-OutputBinding'.
Push-OutputBinding -Name Response -Value ([HttpResponseContext]@{
    headers = @{'content-type' = 'text/html'}
    StatusCode = [httpstatuscode]::OK
    Body = $body
})
2
3
4
5
6
7
8
9
10
11
12
13
14
15
16
17
18
19
20
21
22
23
24
25
26
27
28
29
30
31
32
33
34
35
😏 Looks ugly right? Let me show styling your web page using bootstrap 4 in next step. Yes, no doubt you can choose any UI framework of your choide.
🔥 Learn Bootstrap (opens new window)
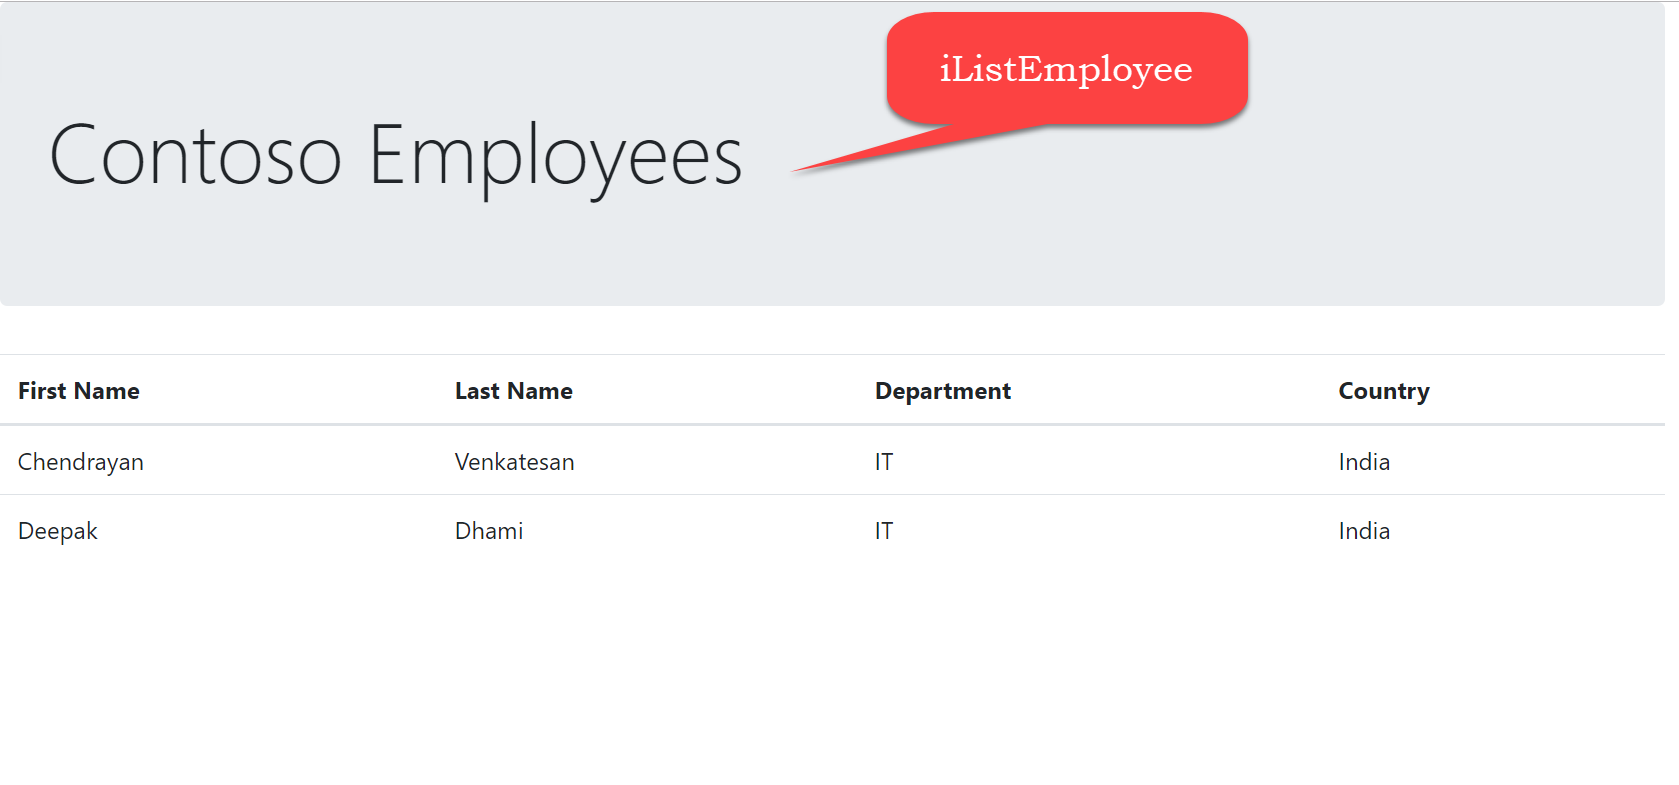
# 5. Style your Azure Function App web page using bootstrap 4
using namespace System.Net
param($Request, $TriggerMetadata)
$body = html -Content {
    head -Content {
        Title -Content "Contoso Employee"
        Link -href 'https://maxcdn.bootstrapcdn.com/bootstrap/4.0.0/css/bootstrap.min.css' -rel stylesheet
        script -src 'https://code.jquery.com/jquery-3.2.1.slim.min.js'
        script -src 'https://cdnjs.cloudflare.com/ajax/libs/popper.js/1.12.9/umd/popper.min.js'
        script -src 'https://maxcdn.bootstrapcdn.com/bootstrap/4.0.0/js/bootstrap.min.js'
    }
    Body -Content {
        Div -Class 'container' -Content {
            Div -Class 'jumbotron' -Content {
                H1 -Class 'display-4' -Content "Contoso Employees"
            }
        }

        Div -Class 'container' -Content {
            $employees = Get-Content .\database\employees.json | ConvertFrom-Json
            Table -class 'table' -Content {
                Thead -Content {
                    Th -Content "First Name"
                    Th -Content "Last Name"
                    Th -Content "Department"
                    Th -Content "Country"
                }
                Tbody -Content {
                    foreach ($employee in $employees.employees)
                    {
                        tr -Content {
                            td -Content $employee.firstname
                            td -Content $employee.lastname
                            td -Content $employee.department
                            td -Content $employee.country
                        }
                    }
                }
            }
        }
    }
}
# Associate values to output bindings by calling 'Push-OutputBinding'.
Push-OutputBinding -Name Response -Value ([HttpResponseContext]@{
        headers    = @{'content-type' = 'text/html' }
        StatusCode = [httpstatuscode]::OK
        Body       = $body
    })
2
3
4
5
6
7
8
9
10
11
12
13
14
15
16
17
18
19
20
21
22
23
24
25
26
27
28
29
30
31
32
33
34
35
36
37
38
39
40
41
42
43
44
45
46
47
48
# 6. It's time to deploy our code - We tested it locally
- Login to your Azure Portal
- Browse to your Azure Functions App (iContoso)
- Select Platform features.
- Choose Deployment Center (Under Code Deployment)
- Source of truth is Azure DevOps (Select it and Continue)
- Opt for Kudu and continue
- Fill the form with your organization, project, repo and branch.
# 7. Finally - Push from your Local Machine.
# You see all the files which are about to get committed.
PS C:\Projects\iContoso> git status
# Stage it
PS C:\Projects\iContoso> git add -A
# Commit
PS C:\Projects\iContoso> git commit -m "Initial Commit"
# PUSH
PS C:\Projects\iContoso> git push -u origin master
2
3
4
5
6
7
8
❤️ Congrats - Now, you can browse your azure function app through your browser.
# 8. Outcome of the work
iListEmployee
iGetEmployee
